Robot remote control program with Vive/Oculus
This package depends on these branches below:
-
For PR2 and Baxter
-
For Baxter only
- Ubuntu 16.04 + ROS Kinetic
- NVidia driver:
396.37 - OpenVR:
1.3.22 - Steam VR:
1.6.10
- NVidia driver:
- Ubuntu 18.04 + ROS Melodic
- NVidia driver:
390.116 - OpenVR:
1.3.22 - Steam VR:
1.6.10
- NVidia driver:
- Vive
- Arm motion tracking
- Controller button interface
- HMD visual interface
- Vibration interface
- Sound interface
- Oculus
- Arm motion tracking
- Controller button interface
- HMD visual interface
- Vibration interface
- Sound interface
sudo apt-get install --reinstall xserver-xorg-video-intel libgl1-mesa-glx libgl1-mesa-dri xserver-xorg-core
sudo dpkg-reconfigure xserver-xorg# for melodic, run command below
sudo apt install nvidia-driver-390
# for kinetic, install cuda-9.2 deb (local) manually and run command below.
sudo apt install nvidia-396Follow here
sudo cp udev/99-kodak.rules /etc/udev/rules.d/
sudo udevadm control --reload-rules && sudo udevadm triggersource /opt/ros/$ROS_DISTRO/setup.bash
mkdir ~/jsk_apc_ws/src -p
cd ~/jsk_apc_ws/src
wstool init . https://raw.githubusercontent.com/start-jsk/jsk_apc/master/fc.rosinstall.${ROS_DISTRO}
wstool up
rosdep install -y -r --from-paths .
cd ~/jsk_apc_ws
catkin config
catkin buildsource /opt/ros/$ROS_DISTRO/setup.bash
mkdir ~/vive_ws/src -p
cd ~/vive_ws/src
wstool init . https://raw.githubusercontent.com/knorth55/eus_vive/master/fc.rosinstall
# Only for baxter users
# wstool merge https://raw.githubusercontent.com/knorth55/eus_vive/master/baxter.rosinstall
# wstool merge https://raw.githubusercontent.com/knorth55/eus_vive/master/baxter.rosinstall.$ROS_DISTRO
wstool up
rosdep install --ignore-src --from-path . -y -r -i
# Only for baxter users
# source ~/jsk_apc_ws/devel/setup.bash
cd ~/vive_ws
catkin config
catkin build- Connect Vive HMD and Lighthouse and power on the controller.
- Place Lighthouse B in front of you.
- Start one of launch files below.
- If you don't use HMD, press
Calibratebutton and do arm calibration. - Press
Enablebutton in GUI to start teleoperation.
The arm calibration is required for no HMD mode in order to measure your position and your arm length.
- Press
Calibrate l/rarmbutton in GUI - Listen to the voice instruction.
- Stretch your left/right arm and Press Trigger after the first instruction.
- Listen to the voice instruction again.
- Fold your left/right arm and Press Trigger after the second instruction.
- If calibration failed, please try again.
rossetip
rossetmaster pr1040
# HMD mode
roslaunch eus_vive pr1040_vive.launch
# No HMD mode
roslaunch eus_vive pr1040_vive.launch head:=falserossetip
rossetmaster pr1012
# HMD mode
roslaunch eus_vive pr1012_vive.launch
# No HMD mode
roslaunch eus_vive pr1012_vive.launch head:=falseroslaunch eus_vive pr2_vive_gazebo.launchrossetip
rossetmaster baxter
# HMD mode
roslaunch eus_vive baxter_vive.launch
# No HMD mode
roslaunch eus_vive baxter_vive.launch head:=falseroslaunch baxter_gazebo baxter_world.launch
roslaunch eus_vive vive.launch
roslaunch eus_vive baxter_vive_gazebo.launchrossetip
rossetmaster baxter
roslaunch eus_vive baxter_moveit.launchrossetip
rossetmaster baxter
roslaunch eus_vive baxter_vive_mirror.launchrossetip
rossetmaster baxter
roslaunch eus_vive baxter_remote.launchrossetip
rossetmaster baxter
roslaunch eus_vive baxter_vive_remote.launchrossetip
rossetmaster baxter
roslaunch eus_vive baxter_display_remote.launch| Button | Usage |
|---|---|
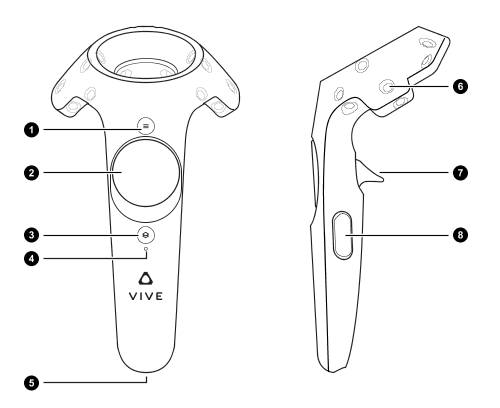
| 1 / Menu | Control toggle: base/arm (Default: base) |
| 3 / Stream Menu | Steam Menu |
| 8 / Grip | Not used |
You can enable arm mode of right and left arm separately.
| Command | Usage |
|---|---|
| 7 / Trigger | Gripper toggle: open/close in Toggle grasp mode (Default: open) |
| 7 / Trigger | Gripper toggle: open only when trigger is pressed in Hold grasp mode |
| Controller pose | robot end effector's pose |
Base mode is enabled when both arms are disabled in Arm mode.
| Command | Usage |
|---|---|
| 2 / Trackpad | Torso control: right: down / left: up |
| 2 / Trackpad + 7 / Trigger (right) | Safe base control: right: x, y / left: w |
| 2 / Trackpad + 7 / Trigger (right + left) | Unsafe base control: right: x, y / left: w |
| Button | Usage |
|---|---|
| 2 / Trackpad | Control toggle: stop / arm (Default: stop) |
| 3 / Stream Menu | Steam Menu |
| 8 / Grip | Not used |
You can enable arm mode of right and left arm separately.
| Command | Usage |
|---|---|
| 7 / Trigger | Gripper toggle: open/close (Default: open) |
| Controller pose | robot end effector's pose |
| Button | Usage |
|---|---|
| Reset | Diable and reset robot to initial posture |
| Enable | Enable robot |
| Disable | Disable robot |
| Calibrate larm/rarm | Calibrate with left/right arm |
| Button | Usage |
|---|---|
| Reset larm/rarm | Reset only left/right arm |
| Enable larm/rarm | Enable only left/right arm |
| Disable larm/rarm | Disable only left/right arm |
| Start grasp lgripper/rgripper | Start grasp only left/right gripper |
| Stop grasp lgripper/rgripper | Stop grasp only left/right gripper |
| Toggle grasp mode | Change to Toggle grasp mode |
| Hold grasp mode | Change to Hold grasp mode |
Open Field Service Menu and change network configuration
sudo apt install libgcrypt20-dev libgnutls28-dev
git clone https://github.com/streambinder/vpnc.git
cd vpnc
git checkout 1cf24ed6aa4a04b4b01cc9ebfacbad723eed04f5
make
sudo make install
cd ..
git clone git://git.infradead.org/users/dwmw2/vpnc-scripts.git
cd vpnc-scripts
sudo cp vpnc-script /etc/vpncsudo vpnc --local-port 0 --gateway <gateway> --id ipsecvpn --username <username> --pfs dh5 --dh dh5 --auth-mode psk --no-detach --vendor fortigate --dh dh5