init_system
Welcome to the first tutorial! In this guide, you will learn how to set up the initial system. This is the recommended way to start for developers who need to quickly roll out their projects. Besides this, there are two alternative ways to start the project:
- Demo setup - approximately 1 minute to get started. This is good for non-tech people or those who just want to quickly get a look and feel of CMS-KIT-Sanity. It provides a personal setup under FocusReactive orgs. Nevertheless, starting this way, you can switch later to a full-featured system setup. See details in the documentation.
- Manual setup - approximately 40 minutes to complete. Follow this guide if you prefer full control and understanding of your system. Good for experienced engineers.
By the end of this tutorial, you will have a production-ready system, assembled from the following components:
- A GitHub repository containing your project code
- A Sanity project for content hosting
- A Vercel project for deploying your app and Sanity Studio
From this point forward, you will have complete ownership of all projects and accounts.
Approximately 10 minutes
Before starting, ensure you have the following:
- Registered and logged in to your GitHub, Vercel, and Sanity accounts.
- Basic knowledge of web development and a suitable development environment.
All services offer free plans sufficient for the initial setup.
On your local machine:
- Node.js: Version 20.0 or higher is required. Version 20 is recommended (any minor version).
-
PNPM: Version 9 of PNPM is required. Check it with
pnpm -v.
Let's go through these steps to make sure you have the required accounts and they are configured properly. You likely already have everything set up. In this case, you don't need to repeat these steps. But please go through all steps of this part to ensure you haven't missed anything.
Please log in or register with the following services:
Once done, let's check some settings that we will need in the next steps.
Open this page.
Vercel Authentication (Image 1)

Click on the "GitHub" button and follow the instructions on the page.
Open this page.
Install Vercel App (Image 2)
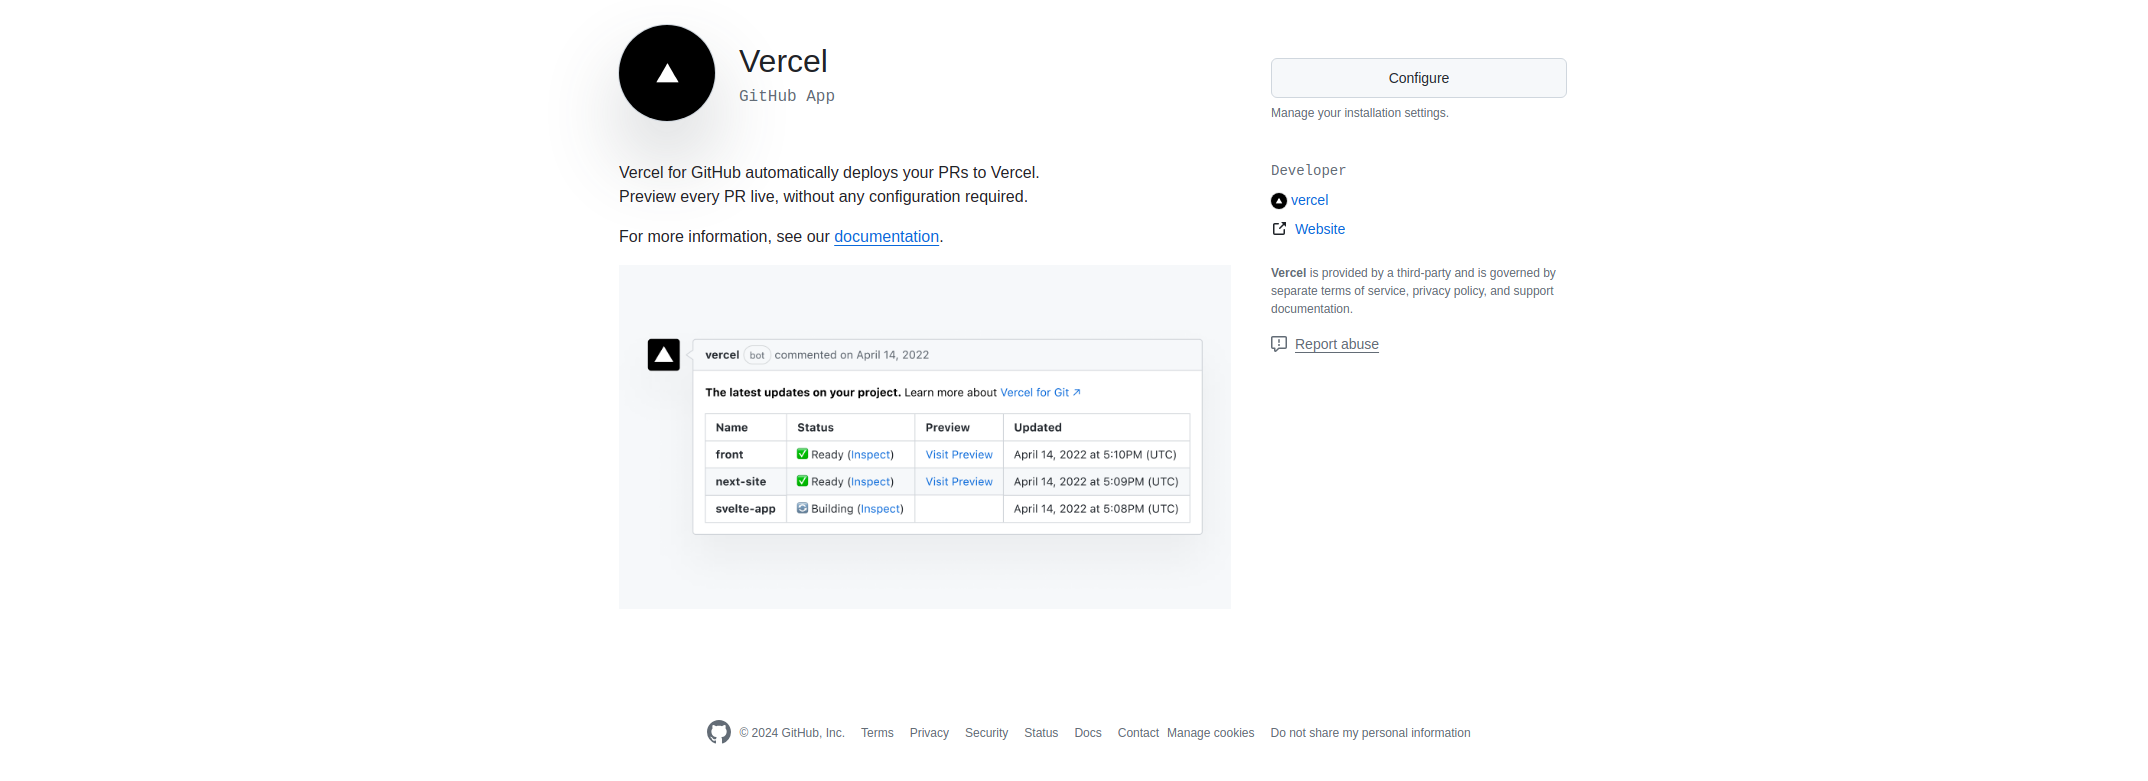
Press the "Configure" button. Select your personal account or an organization where you plan to create the repository for this project. Give access to all repositories or repeat this step after you create a repo to give access only to it.
Open this page and create a new organization. You don't need to fill in the bank account fields; you can skip them. Note that you must have at least one org on Sanity where we will create a project.
Create Sanity Organization (Image 3)
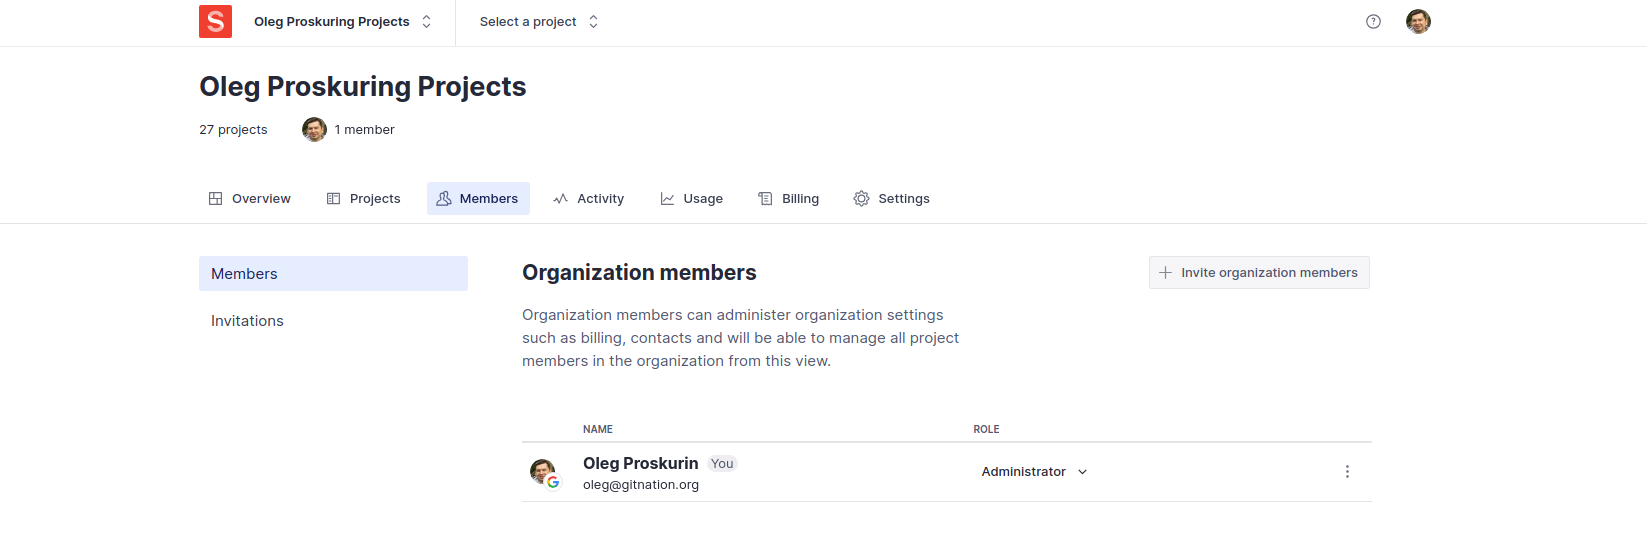
You might already be invited to other orgs. Check if you have admin permissions there. You won't be able to create a project without them, so create a new one if you don't have it.
Open the CMS-KIT-Sanity public template on GitHub. Create your own repository based on this template using the "Use this template" dropdown in the toolbar. Select "Create a new repository."
Use This Template Dropdown (Image 4)

You will be directed to a page where you can specify the name and org for a new project. Use default settings.
Creating Repository Page (Image 5)

Once this step is complete, a new repository will be created. Additionally, an initial GitHub action will be triggered automatically. You will see a yellow dot next to the "Initial commit" label.
New Repository (Image 6)

This GitHub action collects the initial repository credentials and places them into a .env.initial file in the project's root. This file contains environment variables specifying repository details that we will need in the next step.
REPO_ID=810343920
REPO_NAME=usulpro/my-hcms-based-project
MAX_NUMBER_OF_PROJECTS=7
REPO_PROD_BRANCH=main
Open the "Actions" menu in the toolbar of your repository. Wait until the action is completed. You can click on it and see a sequence of two steps running on CI. In a few seconds, both steps will be finished (green checkboxes indicate that the step is completed). Once done, you are ready to clone this project to your machine and start the rollout process.
Retrieve the repository remote URL from the "< > Code" dropdown and git clone the project locally (or use your preferred method). Navigate to the project folder with cd your_project_name and install the dependencies by running pnpm i in the project root.
Run pnpm run rollout in your terminal to start the CLI tool, which will guide you through the system initialization process. Follow the instructions and answer the questions carefully. The rollout process includes several steps, beginning with entering your credentials to populate the .env file in your project root.
Important
The
rolloutscript provides detailed instructions for each step. Make sure to read them carefully to avoid any unnecessary actions.
Rollout CLI (Image 7)

The tool will prompt you to create authentication tokens for Vercel and Sanity. Refer to the terminal instructions for details. If you need to restart the process, the tool will detect existing tokens in your .env file and offer to use them or allow you to input new ones.
Note: Get the Sanity token from the Auth token field in sanity debug --secrets output.
Troubleshooting:
- Read the Prerequisites.
- Follow tips and instructions in your terminal when working with the rollout script.
- Check your node version with
node -v.- Check your pnpm version with
pnpm -v.- You can break and restart your
rolloutprocess. Previously entered values will be stored in the.envfile and will be offered to reuse them next time. Note that if you already created a Vercel project, you have to set another project name or delete the existing project to create a new one with the same name.
Once all variables in the .env file are specified, the CLI tool will send requests to create new projects on your behalf in Vercel and Sanity. After the projects are created, it will configure and set up:
- Environment variables in the Vercel project.
- Connect the Vercel project with your GitHub repository to rebuild the hosted project on commits to the main branch.
- Set up a webhook in Sanity to trigger rebuilds on Vercel when public content changes.
- Add the Vercel deploy URL to Sanity CORS settings.
- Create a preview token in the Sanity project.
- Upload initial content matching the project's content model to the production dataset on Sanity.
- Other minor settings.
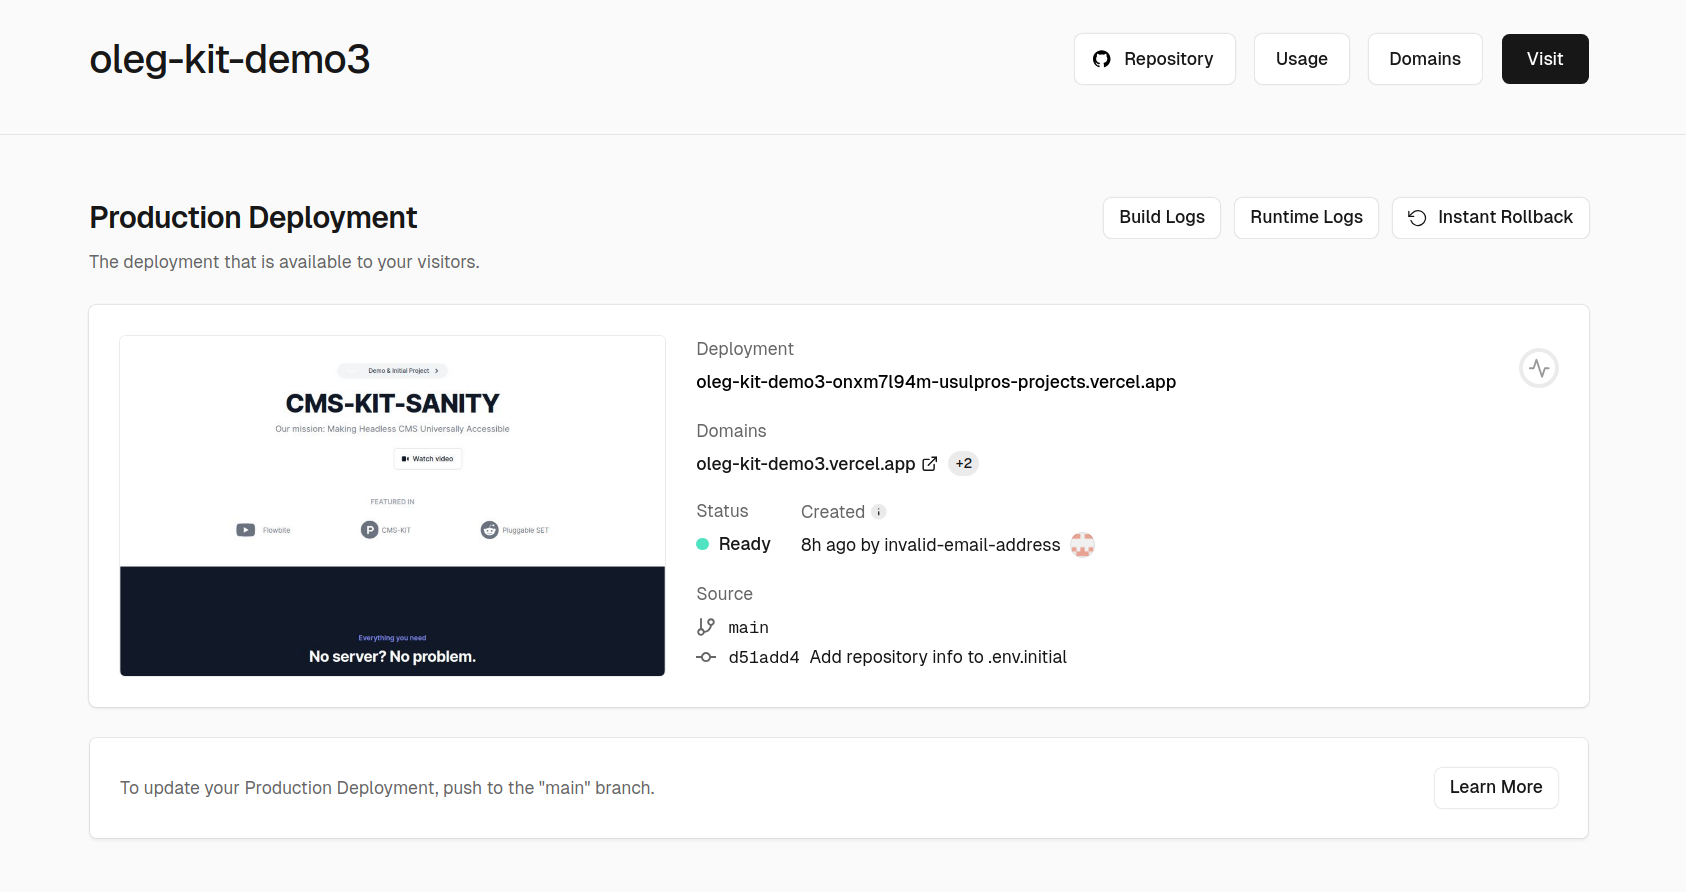
The final step initiates a deploy on your Vercel project, so within a few minutes, you will be able to access the initial pages of your website and enter the Sanity studio. At the end of the process, you will see result URLs with your created projects and the deployed website and Sanity Studio. Store these URLs to use them later.
Final Step (Image 8)

Now your system is ready, and you can open the provided URLs to start working with your newly created projects. You should be able to see your deployed website and access the Sanity Studio. This setup will allow you to manage content seamlessly and deploy changes quickly.
When the Sanity project is created, you will receive an email invitation to your project.
Home Page (Image 9)

Additionally, you will have a configured local development environment. You can use the following commands to continue working locally:
> pnpm run build - to build the project locally
> pnpm run dev - to start the dev serverOpen and inspect the project settings in your Sanity account.
Sanity Project Settings (Image 10)

Add an additional CORS origin: http://localhost:3000, and allow credentials.
Open and inspect the created project on Vercel.
Vercel Project Settings (Image 11)
Once the initial deploy is complete, click the "Visit" button to open your website in a new tab.
Your Sanity studio will be deployed under the /admin route of your website URL, e.g., https://oleg-kit-demo3.vercel.app/admin in this example. Open your Sanity studio and log in using the same account credentials as used for Sanity project settings.
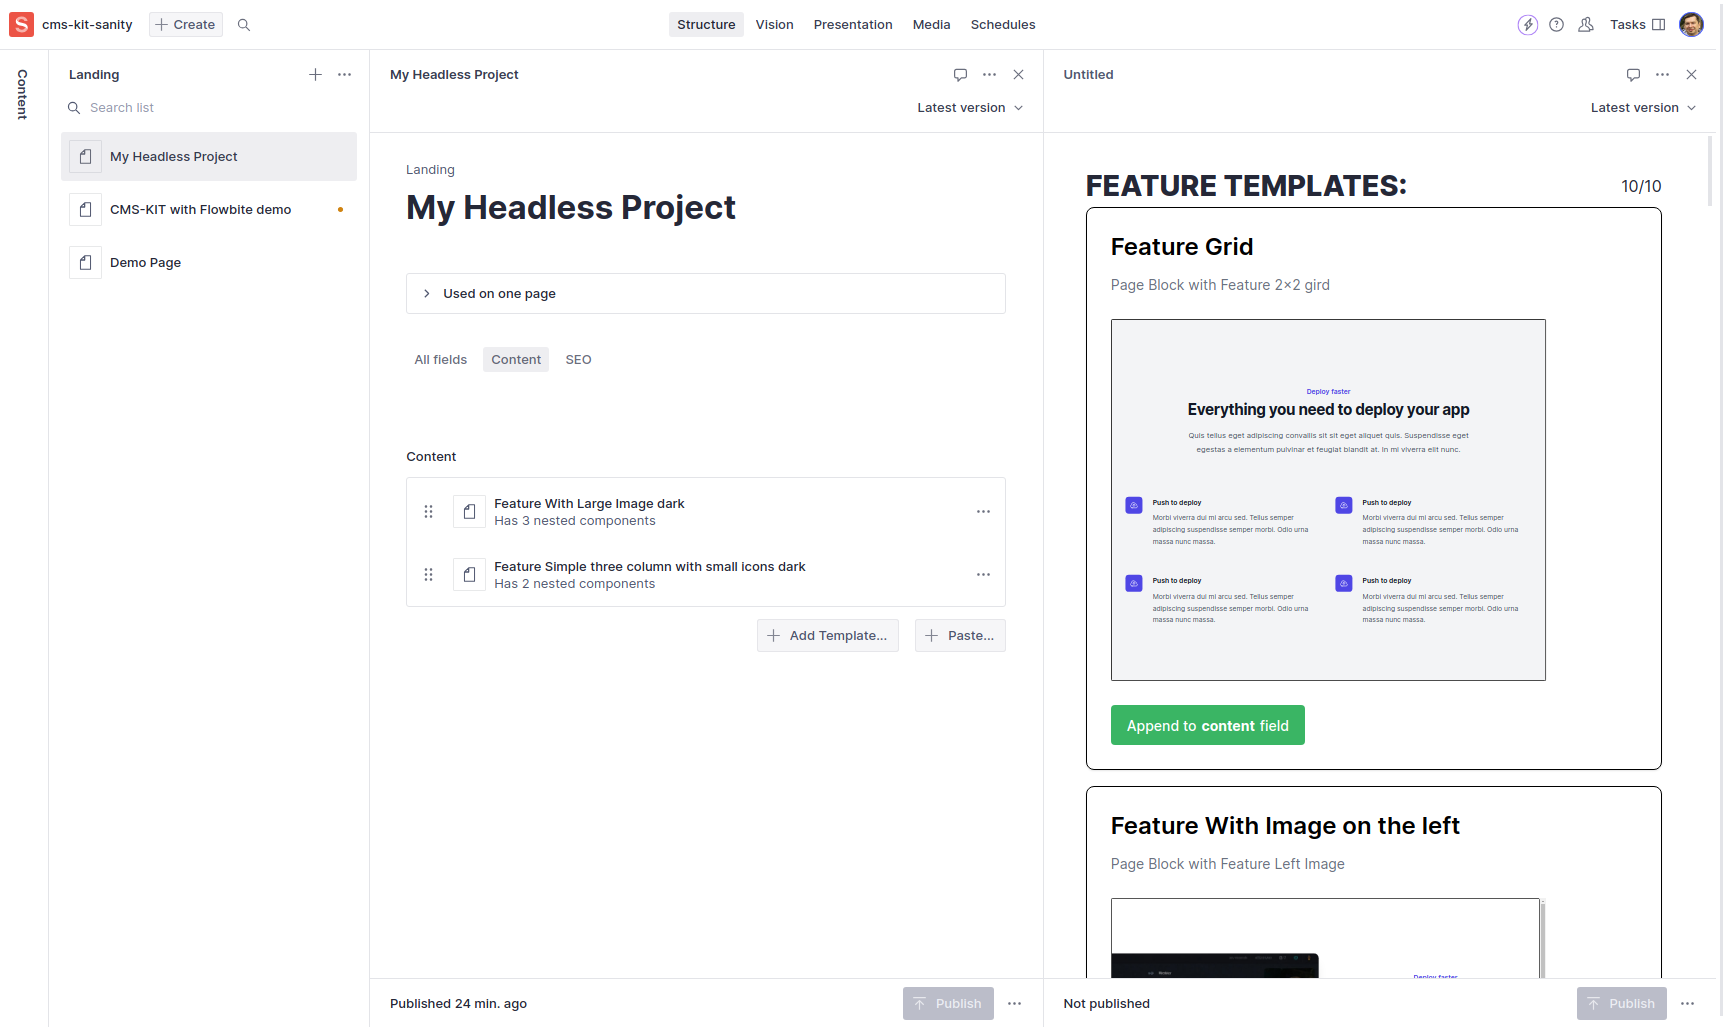
As you open it, you will see available content types in the first column. "Landing" and "Author" might be the first document types you want to inspect. They contain some pre-defined documents to help you start working comfortably with the project.
Select "landing" in the first column. You will see an initial list of pre-created pages. Select any page, and its content will appear on the right side of the editor. Feel free to edit any value. For example, open the page titled "CMS-KIT-SANITY" (the home page). Locate the "title" field with the value "CMS-KIT-SANITY" and change it to something personal.
Editing Document (Image 12)

Open the "used on one page" dropdown and select an item from the list. You will be redirected to the Presentation tool, where you can live preview the editing page and visually select elements to edit them.
Live Preview (Image 13)

Here, you can preview your page changes immediately as you edit content in the right-hand form. Note the blue bar that appears around the content when your mouse hovers over it. Click on it when you see the blue bar, and the content editor will open and scroll to the field containing that exact content. Editing is simple and intuitive, even with nested arrays and objects.
Visual Editing (Image 14)

Go back to the structure tool and select the page with the title "Demo Page". The editor allows you to group document fields by tags to simplify access to different types of fields. You should see tags like All fields, Content, and SEO. Select the Content tag. You will see a "content" field with an array of content blocks. Click the "Add Template..." button under it. This will open the template selector panel on the right.
Template Selector (Image 15)
On this right-hand panel, you can browse all available content blocks and their variations, that you can insert into the content field. This way, you can assemble the page from these blocks like a lego. As you insert the block, it will appear on the page with its initial content represented in the image. After that, you can open it in the list and edit all fields as needed. Find the block with the "Feature With Image on the right" title and insert it by pressing the big green "Append to content field" button under the block image. As you see it at the bottom of the list, click on it and edit some values. Set the "Custom Title" field to "My new block" - this change will affect only the title of that block in Sanity Studio. Switch to the Presentation tool to preview changes visually. Scroll to that block in the visual panel and hover the mouse above the image on the right side. As the image is outlined with a blue rectangle, click on it. You will see this image opened in the content editor form. Swap this image with another one.
Change the Image (Image 16)
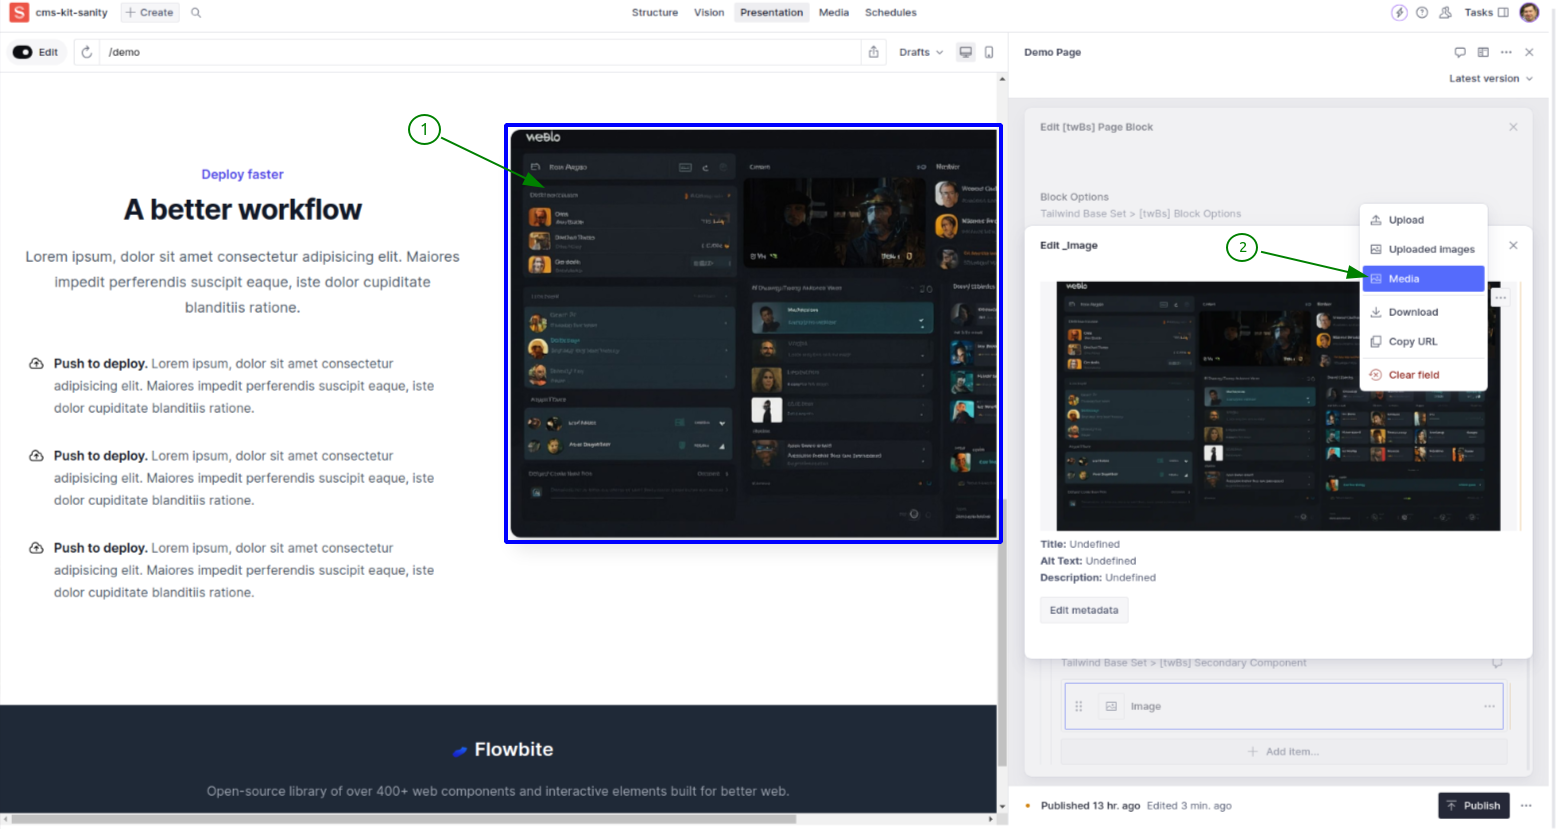
For that, click on the button with three dots at the top right corner and select "media" to open a media browser. Select another image.
As a developer, you might want to work with your project locally. In this scenario, you can edit your project and CMS code and see the changes locally in your browser. Remember that changes in Sanity Studio, content model, and component schemas made locally don't affect the deployed Sanity Studio and website. While data stored in Sanity datasets are fetched from the cloud database, change your content carefully as it can affect your production website.
Let's build your project on your machine: pnpm run build.
Build Step (Image 17)

Now you can run your app with pnpm start. Open http://localhost:3000/ in your browser to preview your website. Open http://localhost:3000/admin to work with Sanity Studio. Instead of building your app to see the changes, you likely prefer to launch it in dev mode to see the changes immediately. Use pnpm run dev to run the dev server. Use the same links for working with your project.
Now we have prepared and tested the system. We are ready for the next steps.
In this tutorial, you have successfully set up a production-ready system using CMS-KIT. Here's what we've accomplished:
- Created a GitHub repository containing your project code.
- Set up a Sanity project for content hosting.
- Configured a Vercel project for deploying your app and Sanity Studio.
- Connected these services to ensure seamless deployment and content management.
- Learned how to work with Sanity Studio to manage and edit content.
- Explored how to add content blocks and use the visual editor in Sanity Studio.
- Set up a local development environment for ongoing development and testing.
With this setup, you can efficiently manage your content, make updates, and deploy your application with ease. You're now ready to start building and managing your website.