-
Notifications
You must be signed in to change notification settings - Fork 14
Start a new course
For any OTTR questions we suggest joining the OTTR Google Group and adding a discussion there about the problems you are encountering or questions you have.
Table of Contents generated with DocToc
- 1. Create a repository from this template
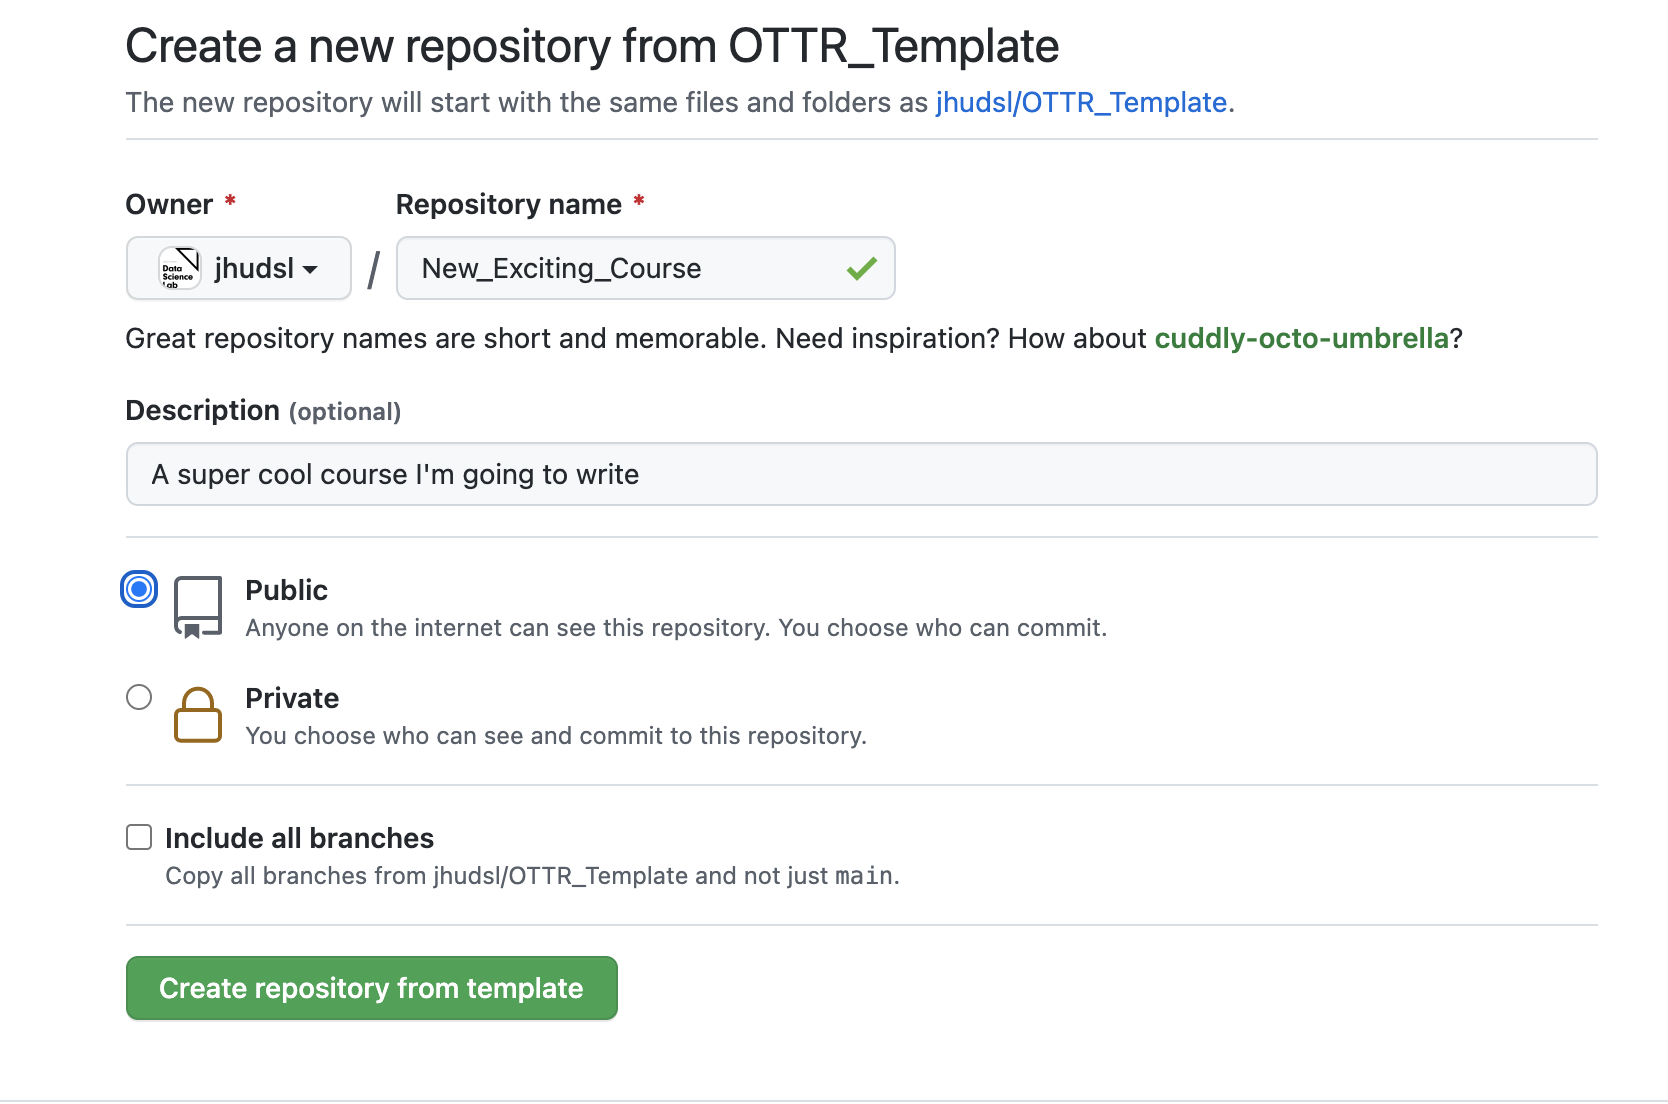
- 2. Name your repository and fill in a short description.
- 3. Your course must be set to
publicfor Github actions to work. - 4. Set up a Git client
- 5. Add jhudsl-robot as a collaborator
- 6. Set up your Github Personal access token
- 7. Set up GitHub pages
- 8. Set up branch rules
- 9. Enroll your repository for OTTR updates
Upon creating your repository, issues for getting your course started will be automatically filed in your repository. Go to Issues and you can follow them along to get set up.
In the upper right of the landing page for this repository, click the green Use this template button and follow the steps to set up your course's GitHub repository.

In particular, the rendered preview on pull requests won't work, but you can alternatively preview the content by re-rendering locally, we will cover this later.
If you do not have a method of working with Git already it is recommended you use a git client to help you manage your branches more easily. Install GitKraken for a handy way to manage your course locally.
*You can skip this step if your course is in the jhudsl organization.
The Github actions in this repository need permissions to fully function.
To this end, you need to add the jhudsl-robot as a collaborator on your repository with write permissions.
In your repository, go to your Settings > Collaborators & Teams and click on Add people.
In the pop up window, search for and add jhudsl-robot.

Choose the write option then click Add jhudsl-robot to this repository.
The OTTR robots need permissions to run some of the actions.
To give them permission for all the actions, you need to set a GitHub secret we will call GH_PAT. Go to Settings > Secrets and scroll down to Repository secrets. Read more about GitHub secrets here if you have general questions.
If you have organization admin privileges and plan on making multiple courses with OTTR, you can set GH_PAT as an organization secret so you don't have to do this again You only need to do this once as an organization (if this course is under jhudsl you don't need to do this step).
- Click
New repository secret/New organization secretbutton. - Under name you must use
GH_PAT. - For
value: Create a personal access token following these instructions. UnderneathSelect scopes, check bothrepoandworkflow. Then copy the PAT and save as the value. Your Github actions should all be able to run smoothly now.
Go to Settings > Pages.
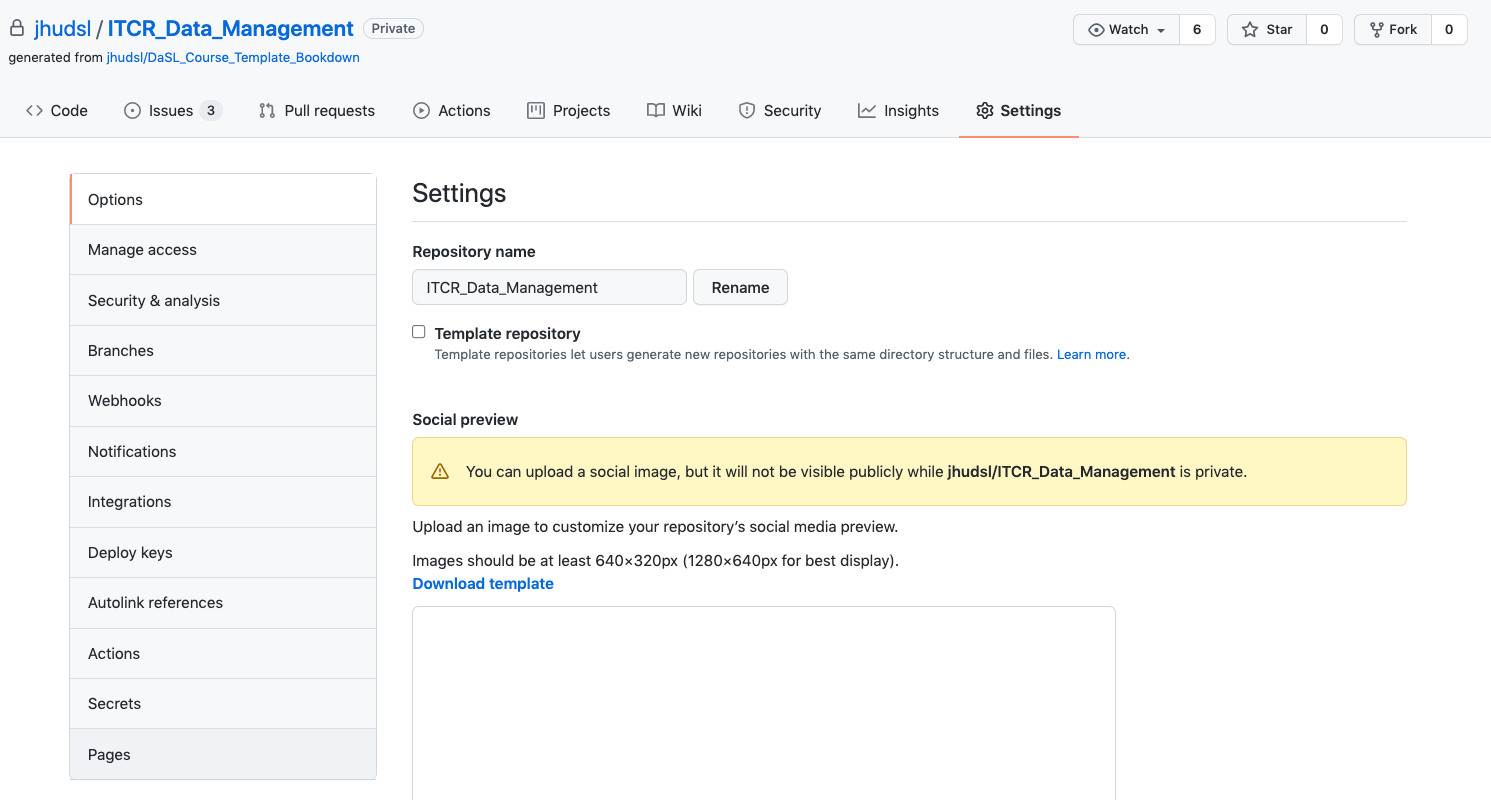
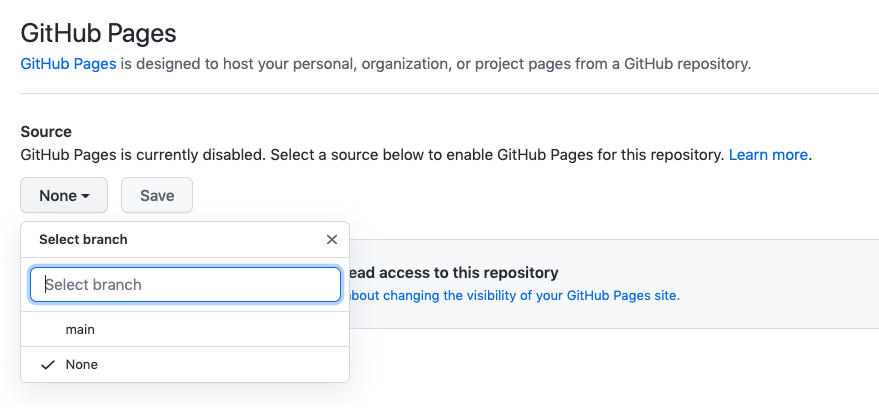
- Under
Source, pick the drop down menu and pickmainand/docs. - Then click
Save. - Lastly, check the box that says
Enforce HTTPSat the bottom of this page.
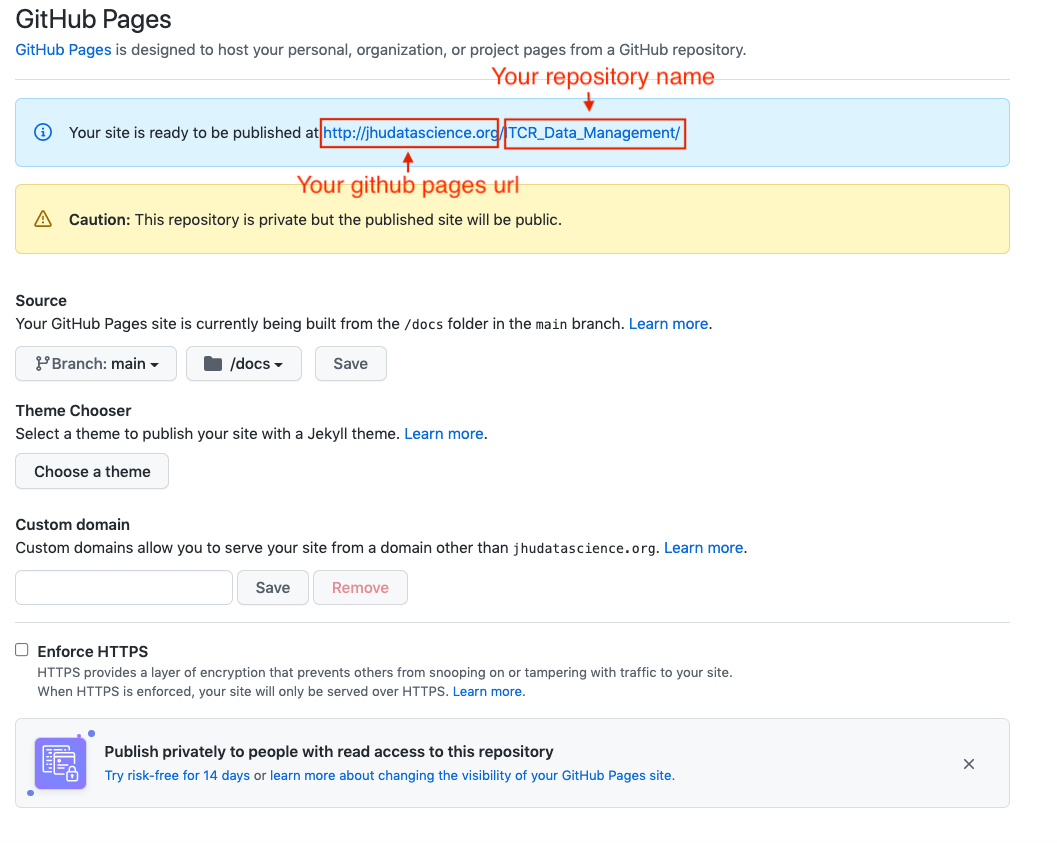
* Note that if you go to your pages url right now (before you've pushed any file changes) you might see a 404 error because nothing has been triggered to be rendered. You can check your url pages after you file your first pull request (which we will guide you through in the next section).
* Don't set these settings right away! Wait a few minutes after starting your repository.
Go to Settings > Branches and click Add rule. This is only possible if you have GitHub Pro, Team, or Enterprise access. We recommend seeing if your organization can give you access if you do not already have access. To get this access through your organization, you will need to transfer ownership of your repo to your organization. See here about how to do this.

For Branch name pattern, put main.

Protect the main branch:
Then check the box that says Require pull requests before merging.
Make sure branches are updated:
- Check the box that says
Require status checks to pass before merging. - Underneath this also check the box that says
Require branches to be up to date before merging.
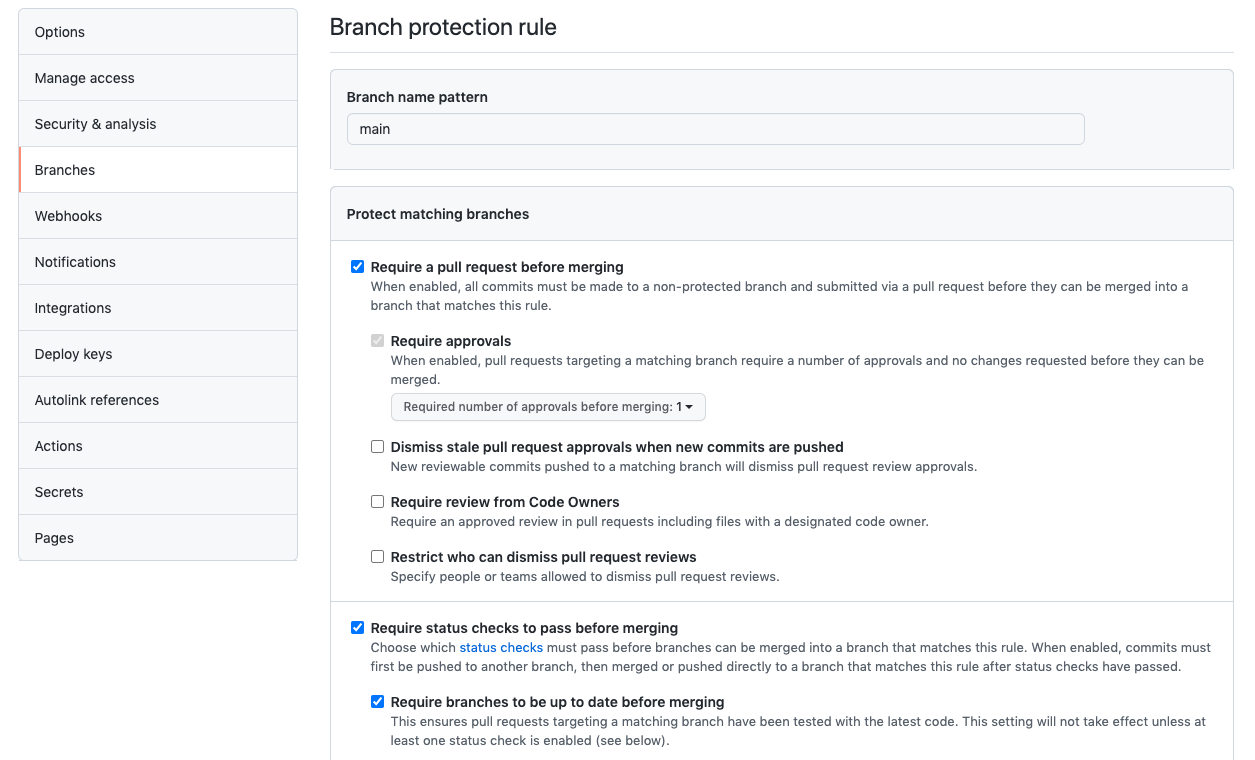
After setting up these new branch items, click Create and Save changes.
This original course template: https://github.com/jhudsl/OTTR_Template is always a work in progress. We are working on adding more features and smoothing out bugs as we go (this is also why your feedback is greatly appreciated).
When updates are made to files that aren't specific to the course content but instead run checks and other processes in the original repository, pull requests are filed automatically to any downstream repositories made from this template.
To enroll in these automatic update pull requests, the new course's repository name will need to be added to this file in the original template
- Got to the respective file:
.github/sync.ymlof the OTTR template repository you created your repository from: - Add your repository's name where it says
#NEW REPO HERE#, being careful to indent the same amount as the other repositories listed.
- Choose
Create a new branch for this commit and start a pull request.Name the branch what you like.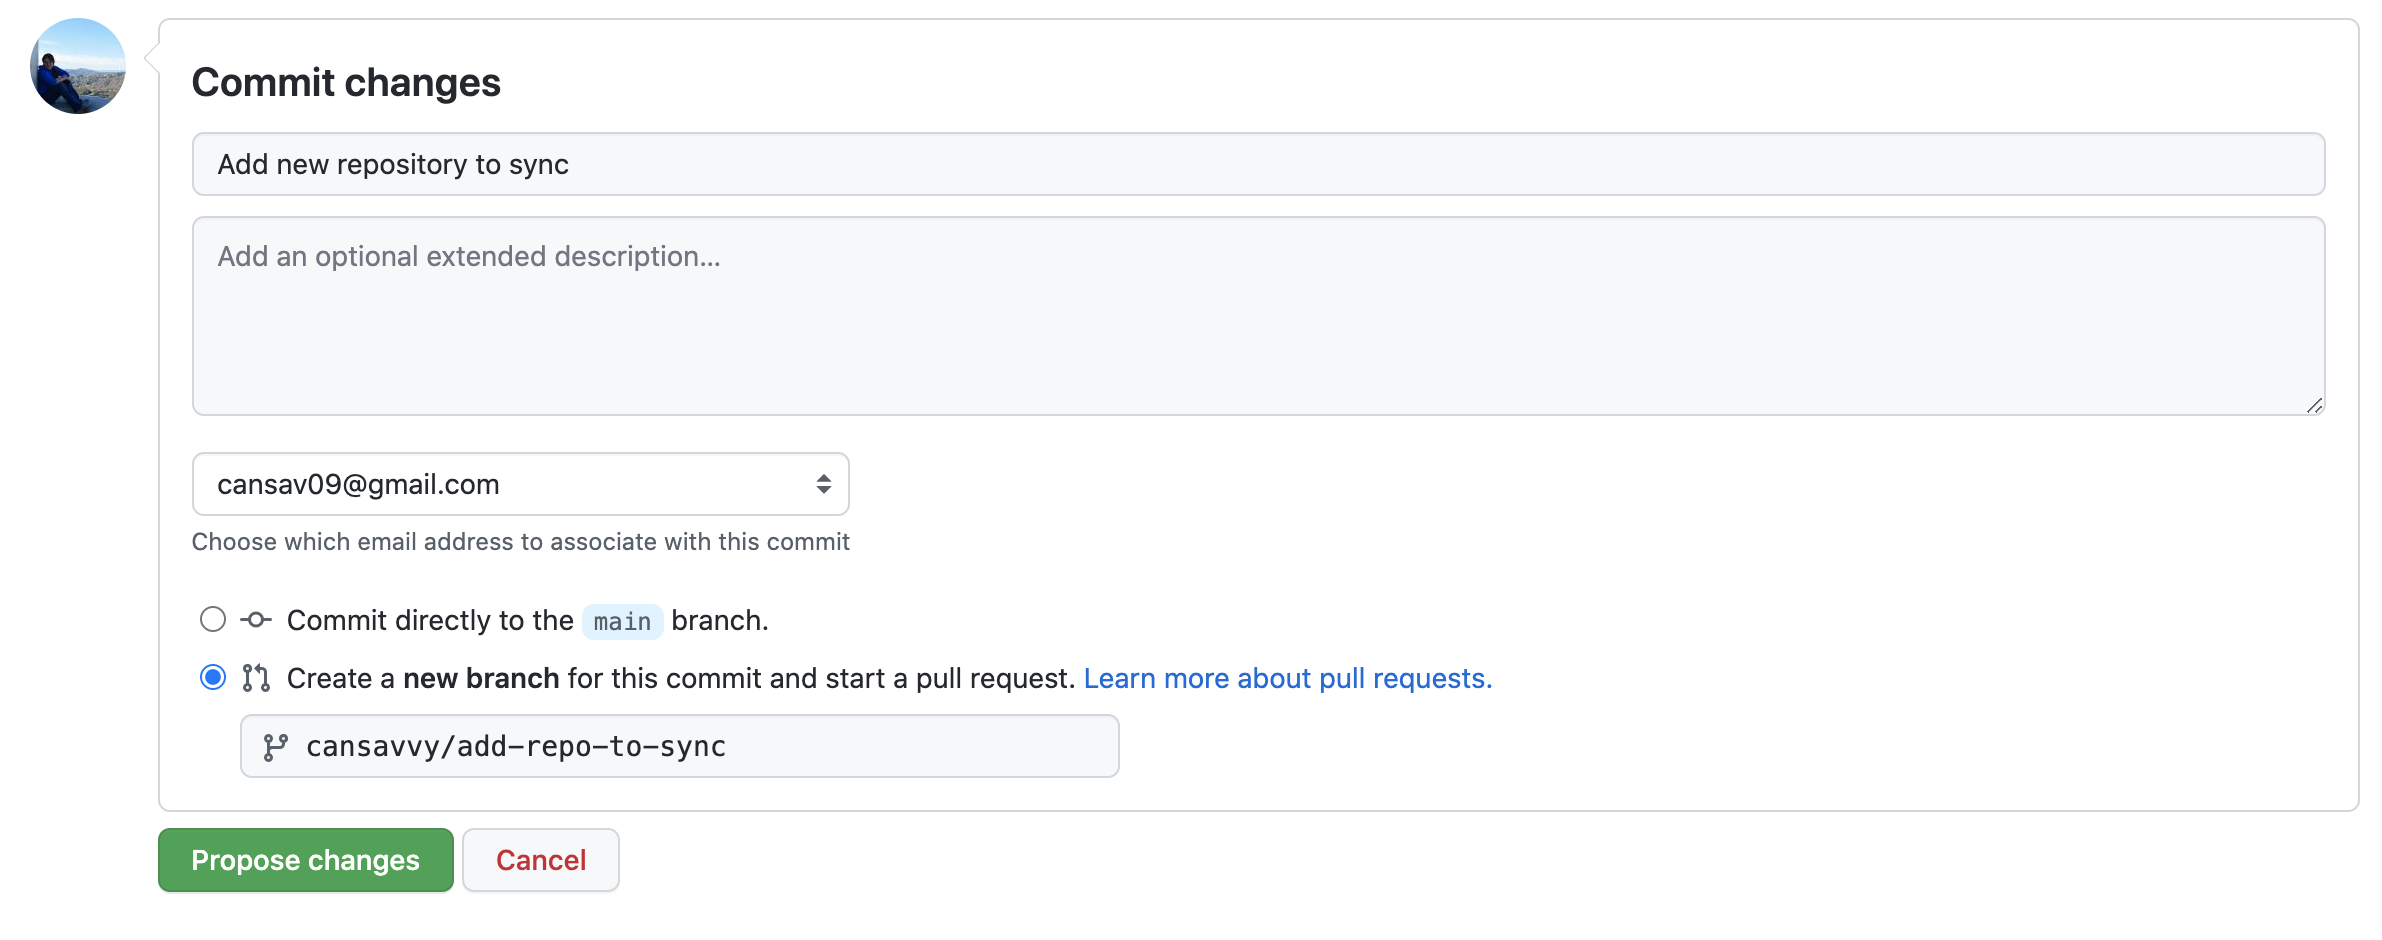
- Name the commit
Add new repository to sync - Click
Propose changes. - See this guide for any questions you have about creating a pull request from your forked repository.
- Write a short pull request description describing that you are adding a new repository to the sync.yml file.
- Click
Create Pull Request - Request
@cansavvyas a reviewer.
If your new course doesn't need some of the functionality of these files or you find the automatic updates bothersome, you can feel free to use this guide to tailor which files you want updates for.
If you have any questions about the implications of any of these updates or files, please tag @cansavvy.
Your repository is all set up and you are ready to start editing your course and adding content! Follow the next section's instructions here
If you encounter any problems or have ideas for improvements to this template repository or this getting started guide, please file an issue here! Your feedback is very much appreciated.
Note all materials in this template are licensed CC-BY and can be repurposed freely with attribution.
- Getting started
- Start a new course!
- Start editing course files
- Content creation tips
- Setting up images and videos
- About citations
- About Docker
- Spell check
- URL check
- Generate docx output
- Borrowing chapters between courses
- Most common errors
- Choosing between platforms
- Publishing with Bookdown
- Publishing on Coursera
- Publishing on Leanpub
- Making quizzes private (Leanpub and Coursera)
- Set up user feedback method
- Change title and style
- Credits section
- Adding Google Analytics Traffic Tracking
- Release a course for public viewing