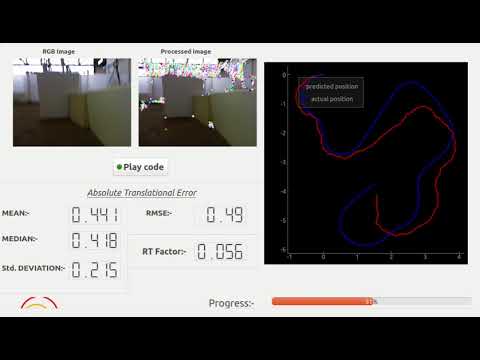
This software helps the user to practice/test their own odometry/localization algorithm on the TUM RGBD dataset. The performance(speed) and accuracy of the users' algorithm are shown on the GUI of the software. More details description about this software is available here.
To launch the software, follow these steps below:
-
Clone/Download this Repo.
-
Download the rosbag file from the TUM RGBD dataset.( https://vision.in.tum.de/rgbd/dataset/freiburg2/rgbd_dataset_freiburg2_pioneer_slam.bag ) or a truncated version of the same file from here ( https://drive.google.com/file/d/1H3hRQZcNgOlyKMoAPSVcPDnoBLexWCDx/view?usp=sharing )
-
Requirements - (install these packages before proceeding).
ROS --- http://wiki.ros.org/kinetic/Installation/Ubuntu
rosbag ---
sudo apt-get install python-rosbagpyqtgraph ---
sudo pip install pyqtgraph -
Place the rosbag file in the same directory as of this exercise and replace the name of the rosbag file in the 'visual_odometry.cfg' or mention the full path of the rosbag file.
-
Write your own odometry logic/algorithm here.
-
Execute the exercise with GUI :
python visual_odom.py
    def execute(self):
        # demo code (replace with your code )
        print ("Runing")

        #Getting sensor data
        data = self.getReadings( 'color_img' , 'depth_img' )

        #color image
        color_image = data.color_img

        #depth image
        depth_image = data.depth_img

        #set processed image
        self.set_processed_image(color_img)

        #set predicted pose
        x = 1
        y = 1
        self.set_predicted_pose(x,y)
Sensors available: - 'color_img' , 'depth_img', 'orientation' , 'accelerometer' , 'scan' (laser scan) .
-
data = self.getReadings('color_img' , 'depth_img')- to get the next available RGB image and the Depth image from the ROSbag file. ( only one pair of RGB image and Depth image will be provided per call). -
color_img = data.color_img- to get the RGB image from the object 'data'. -
depth_img = data.depth_img- to get the Depth image from the object 'data'. -
color_img_t = data.color_img_t- to get the timestamp of the RGB image. -
depth_img_t = data.depth_img_t- to get the timestamp of the Depth image. -
self.set_processed_image(color_img)- to set the processed RGB image to be shown on the GUI. -
self.set_predicted_pose(x,y)- to set the position predicted by the algorithm ( x and y should be floating point number.) -
self.set_predicted_path(path)- to set predicted path at once /or reset the previously set predicted poses at once ---- path should be Nx2 (numpy array or python list) [x,y].
More information is available here.
-
The Color RGB image is provided in 640×480 8-bit RGB format.
-
The Depth image is provided in 32-bit floating point precision.
-
The Timestamps are floating point numbers.
-
The laser scan data is provided in numpy array format.
-
Orientation data can be accessed as follows:
qz = data.orientation['qz']
qw = data.orientation['qw']
‘qx’ and ‘qy’ are essentially zero(since it is a 2D odometry).
-
Accelerometer data can be accessed as follows:
ax = data.accelerometer['x']
ay = data.accelerometer['y']
‘ay’ is essentially zero.
-
For more details refer to the original page of the TUM RGBD dataset https://vision.in.tum.de/data/datasets/rgbd-dataset/file_formats#ros_bag.