Vue 컴포넌트
화면을 구성할 수 있는 블록.
인스턴스 내용이 화면 요소로 변환될 때 컴포넌트 태그도 함께 변환된다.
컴포넌트를 등록하는 방법은 전역 컴포넌트 등록, 지역 컴포넌트 등록이 있다.
전역 컴포넌트
인스턴스를 생성할 때마다 등록할 필요 없이 한번 등록하면 어느 인스턴스에서든지 사용 가능
<script>
    Vue.component('my-global-component'), {
        template: '<div>전역컴포넌트</div>'
    }
</script>
지역컴포넌트
등록된 인스턴스 내에서만 사용가능한 컴포넌트
<script>
    var cmp = {
        template: '<div>지역 컴포넌트</div>'
    }

    new Vue({
        el: '#app',
        components: {
            'my-local-componennt': cmp
        }
    })
</script>컴포넌트들은 각자의 유효범위를 가지기 때문에 컴포넌트간 통신을 위해서는 props나 이벤트를 활용해야 한다.
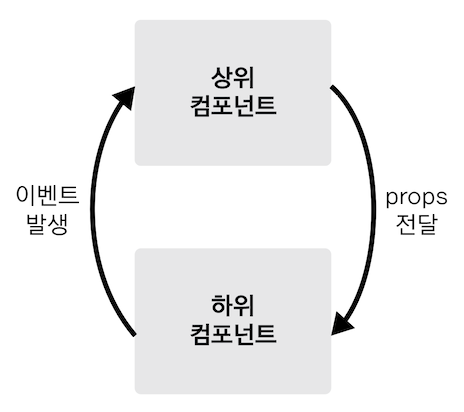
상위에서 하위로는 props로 데이터를 내려주고, 하위에서 상위로는 이벤트를 올려준다.
하위컴포넌트의 속성에 props를 정의하고 상위 컴포넌트에 등록된 하위컴포넌트 태그에 v-bind속성을 추가해준다.
<div id="app">
    <child-component v-bind:propsdata="message"></child-component>
</div>
...

<script>
    Vue.component('child-component', {
        props: ['propsdata'],
        template: '<p>{{propsdata}}</p>'
    })

    new Vue({
        el: '#app',
        data: {
            message: 'Hello world'
        }
    });
</script>props는 react처럼 위와 같이 사용이 가능하다.
또한 HTML에서는 kebab-case, script에서는 camelCase를 써주면 좋다. 각각의 언어의 컨벤션에 따른 것이다.
Vuejs가 자동으로 camelCase를 kebab-case간의 변환을 해주기 때문에 변환에 대해 걱정하지 않아도 된다.
<child-component title-text="wow"></child-component>
props:{
	titleText: String
}
props의 validator를 정의해주는 것과같이 props에 대해 자세하게 정의해주면 좋다.
props: {
  status: {
    type: String,
    required: true,
    validator: function (value) {
      return [
        'syncing',
        'synced',
        'version-conflict',
        'error'
      ].indexOf(value) !== -1
    }
  }
}- https://learnvue.co/2020/01/12-vuejs-best-practices-for-pro-developers/
- https://www.innofied.com/top-10-vus-js-best-practices/
하위 컴포넌트에서 이벤트로 상위 컴포넌트의 메소드를 발생시킨다.
<child-component v-on:이벤트명="상위컴포넌트의 메소드명"></child-component><child-component v-on:show-log="printText"></child-component>
...
<script>
Vue.component('child-component',{
template: '<button v-on:click="showLog">show</button>',
methods:{
showLog: function(){
this.$emit('show-log'); // 자식메소드에서 이벤트 발생
}
}
})
new Vue({
el: '#app',
methods:{
printText: function(){
console.log('received an event');
}
}
})
</script>event 는 parent component에 있기 때문에 kebab case 를 쓰는 것이 좋다 (?)
또한 v-on: 대신에 @을 쓸 수도 있다.
같은 계층에 있는 컴포넌트끼리 통신하려면 몇단계를 거쳐야 한다. 이럴 경우 이벤트 버스라는 인스턴스를 만들어서 활용하면 편리하다.
<script>
	const eventBus = new Vue();

    ...
    methos: {
        showLog: function(){
            eventBus.$emit('triggerEventBus',100);
        }
    }

    const app = new Vue({
        el: '#app',
        created: function(){
            eventBus.$on('triggerEventBus', function(value){
                console.log('이벤트를 저달받음. 전달받은 값 :', value);
            });
        }
    });

</script>