-
Notifications
You must be signed in to change notification settings - Fork 339
How to Call a Remote SPL Script in Java
In How to Call an SPL Script in Java, we explain the invocation of a local SPL script through deploying esProc JDBC. Here let’s look at how to call an SPL script remotely.
The following diagram illustrates the process flow.

A server is a high-performance database running on a Java platform that caters for data analysis. The data warehouse is efficient in performing offline batch processing, online query, multi-dimensional analysis and in-memory computing. To learn more about the server, you can refer to The Server in esProc Tutorial.
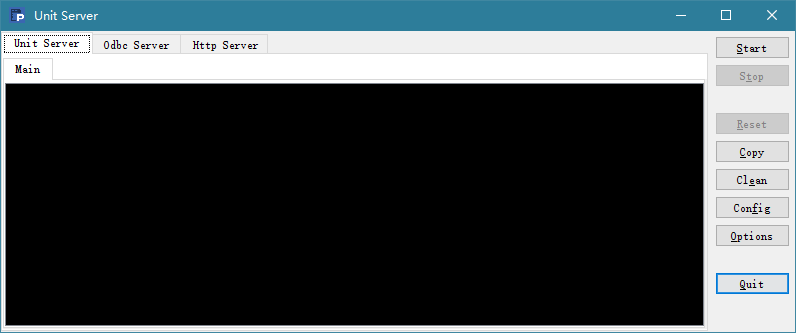
Start or deploy a server by running esprocs.exe file under esProc installation directory’s esProc\bin path and the necessary jars will be automatically loaded into the installation directory. Make sure esProc configuration files raqsoftConfig.xml and unitServer.xml should be placed under the installation directory’s esProc\config path in advance. Below is the pop-up window after running the .exe file.

During the process information of loading initial server settings from raqsoftConfig.xml is displayed on the window. You can configure the settings through Options button on the right side of the window. Below is the Options window:

The settings include Search path, Main path, Date/Time/Date Time format, Default charset name, Log level, File buffer, and etc.
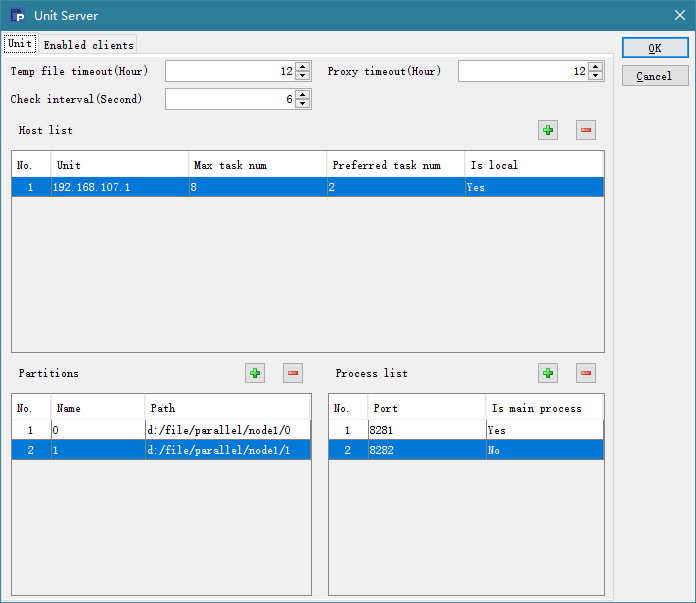
Click Config button on the right side of the window to configure node settings under Unit tab, as shown below:

Temp file timeout sets the life span (Hours) for a temporary file. Check interval is the number of seconds between two expiration checks, which must be a positive value or 0. Proxy timeout is the agent life span, i.e. the remote cursor and task space’s life span (Hours). Do not perform expiration check if Temp file timeOut or Proxy timeout is set as 0.
Under Host list, you can configure IP addresses of all nodes on the local machine that potentially can run servers. Under Process list, you can configure Ports of multiple processes for one IP address on the local machine, among which the first one is the main process. The server automatically searches the node list for one with idle processes at the launch, which will give a task to an idle process to execute. The IP address should be real and multiple IP addresses are allowed when there are network adapters.
Under Host list,** Max task num** is the maximum number of tasks a node is allowed to perform; Preferred task num is the appropriate number of tasks a node can perform. When multiple processes are running on a node, Preferred task num is the number of processes. You can configure data partitions on each node under Partitions.
The Enable clients tab offers the settings of client-side whitelist:

Select Check clients to configure an IP whitelist that can invoke the server under Clients hosts. IP addresses that are not in the whitelist cannot invoke the server for computations.
When server configuration is done, click OK to automatically configure the corresponding configuration file unitServer.xml, as shown below:
    <?xml version="1.0" encoding="UTF-8"?>
    <SERVER Version="3">
        <TempTimeOut>12</TempTimeOut>
        <Interval>1800</Interval>
        <ProxyTimeOut>12</ProxyTimeOut>
        <Hosts>
            <Host ip="192.168.107.1" maxTaskNum="8" preferredTaskNum="3">
            <Partitions>
                <Partition name="0" path="d:/file/parallel/node1/0">
                </Partition>
                <Partition name="1" path="d:/file/parallel/node1/1">
                </Partition>
            </Partitions>
            <Units>
                <Unit port="8281">
                </Unit>
                <Unit port="8282">
                </Unit>
            </Units>
        </Host>
    </Hosts>
    <EnabledClients check="true">
        <Host start="192.168.107.1" end="192.168.107.1">
        </Host>
    </EnabledClients>
    </SERVER>
Now click on Start button on the following window to run the server. Click Stop to suspend the server service; after that, you can click Quit to exit the service. Click Reset to initialize and restart the server and to remove all global variables and release memory at the same time.

Once a node is started, the processes on it start, too. You can check the main process on the Main tab, or click a port number to view the execution status of a sub process.
Run* *ServerConsole.sh to launch the server class under Linux:

The node running information window under Linux is the same as that under Windows:

We can also add the –p parameter in the execution command to launch a server in a non-GUI way to directly execute operations:

To deploy esProc JDBC is to put jars and configuration files necessary for loading esProc at the start of a Java application in a target project. The required JDK should be 1.8 version or above.
esProc JDBC resembles a database JDBC driver without a physical table. It can be simply treated as a database equipped only with the stored procedure. As a fully embedded computing engine, it performs all computations independently; whereas database JDBC serves only as connectivity interface and computations are performed in a separate database server.
Put the following jars under WEB-INF/lib directory in the Web application environment. esProc JDBC requires two basic jars, which can be found in [instllation directory]\esProc\lib:
esproc-bin-xxxx.jar esProc computing engine and JDBC driver package
icu4j-60.3.jar Handle internationalization
There are jars specifically for certain functionalities:
To use databases as data sources, their driver jars are required;
To read and write Microsoft Office files via requires poi.jar* and xmlbeans-4.0.0.jar;
To use the graphic functionalities requires jars for SVG-typed image processing, which include batik.jar*, js-1.0.jar, pdf-transcoder-1.0.jar, xalan-2.7.0.jar, xercesImpl-2.12.1.jar, xml-apis-xerces-2.7.1.jar and xml-apis-ext-2.5.0.jar.
The configuration file raqsoftConfig.xml is located in [installation directory]\esProc\config. It needs to be copied under the target project’s class path in its original name.
The file contains information for configuring esProc, including esProc main path, script file search path, and remote server address. Here we introduce the basic configurations – server address.
    <?xml version="1.0" encoding=" UTF-8"?>
    < Config Version="2">
        <Runtime>
            <Esproc>
                ......
            </Esproc>
        </Runtime>
	<JDBC>
	    <!-- Configure the remote server address that JDBC visits -->
            <Units>
	        <!—Add more <Unit/> nodes to configure multiple server addresses for a multi-machine system-->
	        <Unit>192.168.107.1:8281</Unit>
	    </Units>
        </JDBC>
    </Config>
Types of files Java can remotely access through SPL include TXT, Excel, JSON, CSV, and CTX.
A server file can be located through an absolute path or a relative path, which is relative to the main directory configured in the server’s configuration file raqsoftConfig.xml. Both search paths search the server for the file. First, we’ll configure the server’s main directory:
Add the following nodes under in raqsoftConfig.xml:
    <!-- esProc main path, which is a unique absolute path-->
    <mainPath>D:\mainFile</mainPath>
D:\mainFile
Then, put the to-be-called file employee.txt under the server’s main directory. Below is Java code:
    public  void runSPL() throws ClassNotFoundException, SQLException{
	    Connection con = null;
	    PreparedStatement st;
	    ResultSet set ;
	    // Establish a connection
	    Class.forName("com.esproc.jdbc.InternalDriver");
//onlyServer controls whether the current JDBC starts a remote computation on server. Yes if the value is true; start a local computation if it’s false.
Note: If onlyServer’s value is false, start a local computation when the SPL statement uses call dfx for dfx; start a remote computation if the local computation fails.
	    con= DriverManager.getConnection("jdbc:esproc:local://?onlyServer=true");
	    // Execute the SPL statement to return a result set
	    st = (PreparedStatement)con.createStatement();
	    ResultSet rs = st.executeQuery("=file(\"employee.txt\").import@t()");

	    // Output field names and detailed data from the result set
	    ResultSetMetaData rsmd = rs.getMetaData();
	    int colCount = rsmd.getColumnCount();
	    for ( int  c = 1; c <= colCount;c++) {
	    String title = rsmd.getColumnName(c);
	    if( c > 1 ) {
	        System.out.print("\t");
	    }
	    else {
	        System.out.print("\n");
	    }
	        System.out.print(title);
	  }
	    while (rs.next()) {
	     for(int c = 1; c<= colCount; c++) {
	       if ( c > 1 ) {
	            System.out.print("\t");
	  }
	       else {
	            System.out.print("\n");
	  }
	     Object o = rs.getObject(c);
	     System.out.print(o.toString());
	  }
	  }
	   // Close the connection
	   if (con!=null) {
	        con.close();
	   }
}
Execution output:

Three aspects you’d better pay special attention when calling a server SPL script:
1. Deploy server;
2. Add server address in raqsoftConfig.xml;
3. Add onlyServer property in the JDBC URL. If the property value is true, perform remote computations always by accessing the server; and if the vlaue is false, perform local computations. When the SPL statement is "call spl", perform the computation locally; but peform it remotely if the local computation fails.
About calling a local SPL script in Java, refer to How to Call an SPL Script in Java. See Tutorial to learn more about SPL (Structured Process Language).
SPL Resource: SPL Official Website | SPL Blog | Download esProc SPL | SPL Source Code