-
Notifications
You must be signed in to change notification settings - Fork 0
ChainX Contracts Tutorial
Please go to chainx-org/ChainX to download the latest version of ChainX v1.0.7-beta.1.
Install Rust environment, please refer to rust-lang.org/tools/install for details.
After the Rust environment is installed, install the command-line tool cargo-contract that facilitates the construction of contract projects. Note that please install chainx-org/cargo-contract ink2.0 branch, instead of paritytech/cargo-contract.
$ cargo install --git https://github.com/chainx-org/cargo-contract --branch ink2.0 cargo-contract --forcechainx-org/cargo-contract consists in paritytech/cargo-contract: the difference is that chainx-org/cargo-contract uses custom chainx-org/ink (ink2.0 branch), instead of paritytech/ink.
Create a flipper sample project:
$ cargo-contract contract new flipperRun the test:
$ cd flipper
$ cargo +nightly test
Compile the WASM contract file:
$ cargo-contract contract buildGenerate contract metadata,which is the contract ABI:
$ cargo-contract contract generate-metadataA metadata.json file is generated in the target directory, which contains the necessary information to interact with the contract.
Start a single node:
$ ./chainx --dev --default-log -d <specified_data_directory> --log=runtime=debug --no-telemetry --block-construction-execution=native --other-execution=nativeFor more information about to start a local node, you can read the ChainX-Dev wiki. Generally, a single node is sufficient for debugging contracts purpose.
Click Chainx Extension to install the plugin.
If the plugin cannot be installed because of the network, you can download the plugin compressed package in our plugin distribution repository and load it in Chrome browser (please see at readme file on this repository).
After the installation is complete:
-
Switch network to test network
- ChainX currently provides
wss://testnet.w1.org.cn/wsas default node configuration - If you are using
ChainX Dev Mode, you have to add localhost:ws://localhost:<websocket>
- ChainX currently provides
-
Create or import account

- If you select "Import Wallet", there is an option to directly import the private key in the upper right corner of the mnemonic page.
The whole process is mainly divided into 3 steps:
- Upload of the contract on chain (Upload WASM file)
- Instantiate of the contract (or deploy)
- Call contract functions
All steps can be performed by UI (https://dapps.chainx.org.cn/), or by JS-SDK script.
- Open Chainx Wallet and switch to "Contract" page and "Contract Code" tab:

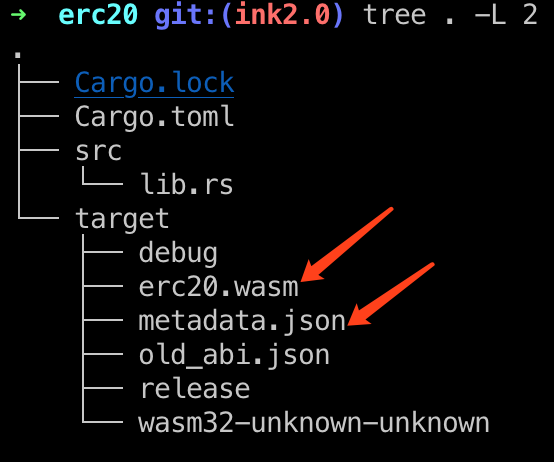
- Make sure that the compiled
wasmfile andjsonfile exist in thetargetdirectory of your contract directory:

- Click on "Upload WASM",and fill in the corrisponding fields in the form:

-
After clicking on "Confirm", the plugin will be called to sign the transaction. Please enter the account password and confirm the signature
-
After the contract is successfully uploaded on chain, it is displayed as follow (including all methods of the contract):

Upload contract using JS-SDK:
const { compactAddLength } = require('@chainx/util');
const code = compactAddLength(fs.readFileSync(path.resolve(__dirname, './erc20.wasm')));

const extrinsic = chainx.api.tx.xContracts.putCode(100000000, code);

let codeHash;

ex.signAndSend(Test, (error, result) => {
  console.log(error, result);
  if (result && result.result === 'ExtrinsicSuccess') {
    // Obtain codeHash
    codeHash = result.events.find(e => e.method === 'CodeStored').event.data;
  }
});
If the upload fails, the possible reasons are:
- The codehash already exists, please copy the hinted codehash and upload the contract via "Add an existing code hash" function
- Insufficient account balance, please ensure that there are enough PCX in the account used to upload contract
- "Maximum gas allowed" is not enough, try increasing it and try again
In the previous step about uploading of the contract, we simply stored the contract code on the chain and did not have any functions that can be called, so we need to instantiate this contract.
- Click "Deploy" and fill in the necessary fields for instantiation:

After calling up the plugin, enter the password account and confirm the signature to instantiate the contract.
- After the contract is successfully deployed, the UI will automatically jump to the "Contract" tab, as shown in the following figure:

- If the contract is already deployed, click the "Add existing contract" button to add an existing contract. Please note that when adding an existing contract, you need to provide the contract's
abi.json. If you provide the wrong abi, it will cause a selector error when calling, and the corresponding function cannot be called.
Instantiate the contract using JS-SDK:
// contract abi
const erc20 = require('./erc20');
// parse abi
const Abi = require('@chainx/api-contract');

const abi = new Abi(erc20);
// 5GE7vwvDmKCCPrVLc9XZJAiAspM9LhQWbQjPvZ3QxzBUbhT7
const extrinsic = chainx.api.tx.xContracts.instantiate(
  1000,
  100000000,
  '0x5e71dc66c1527bf4047942c5ada9c5c59941bff8eb8b2d1a6d849306bfd52e93',
  abi.constructors[0](...), // contract constructor
);

let contractAddress

ex.signAndSend(Test, (error, result) => {
  if (result && result.result === 'ExtrinsicSuccess') {
    // get contractAddress
    contractAddress = result.events.find(e => e.method === 'Instantiated').event.data[1];
  }
});
After the function is successfully executed, the corresponding returned data is displayed in the result area:


Call contract functions using JS-SDK:
const abi = new Abi(erc20);

const ex = chainx.api.tx.xContracts.call(
  '5GE7vwvDmKCCPrVLc9XZJAiAspM9LhQWbQjPvZ3QxzBUbhT7', // contract address
  0, // value
  10000000, // gas
  // called function
  abi.messages.transfer('5FvHGYk44FHZXznrhoskVyr2zGPYn5CpUXphRKM8eGRJZMtX', 10)
);

ex.signAndSend(Alice, (error, result) => {
  console.log(error, result);
});
From ChainX
中文 | English
