-
Notifications
You must be signed in to change notification settings - Fork 3
FlatGeneratedVillages
本示例会一步步,从零开始写一个超平坦类型的维度里面,生成原版的村庄;以此来领略多维度的无限可能。
本教程涉及以下内容
- C++多态
所以本教程默认你懂得C++的多态设计
同时注意,构建本插件的依赖 Levilamina
需要使用这个提交aecd4b3之后的版本
确保你有以下环境
- 安装了C++桌面开发的
msbuild(v143)或者MS Studio - 一个你熟悉的文件编辑器,本教程使用
vscode -
Git(建议vscode里也安装对应插件) -
xmake(vscode需要安装对应插件,同名直接搜) -
clangd(vscode需要安装对应插件,同名直接搜) - 一个已经安装了levilamina的BDS
本教程全程使用xmake构建项目
首先clone插件模板,在你任意文件夹内,使用以下指令clone插件模板到本地
git clone --depth 1 https://github.com/LiteLDev/levilamina-plugin-template.git上面指令执行成功后,你可以在执行了clone的目录看到levilamina-plugin-template文件夹
(可选)重命名levilamina-plugin-template为flat-gen-village,这样更好辨认
进入flat-gen-village文件夹
左键空白处,选择Open with Code,在vs code里面打开这个文件夹
注意:关于以下所有的路径,如无特别说明,均是以插件根目录为开始目录
-
首先把
src下的change_this文件夹,改成flat-gen-village -
然后把
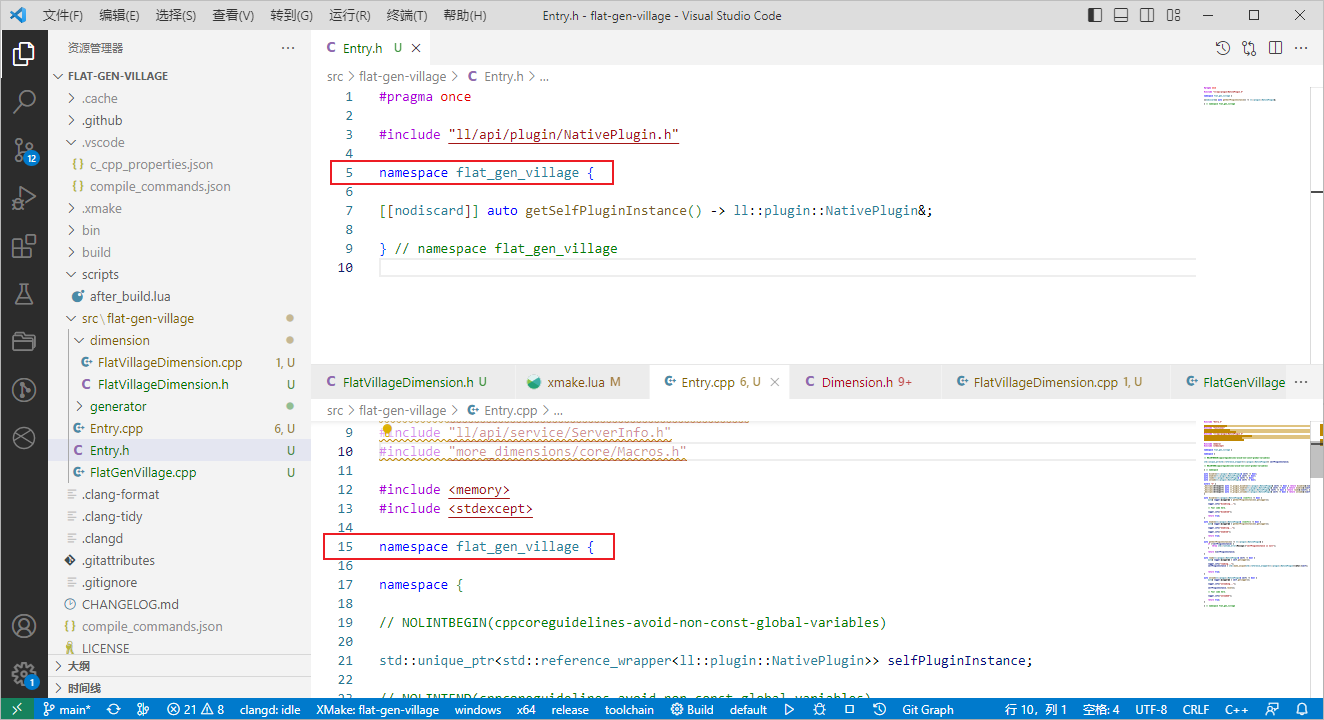
src/flat-gen-village下的两个文件的文件名改成:Entry.h,Entry.cpp -
把
Entry.h和Entry.cpp两个文件里面的命名空间更改成flat_gen_village
效果如下:
由于本插件是依赖more-dimensions的,所以还得配置依赖,让我们写的插件加载比more-dimensions晚
在插件的根目录下,你会看到manifest.json这个文件,里面的初始内容大概如下:
{
    "name": "${pluginName}",
    "entry": "${pluginFile}",
    "type": "native"
}
把它改成
{
    "name": "${pluginName}",
    "entry": "${pluginFile}",
    "type": "native",
    "dependencies": [
        {
            "name": "more-dimensions"
        }
    ]
}除了dependencies之外,还有description,author,version的可选配置
如果你的vs code还没有安装xmake插件,请先安装
在文件列表里点击xmake.lua这个文件来,打开文件内容后,在里面添加more-dimensions依赖
add_requires("more-dimensions") -- add_requires("more-dimensions x.x.x") 如果使用某版本这里不加版本参数,使用最新版本,然后把
target("change-this") 改成
target("FlatGenVillage") 在target分层下面添加
add_packages("more-dimensions")完成后,效果应该是这样的
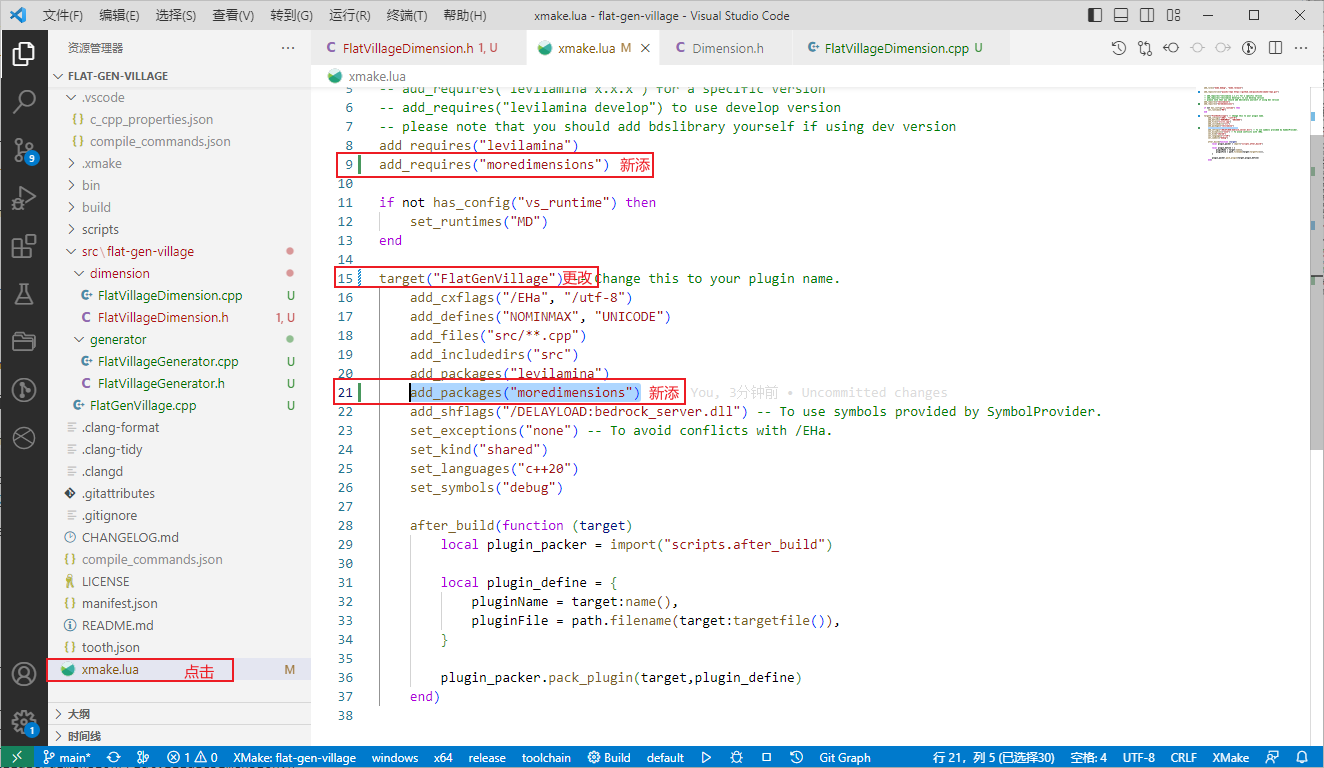
然后使用以下指令初次构建与下载依赖,等待时间可能会很长,可以先执行,然后跟着教程走,让其后台跑
xmake按以下路径创建五个文件
src/flat-gen-village/FlatGenVillage.cpp
src/flat-gen-village/generator/FlatVillageGenerator.h
src/flat-gen-village/generator/FlatVillageGenerator.cpp
src/flat-gen-village/dimension/FlatVillageDimension.h
src/flat-gen-village/dimension/FlatVillageDimension.cpp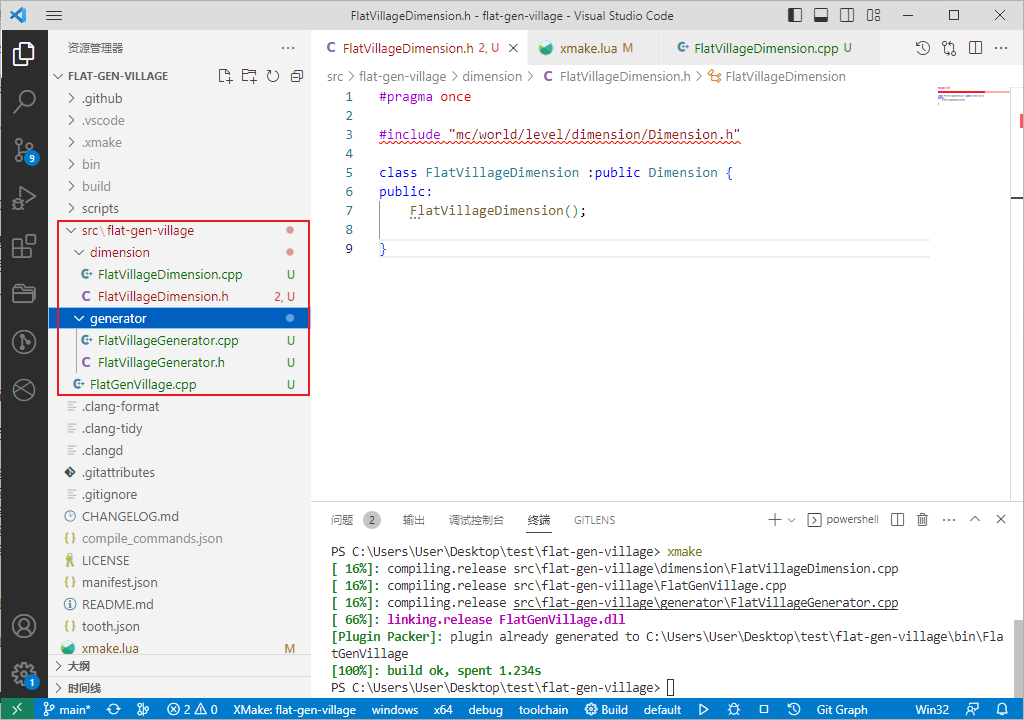
我们需要的超平坦在原版中并没有类似FlatDimension这样的维度类,而是在主世界维度类中做判断而创建,所以我们需要新建一个维度类
在这里我们把其命名为FlatVillageDimension,现在我们根据多态创建一个这样的维度类
首先,在src/flat-gen-village/dimension/FlatVillageDimension.h文件里输入以下内容
#pragma once

#include "mc/world/level/dimension/Dimension.h" // 新维度类需要继承的类
#include "more_dimensions/api/dimension/CustomDimensionManager.h" // 使用DimensionFactoryInfo的声明

// 建议是加一个命名空间,避免与其他插件同类名的情况
namespace flat_village_dimension {

class FlatVillageDimension :public Dimension {
public:
    // 建议固定这样写,DimensionFactoryInfo类里面提供了Dimension实例化的基本数据,name就是维度名,多维度是维度名区分不同维度
    FlatVillageDimension(std::string const& name, ll::dimension::DimensionFactoryInfo const& info);

    // 多维度需要的一个方法,参数是你需要处理的数据,比如种子,这里不没有这样的需要,后面说原因
    static CompoundTag generateNewData();

    // 以下六个是必须重写的函数
    // 维度地形的生成器,是本教程主要更改的地方
    std::unique_ptr<WorldGenerator> createGenerator(br::worldgen::StructureSetRegistry const&) override;

    // 与本教程无关,按照本教程写的就行,无需留意
    void upgradeLevelChunk(ChunkSource& chunkSource, LevelChunk& oldLc, LevelChunk& newLc) override;

    // 与本教程无关,按照本教程写的就行,无需留意
    void fixWallChunk(ChunkSource& cs, LevelChunk& lc) override;

    // 与本教程无关,按照本教程写的就行,无需留意
    bool levelChunkNeedsUpgrade(LevelChunk const& lc) const override;

    // 与本教程无关,按照本教程写的就行,无需留意
    void _upgradeOldLimboEntity(CompoundTag& tag, ::LimboEntitiesVersion vers) override;

    // 与本教程无关,按照本教程写的就行,无需留意
    std::unique_ptr<ChunkSource>
    _wrapStorageForVersionCompatibility(std::unique_ptr<ChunkSource> cs, ::StorageVersion ver) override;

    // 当你转到这个维度时,坐标怎么转换,比如主世界与地狱的
    Vec3 translatePosAcrossDimension(Vec3 const& pos, DimensionType did) const override;

    // 云高度,默认是y128,但多维度高度范围是在y-64~320,与主世界相同,重写它,放高些
    short getCloudHeight() const override;

    // 非必要。下雨时,可视范围的更改
    bool hasPrecipitationFog() const override;

};

}然后是实现的编写src/flat-gen-village/dimension/FlatVillageDimension.cpp
#include "FlatVillageDimension.h"

#include "mc/world/level/BlockSource.h"
#include "mc/world/level/DimensionConversionData.h"
#include "mc/world/level/Level.h"
#include "mc/world/level/chunk/ChunkGeneratorStructureState.h"
#include "mc/world/level/chunk/VanillaLevelChunkUpgrade.h"
#include "mc/world/level/dimension/DimensionBrightnessRamp.h"
#include "mc/world/level/dimension/OverworldBrightnessRamp.h"
#include "mc/world/level/dimension/VanillaDimensions.h"
#include "mc/world/level/levelgen/flat/FlatWorldGenerator.h"
#include "mc/world/level/levelgen/structure/StructureFeatureRegistry.h"


namespace flat_village_dimension {

FlatVillageDimension::FlatVillageDimension(std::string const& name, ll::dimension::DimensionFactoryInfo const& info)
: Dimension(info.level, info.dimId, {-64, 320}, info.scheduler, name) {
    // 这里说明下,在DimensionFactoryInfo里面more-dimensions会提供维度id,请不要使用固定维度id,避免id冲突导致维度注册出现异常
    mDefaultBrightness.sky   = Brightness::MAX;
    mSeaLevel                = -61;
    mHasWeather              = true;
    mDimensionBrightnessRamp = std::make_unique<OverworldBrightnessRamp>();
    mDimensionBrightnessRamp->buildBrightnessRamp();
}

CompoundTag FlatVillageDimension::generateNewData() { return {}; }

std::unique_ptr<WorldGenerator> FlatVillageDimension::createGenerator(br::worldgen::StructureSetRegistry const&) {
    // 本教程只涉及到生成器的更改,所以对其余部分不做详细说明
    // 暂且这样处理,因为我们还没写生成器,先利用原版的超平坦生成器
    std::unique_ptr<WorldGenerator> worldGenerator;
    auto                            seed      = getLevel().getSeed();
    auto&                           levelData = getLevel().getLevelData();

    // 实例化一个FlatWorldGenerator类
    worldGenerator = std::make_unique<FlatWorldGenerator>(*this, seed, levelData.getFlatWorldGeneratorOptions());
    // 此为必须,一些结构生成相关
    worldGenerator->getStructureFeatureRegistry().mChunkGeneratorStructureState =
        br::worldgen::ChunkGeneratorStructureState::createFlat(seed, worldGenerator->getBiomeSource(), {});

    // 必须调用,初始化生成器
    worldGenerator->init();
    return std::move(worldGenerator);
}

void FlatVillageDimension::upgradeLevelChunk(ChunkSource& cs, LevelChunk& lc, LevelChunk& generatedChunk) {
    auto blockSource = BlockSource(getLevel(), *this, cs, false, true, false);
    VanillaLevelChunkUpgrade::_upgradeLevelChunkViaMetaData(lc, generatedChunk, blockSource);
    VanillaLevelChunkUpgrade::_upgradeLevelChunkLegacy(lc, blockSource);
}

void FlatVillageDimension::fixWallChunk(ChunkSource& cs, LevelChunk& lc) {
    auto blockSource = BlockSource(getLevel(), *this, cs, false, true, false);
    VanillaLevelChunkUpgrade::fixWallChunk(lc, blockSource);
}

bool FlatVillageDimension::levelChunkNeedsUpgrade(LevelChunk const& lc) const {
    return VanillaLevelChunkUpgrade::levelChunkNeedsUpgrade(lc);
}
void FlatVillageDimension::_upgradeOldLimboEntity(CompoundTag& tag, ::LimboEntitiesVersion vers) {
    auto isTemplate = getLevel().getLevelData().isFromWorldTemplate();
    return VanillaLevelChunkUpgrade::upgradeOldLimboEntity(tag, vers, isTemplate);
}

std::unique_ptr<ChunkSource>
FlatVillageDimension::_wrapStorageForVersionCompatibility(std::unique_ptr<ChunkSource> cs, ::StorageVersion /*ver*/) {
    return cs;
}

Vec3 FlatVillageDimension::translatePosAcrossDimension(Vec3 const& fromPos, DimensionType fromId) const {
    Vec3 topos;
    VanillaDimensions::convertPointBetweenDimensions(
        fromPos,
        topos,
        fromId,
        mId,
        getLevel().getDimensionConversionData()
    );
    constexpr auto clampVal = 32000000.0f - 128.0f;

    topos.x = std::clamp(topos.x, -clampVal, clampVal);
    topos.z = std::clamp(topos.z, -clampVal, clampVal);

    return topos;
}

short FlatVillageDimension::getCloudHeight() const { return 192; }

bool FlatVillageDimension::hasPrecipitationFog() const { return true; }

} // namespace flat_village_dimension本教程是在开服事件中注册维度,我们把这部分写在src/flat-gen-village/FlatGenVillage.cpp,记住,实现尽量不要写在头文件.h中,所以这里是.cpp
#include "ll/api/event/EventBus.h"
#include "ll/api/event/server/ServerStartedEvent.h"
#include "flat-gen-village/dimension/FlatVillageDimension.h"

static bool reg = [] {
    using namespace ll::event;
    // ll的开服事件
    EventBus::getInstance().emplaceListener<ServerStartedEvent>([](ServerStartedEvent&) {
        // more-dimensions注册维度的api
        ll::dimension::CustomDimensionManager::getInstance().addDimension<flat_village_dimension::FlatVillageDimension>(
            "flatVillageDimension"
        );
    });
    return true;
}();
这里说明一下more-dimensions注册维度的api,这个addDimension的原型其实是这样的:
template <std::derived_from<Dimension> D, class... Args>
DimensionType addDimension(std::string const& dimName, Args&&... args);可以看到是一个模板函数,函数的参数传的就是自定义维度类实例化的参数,并且这个类的父类里必须有Dimension
我们创建的FlatVillageDimension正是继承自Dimension,当然,如果你想修改原版的下届,直接继承下届NetherDimension写一个新类也是可以的
这个函数的返回值是一个DimensionType如果成功创建维度,会返回这个维度的id
写好上面三个内容后,就已经做好创建新维度的步骤了,现在我们可以放到有levilamina的BDS体验
执行以下指令构建插件
xmake如无意外在插件根目录下会有个bin文件夹,里面会有个FlatGenVillage文件夹,这就是已经打包好的插件
直接复制FlatGenVillage这个文件夹,放到BDS目录/plugins文件夹里,同时,也记得把more-dimensions也放进去
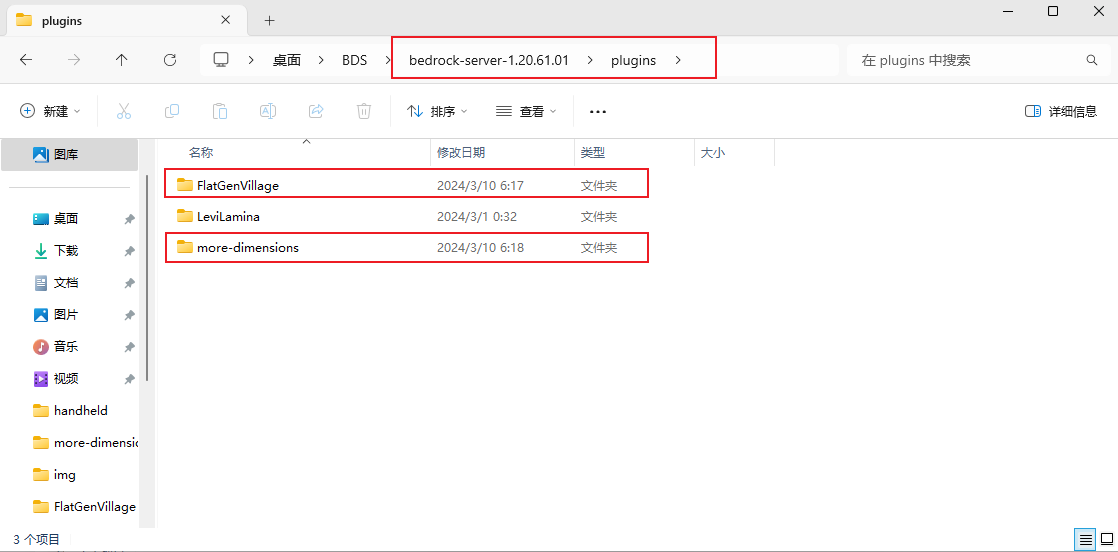
本教程使用的是BDS1.20.61版本作为示例,更高版本应该理同
接下来启动BDS即可,关于ll的安装请看这里levilamina安装
启动BDS后,如果你开启debug级别的log,你会看到以下类似的信息
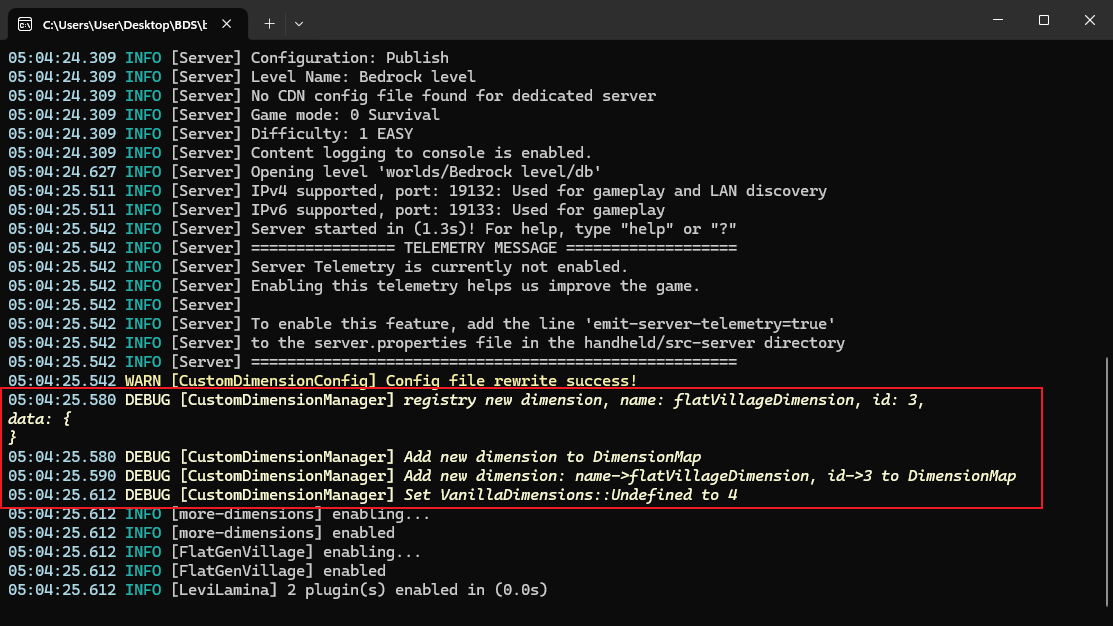
这就是成功注册了维度
同时在存档目录里生成一个记录维度信息的json文件:
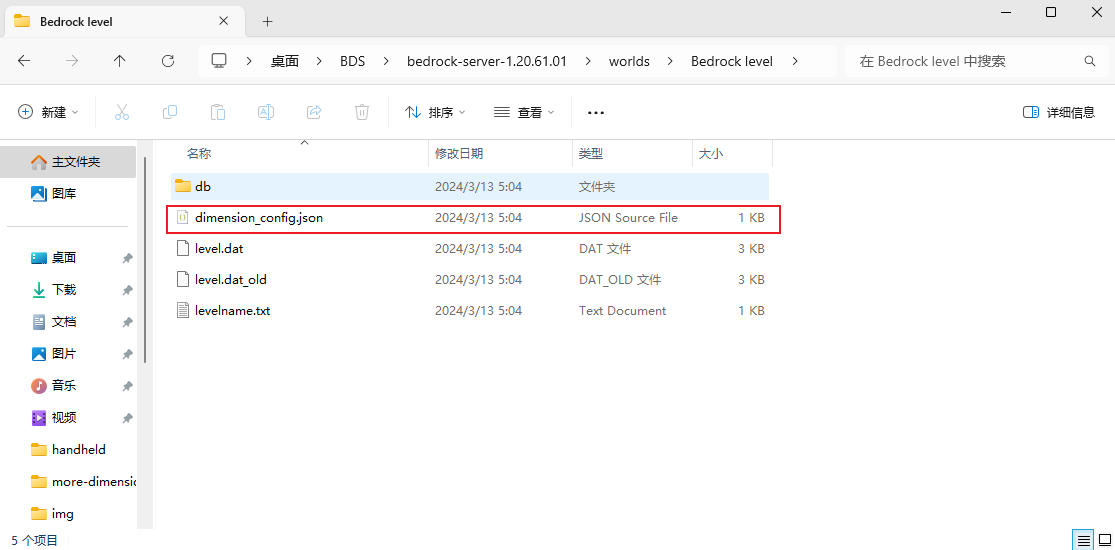
此文件不要做更改,手动修改极有可能损失存档数据
进入游戏后,你可以直接使用tp指令传送到自定义的维度,本教程传送到上面写的维度的指令如下:
tp ~ -61 ~ flat_village_dimension
不出意外,你可以成功传送到上面写的维度。
上面我们已经成功创建一个超平坦的维度,接下来,我们往这个维度添加自然生成村庄功能
打开文件src/flat-gen-village/generator/FlatVillageGenerator.h,填入以下内容
#pragma once

#include "mc/deps/core/data/DividedPos2d.h"
#include "mc/deps/core/utility/buffer_span.h"
#include "mc/util/Random.h"
#include "mc/world/level/block/BlockVolume.h"
#include "mc/world/level/levelgen/flat/FlatWorldGenerator.h"


#include <vector>

class ChunkViewSource;
class LevelChunk;
class ChunkPos;

// 依旧建议加一个命名空间避免冲突
namespace flat_village_generator {

// 我们直接继承原版超平坦这个类来写会方便很多
class FlatVillageGenerator : public FlatWorldGenerator {
public:
    Random random; // 这个是BDS生成随机数有关的类

    // 后面的generationOptionsJSON虽然用不上,但FlatWorldGenerator的实例化需要
    FlatVillageGenerator(Dimension& dimension, uint seed, Json::Value const& generationOptionsJSON);

    // 这里是处理结构放置相关的,包括地物,结构,地形
    bool postProcess(ChunkViewSource& neighborhood);

    // 这里是初始处理新的单区块的方块生成相关的,比如一些大量的方块(石头,泥土)
    void loadChunk(LevelChunk& levelchunk, bool forceImmediateReplacementDataLoad);

    // 判断某个点在哪个结构范围里
    StructureFeatureType findStructureFeatureTypeAt(BlockPos const&);

    // 判断某个点是否在某个结构范围里
    bool isStructureFeatureTypeAt(BlockPos const&, ::StructureFeatureType) const;

    // 这里是获取某个坐标的最高方块
    std::optional<short> getPreliminarySurfaceLevel(DividedPos2d<4> worldPos) const;

    // 如意,以一个坐标,在一定范围内查找某个类型的结构
    bool
    findNearestStructureFeature(::StructureFeatureType, BlockPos const&, BlockPos&, bool, std::optional<HashedString>);

    // 无需在意,照写就行
    void garbageCollectBlueprints(buffer_span<ChunkPos>);

    // 处理地形
    void prepareHeights(BlockVolume& box, ChunkPos const& chunkPos, bool factorInBeardsAndShavers);

    // 与prepareHeights一样,不过与之不同的是,还会计算单区块内的高度
    void prepareAndComputeHeights(
        BlockVolume&        box,
        ChunkPos const&     chunkPos,
        std::vector<short>& ZXheights,
        bool                factorInBeardsAndShavers,
        int                 skipTopN
    );

    // 可选,可以不写
    BlockPos findSpawnPosition() const { return {0, 16, 0}; };
};

} // namespace flat_village_generator然后是实现,打开文件src/flat-gen-village/generator/FlatVillageGenerator.cpp,填入以下内容
#include "FlatVillageGenerator.h"

#include "mc/deps/core/data/DividedPos2d.h"
#include "mc/world/level/BlockSource.h"
#include "mc/world/level/Level.h"
#include "mc/world/level/biome/VanillaBiomeNames.h"
#include "mc/world/level/biome/registry/BiomeRegistry.h"
#include "mc/world/level/chunk/ChunkViewSource.h"
#include "mc/world/level/chunk/LevelChunk.h"
#include "mc/world/level/chunk/PostprocessingManager.h"
#include "mc/world/level/levelgen/v1/ChunkLocalNoiseCache.h"


namespace flat_village_generator {

FlatVillageGenerator::FlatVillageGenerator(Dimension& dimension, uint seed, Json::Value const& generationOptionsJSON)
: FlatWorldGenerator(dimension, seed, generationOptionsJSON) {
    // 值得注意的是,我们是继承的FlatWorldGenerator,后续也会使用其内部成员,所以我们需要调用FlatWorldGenerator的构造
    random.mRandom.mObject._setSeed(seed);

    mBiome       = getLevel().getBiomeRegistry().lookupByHash(VanillaBiomeNames::Plains);
    mBiomeSource = std::make_unique<FixedBiomeSource>(*mBiome);
}

bool FlatVillageGenerator::postProcess(ChunkViewSource& neighborhood) {
    ChunkPos chunkPos;
    chunkPos.x      = neighborhood.getArea().mBounds.min.x;
    chunkPos.z      = neighborhood.getArea().mBounds.min.z;
    auto levelChunk = neighborhood.getExistingChunk(chunkPos);
    auto seed = getLevel().getSeed();

    // 必须,需要给区块上锁
    auto lockChunk =
        levelChunk->getDimension().mPostProcessingManager->tryLock(levelChunk->getPosition(), neighborhood);

    if (!lockChunk) {
        return false;
    }
    BlockSource blockSource(getLevel(), neighborhood.getDimension(), neighborhood, false, true, true);
    auto        chunkPosL = levelChunk->getPosition();
    random.mRandom.mObject._setSeed(seed);
    auto one = 2 * (random.nextInt() / 2) + 1;
    auto two = 2 * (random.nextInt() / 2) + 1;
    random.mRandom.mObject._setSeed(seed ^ (chunkPosL.x * one + chunkPosL.z * two));

    // 放置结构体,如果包含有某个结构的区块,就会放置loadChunk准备的结构
    WorldGenerator::postProcessStructureFeatures(blockSource, random, chunkPosL.x, chunkPosL.z);
    // 处理其它单体结构,比如沉船,这里不是必须
    WorldGenerator::postProcessStructures(blockSource, random, chunkPosL.x, chunkPosL.z);
    return true;
}

void FlatVillageGenerator::loadChunk(LevelChunk& levelchunk, bool forceImmediateReplacementDataLoad) {
    auto chunkPos = levelchunk.getPosition();

    auto            blockPos = BlockPos(chunkPos, 0);
    DividedPos2d<4> dividedPos2D;
    dividedPos2D.x = (blockPos.x >> 31) - ((blockPos.x >> 31) - blockPos.x) / 4;
    dividedPos2D.z = (blockPos.z >> 31) - ((blockPos.z >> 31) - blockPos.z) / 4;

    // 处理其它单体结构,比如沉船,这里不是必须
    WorldGenerator::preProcessStructures(getDimension(), chunkPos, getBiomeSource());
    // 准备要放置的结构,如果是某个结构的区块,就会准备结构
    WorldGenerator::prepareStructureFeatureBlueprints(getDimension(), chunkPos, getBiomeSource(), *this);

    // 这里并没有放置结构,只有单纯基本地形
    levelchunk.setBlockVolume(mPrototype, 0);

    levelchunk.recomputeHeightMap(0);
    ChunkLocalNoiseCache chunkLocalNoiseCache(dividedPos2D, 8);
    mBiomeSource->fillBiomes(levelchunk, chunkLocalNoiseCache);
    levelchunk.setSaved();
    levelchunk.changeState(ChunkState::Generating, ChunkState::Generated);
}

std::optional<short> FlatVillageGenerator::getPreliminarySurfaceLevel(DividedPos2d<4> worldPos) const {
    // 超平坦的高度都是一样的,直接返回固定值即可
    return -61;
}

void FlatVillageGenerator::prepareAndComputeHeights(
    BlockVolume&        box,
    ChunkPos const&     chunkPos,
    std::vector<short>& ZXheights,
    bool                factorInBeardsAndShavers,
    int                 skipTopN
) {
    auto heightMap = mPrototype.computeHeightMap();
    ZXheights.assign(heightMap->begin(), heightMap->end());
}

void FlatVillageGenerator::prepareHeights(BlockVolume& box, ChunkPos const& chunkPos, bool factorInBeardsAndShavers) {
    // 在其它类型世界里,这里是需要对box进行处理,生成地形,超平坦没有这个需要,所以直接赋值即可
    box = mPrototype;
};

StructureFeatureType FlatVillageGenerator::findStructureFeatureTypeAt(BlockPos const& blockPos) {
    return WorldGenerator::findStructureFeatureTypeAt(blockPos);
};

bool FlatVillageGenerator::isStructureFeatureTypeAt(const BlockPos& blockPos, ::StructureFeatureType type) const {
    return WorldGenerator::isStructureFeatureTypeAt(blockPos, type);
}

bool FlatVillageGenerator::findNearestStructureFeature(
    ::StructureFeatureType      type,
    BlockPos const&             blockPos,
    BlockPos&                   blockPos1,
    bool                        mustBeInNewChunks,
    std::optional<HashedString> hash
) {
    return WorldGenerator::findNearestStructureFeature(type, blockPos, blockPos1, mustBeInNewChunks, hash);
};

void FlatVillageGenerator::garbageCollectBlueprints(buffer_span<ChunkPos> activeChunks) {
    return WorldGenerator::garbageCollectBlueprints(activeChunks);
};

} // namespace flat_village_generator
为了使用我们写的生成器,我们需要对我们写的维度类里的createGenerator实现进行修改
打开src/flat-gen-village/dimension/FlatVillageDimension.cpp
先导入以下头文件
#include "mc/world/level/levelgen/structure/StructureSetRegistry.h"
#include "mc/world/level/levelgen/structure/VillageFeature.h"
#include "mc/world/level/LevelSeed64.h"
把
std::unique_ptr<WorldGenerator> FlatVillageDimension::createGenerator(br::worldgen::StructureSetRegistry const&) {
    // 本教程只涉及到生成器的更改,所以对其余部分不做详细说明
    // 暂且这样处理,因为我们还没写生成器,先利用原版的超平坦生成器
    std::unique_ptr<WorldGenerator> worldGenerator;
    auto                            seed      = getLevel().getSeed();
    auto&                           levelData = getLevel().getLevelData();

    // 实例化一个FlatWorldGenerator类
    worldGenerator = std::make_unique<FlatWorldGenerator>(*this, seed, levelData.getFlatWorldGeneratorOptions());
    // 此为必须,一些结构生成相关
    worldGenerator->getStructureFeatureRegistry().mChunkGeneratorStructureState =
        br::worldgen::ChunkGeneratorStructureState::createFlat(seed, worldGenerator->getBiomeSource(), {});

    // 必须调用,初始化生成器
    worldGenerator->init();
    return std::move(worldGenerator);
}
改成
std::unique_ptr<WorldGenerator>
FlatVillageDimension::createGenerator(br::worldgen::StructureSetRegistry const& structureSetRegistry) {
    std::unique_ptr<WorldGenerator> worldGenerator;
    auto                            seed      = getLevel().getSeed();
    auto&                           levelData = getLevel().getLevelData();

    // 实例化我们写的Generator类
    worldGenerator = std::make_unique<flat_village_generator::FlatVillageGenerator>(
        *this,
        seed,
        levelData.getFlatWorldGeneratorOptions()
    );
    // structureSetRegistry里面仅有的土径结构村庄生成需要用到,所以我们拿一下
    std::vector<std::shared_ptr<const br::worldgen::StructureSet>> structureMap;
    for (auto iter = structureSetRegistry.begin(); iter != structureSetRegistry.end(); iter++) {
        structureMap.emplace_back(iter->second);
    }
    worldGenerator->getStructureFeatureRegistry().mChunkGeneratorStructureState.mSeed = seed;
    worldGenerator->getStructureFeatureRegistry().mChunkGeneratorStructureState.mSeed64 =
        LevelSeed64::fromUnsigned32(seed);

    // 这个就相当于在这个生成器里注册结构了
    // VillageFeature的第二第三个参数是村庄之间的最大间隔与最小间隔
    worldGenerator->getStructureFeatureRegistry().mStructureFeatures.emplace_back(
        std::make_unique<VillageFeature>(seed, 34, 8)
    );
    // 此为必须,一些结构生成相关
    worldGenerator->getStructureFeatureRegistry().mChunkGeneratorStructureState =
        br::worldgen::ChunkGeneratorStructureState::createFlat(seed, worldGenerator->getBiomeSource(), structureMap);

    // 必须调用,初始化生成器
    worldGenerator->init();
    return std::move(worldGenerator);
}现在就已经准备完好了,执行xmake构建插件,把bin/内打包好的插件复制到BDS根目录下的plugins/就可以体验了
进入游戏后,如果你使用的是上面第一次进入游戏的存档,这时候你会在注册的自定义维度,你可以使用locate来查找一下村庄
如果不是,先tp到自定义维度,tp指令里维度参数会有维度补全,再使用locate指令
locate structure village
可以看到,聊天栏提示找到了一个村庄,这个位置会因不同种子为不同
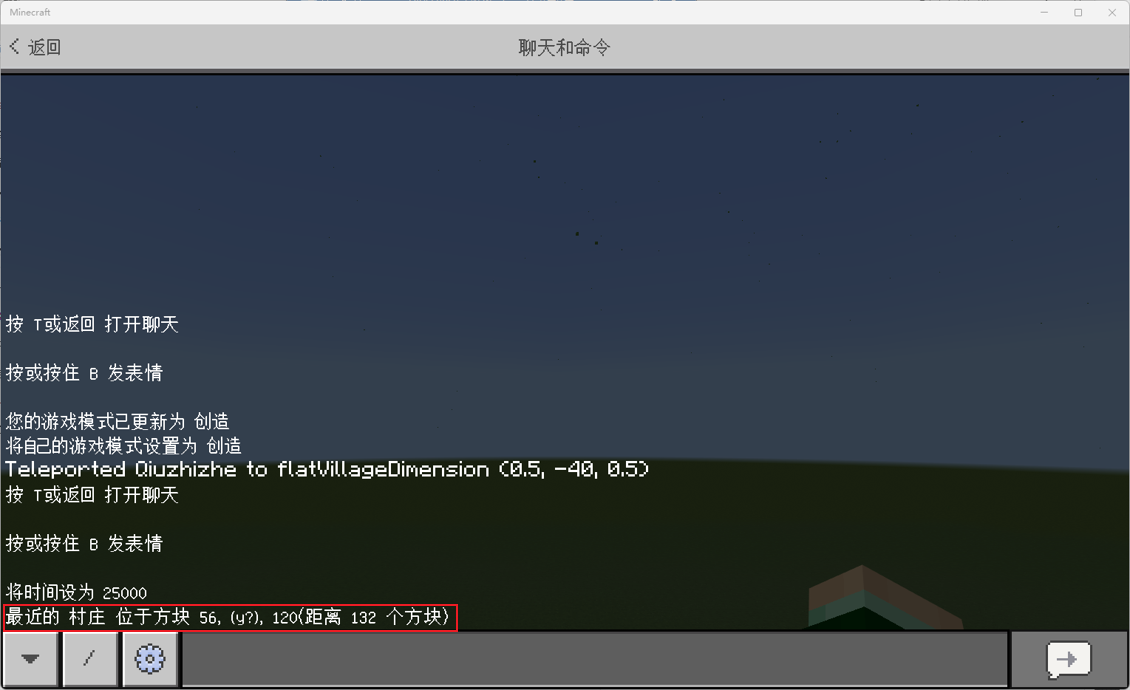
然后我们传送过去,就可以看到一个自然生成的村庄
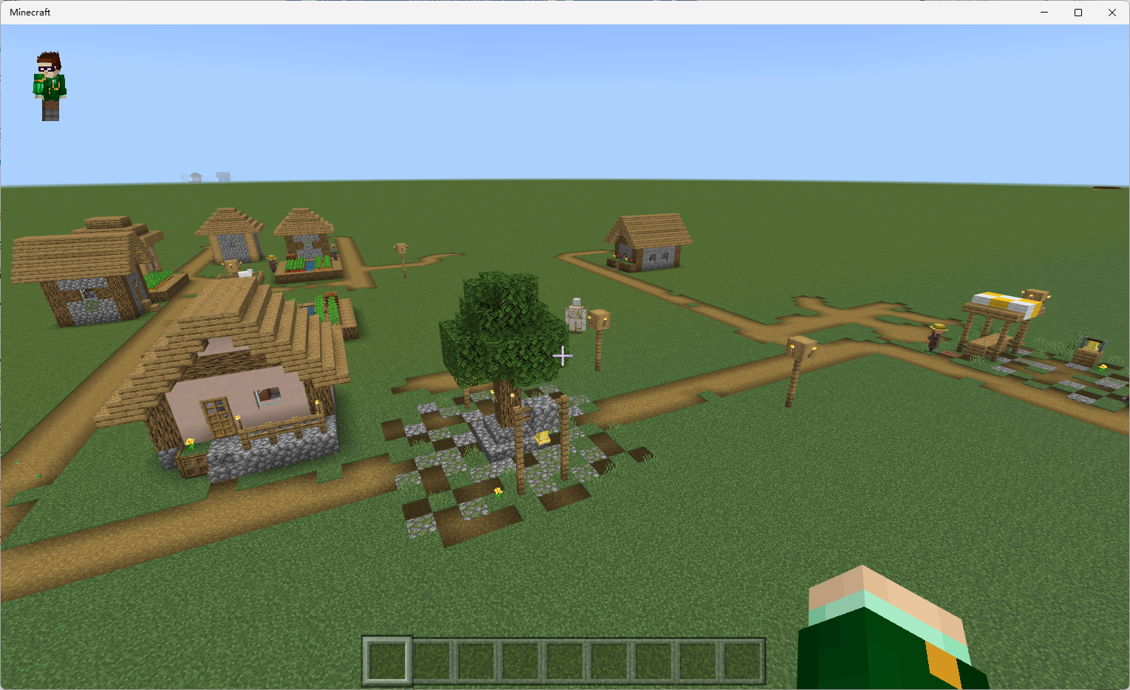
本次教程中,你可以看到使用的种子是原本的
所以有好学的同学问了:我能使用不同的种子吗?
答:可以是可以,但没有效果
无论你本在示例中参数是种子的任意设置,也不会影响,因为判断村庄区块的方法里是使用原来的种子
不建议你不看以上教程就下载示例文件,先跟教程走一遍再下载
This example guides you through creating a vanilla village in a superflat dimension from scratch, showcasing the infinite possibilities of multiple dimensions.
This tutorial covers the following topics:
- C++ Polymorphism
Therefore, this tutorial assumes you are familiar with C++ polymorphism.
Note that building this plugin depends on Levilamina.
Use a version after this commit: aecd4b3.
Ensure you have the following setup:
-
msbuild(v143)or MS Studio with C++ desktop development installed - A file editor you are comfortable with; this tutorial uses
vscode -
Git(recommended to install the corresponding plugin in vscode) -
xmake(install the corresponding plugin in vscode, search by the same name) -
clangd(install the corresponding plugin in vscode, search by the same name) - A BDS with Levilamina installed
This tutorial uses xmake to build the project.
First, clone the plugin template. In any folder, use the following command to clone the plugin template locally:
git clone --depth 1 https://github.com/LiteLDev/levilamina-plugin-template.gitAfter executing the command successfully, you will see the levilamina-plugin-template folder in the directory where you executed the clone command.
(Optional) Rename levilamina-plugin-template to flat-gen-village for easier identification.
Enter the flat-gen-village folder.
Right-click on a blank space and select Open with Code to open this folder in VS Code.
Note: For all paths mentioned below, unless specified otherwise, the starting directory is the plugin root directory.
- First, rename the
change_thisfolder undersrctoflat-gen-village. - Then, rename the two files under
src/flat-gen-villageto:Entry.handEntry.cpp. - Change the namespace inside
Entry.handEntry.cpptoflat_gen_village.
The result should look like this:

Since this plugin depends on more-dimensions, we need to configure the dependencies to ensure our plugin loads after more-dimensions.
In the plugin's root directory, you will find a manifest.json file with initial content similar to:
{
    "name": "${pluginName}",
    "entry": "${pluginFile}",
    "type": "native"
}
Change it to:
{
    "name": "${pluginName}",
    "entry": "${pluginFile}",
    "type": "native",
    "dependencies": [
        {
            "name": "more-dimensions"
        }
    ]
}
Besides dependencies, you can also optionally configure description, author, and version.
If you haven’t installed the xmake plugin in VS Code, please do so first.
Click on the xmake.lua file in the file list to open its content, and add the more-dimensions dependency:
add_requires("more-dimensions") -- add_requires("more-dimensions x.x.x") if using a specific versionHere, we use the latest version without specifying the version number. Then change:
target("change-this") to:
target("FlatGenVillage") Under the target section, add:
add_packages("more-dimensions")After completing the changes, it should look like this:

Then use the following command to build and download dependencies for the first time. This might take a long time, so you can execute it and continue with the tutorial while it runs in the background:
xmakeCreate five files as follows:
src/flat-gen-village/FlatGenVillage.cpp
src/flat-gen-village/generator/FlatVillageGenerator.h
src/flat-gen-village/generator/FlatVillageGenerator.cpp
src/flat-gen-village/dimension/FlatVillageDimension.h
src/flat-gen-village/dimension/FlatVillageDimension.cpp
In the original version, there is no dimension class similar to FlatDimension, and the super flat world is created by making judgments within the main world dimension class. Therefore, we need to create a new dimension class.
Here we name it FlatVillageDimension. Now, we will create such a dimension class using polymorphism.
First, in the file src/flat-gen-village/dimension/FlatVillageDimension.h, input the following content:
#pragma once

#include "mc/world/level/dimension/Dimension.h" // The class that the new dimension class needs to inherit from
#include "more_dimensions/api/dimension/CustomDimensionManager.h" // Declaration of DimensionFactoryInfo

// It is recommended to add a namespace to avoid name conflicts with other plugins
namespace flat_village_dimension {

class FlatVillageDimension :public Dimension {
public:
    // It is recommended to write like this, DimensionFactoryInfo class provides basic data for Dimension instantiation, name is the dimension name, multi-dimensions distinguish different dimensions by name
    FlatVillageDimension(std::string const& name, ll::dimension::DimensionFactoryInfo const& info);

    // A method needed for multi-dimensions, the parameter is the data you need to process, such as seeds, but it's not needed here, reasons will be explained later
    static CompoundTag generateNewData();

    // The following six functions must be overridden
    // The generator for the dimension terrain, which is the main change in this tutorial
    std::unique_ptr<WorldGenerator> createGenerator(br::worldgen::StructureSetRegistry const&) override;

    // Unrelated to this tutorial, just write it as per the tutorial, no need to pay attention
    void upgradeLevelChunk(ChunkSource& chunkSource, LevelChunk& oldLc, LevelChunk& newLc) override;

    // Unrelated to this tutorial, just write it as per the tutorial, no need to pay attention
    void fixWallChunk(ChunkSource& cs, LevelChunk& lc) override;

    // Unrelated to this tutorial, just write it as per the tutorial, no need to pay attention
    bool levelChunkNeedsUpgrade(LevelChunk const& lc) const override;

    // Unrelated to this tutorial, just write it as per the tutorial, no need to pay attention
    void _upgradeOldLimboEntity(CompoundTag& tag, ::LimboEntitiesVersion vers) override;

    // Unrelated to this tutorial, just write it as per the tutorial, no need to pay attention
    std::unique_ptr<ChunkSource>
    _wrapStorageForVersionCompatibility(std::unique_ptr<ChunkSource> cs, ::StorageVersion ver) override;

    // How to convert coordinates when you switch to this dimension, for example, between the overworld and the nether
    Vec3 translatePosAcrossDimension(Vec3 const& pos, DimensionType did) const override;

    // Cloud height, default is y128, but multi-dimension height range is y-64~320, the same as the overworld, so rewrite it and set it higher
    short getCloudHeight() const override;

    // Optional. Change in visibility range when it rains
    bool hasPrecipitationFog() const override;

};

}
Next is the implementation in src/flat-gen-village/dimension/FlatVillageDimension.cpp
#include "FlatVillageDimension.h"

#include "mc/world/level/BlockSource.h"
#include "mc/world/level/DimensionConversionData.h"
#include "mc/world/level/Level.h"
#include "mc/world/level/chunk/ChunkGeneratorStructureState.h"
#include "mc/world/level/chunk/VanillaLevelChunkUpgrade.h"
#include "mc/world/level/dimension/DimensionBrightnessRamp.h"
#include "mc/world/level/dimension/OverworldBrightnessRamp.h"
#include "mc/world/level/dimension/VanillaDimensions.h"
#include "mc/world/level/levelgen/flat/FlatWorldGenerator.h"
#include "mc/world/level/levelgen/structure/StructureFeatureRegistry.h"

namespace flat_village_dimension {

FlatVillageDimension::FlatVillageDimension(std::string const& name, ll::dimension::DimensionFactoryInfo const& info)
: Dimension(info.level, info.dimId, {-64, 320}, info.scheduler, name) {
    // Note here that in DimensionFactoryInfo, more-dimensions will provide the dimension ID, do not use a fixed dimension ID to avoid ID conflicts that cause dimension registration to fail
    mDefaultBrightness.sky   = Brightness::MAX;
    mSeaLevel                = -61;
    mHasWeather              = true;
    mDimensionBrightnessRamp = std::make_unique<OverworldBrightnessRamp>();
    mDimensionBrightnessRamp->buildBrightnessRamp();
}

CompoundTag FlatVillageDimension::generateNewData() { return {}; }

std::unique_ptr<WorldGenerator> FlatVillageDimension::createGenerator(br::worldgen::StructureSetRegistry const&) {
    // This tutorial only involves changes to the generator, so other parts are not detailed
    // For now, handle it this way since we haven't written the generator yet, use the original super flat generator
    std::unique_ptr<WorldGenerator> worldGenerator;
    auto                            seed      = getLevel().getSeed();
    auto&                           levelData = getLevel().getLevelData();

    // Instantiate a FlatWorldGenerator class
    worldGenerator = std::make_unique<FlatWorldGenerator>(*this, seed, levelData.getFlatWorldGeneratorOptions());
    // This is necessary, some structure generation related
    worldGenerator->getStructureFeatureRegistry().mChunkGeneratorStructureState =
        br::worldgen::ChunkGeneratorStructureState::createFlat(seed, worldGenerator->getBiomeSource(), {});

    // Must call, initialize the generator
    worldGenerator->init();
    return std::move(worldGenerator);
}

void FlatVillageDimension::upgradeLevelChunk(ChunkSource& cs, LevelChunk& lc, LevelChunk& generatedChunk) {
    auto blockSource = BlockSource(getLevel(), *this, cs, false, true, false);
    VanillaLevelChunkUpgrade::_upgradeLevelChunkViaMetaData(lc, generatedChunk, blockSource);
    VanillaLevelChunkUpgrade::_upgradeLevelChunkLegacy(lc, blockSource);
}

void FlatVillageDimension::fixWallChunk(ChunkSource& cs, LevelChunk& lc) {
    auto blockSource = BlockSource(getLevel(), *this, cs, false, true, false);
    VanillaLevelChunkUpgrade::fixWallChunk(lc, blockSource);
}

bool FlatVillageDimension::levelChunkNeedsUpgrade(LevelChunk const& lc) const {
    return VanillaLevelChunkUpgrade::levelChunkNeedsUpgrade(lc);
}
void FlatVillageDimension::_upgradeOldLimboEntity(CompoundTag& tag, ::LimboEntitiesVersion vers) {
    auto isTemplate = getLevel().getLevelData().isFromWorldTemplate();
    return VanillaLevelChunkUpgrade::upgradeOldLimboEntity(tag, vers, isTemplate);
}

std::unique_ptr<ChunkSource>
FlatVillageDimension::_wrapStorageForVersionCompatibility(std::unique_ptr<ChunkSource> cs, ::StorageVersion /*ver*/) {
    return cs;
}

Vec3 FlatVillageDimension::translatePosAcrossDimension(Vec3 const& fromPos, DimensionType fromId) const {
    Vec3 topos;
    VanillaDimensions::convertPointBetweenDimensions(
        fromPos,
        topos,
        fromId,
        mId,
        getLevel().getDimensionConversionData()
    );
    constexpr auto clampVal = 32000000.0f - 128.0f;

    topos.x = std::clamp(topos.x, -clampVal, clampVal);
    topos.z = std::clamp(topos.z, -clampVal, clampVal);

    return topos;
}

short FlatVillageDimension::getCloudHeight() const { return 192; }

bool FlatVillageDimension::hasPrecipitationFog() const { return true; }

} // namespace flat_village_dimensionThis tutorial registers the dimension during the server start event. We'll write this part in src/flat-gen-village/FlatGenVillage.cpp. Remember, try to avoid writing implementations in the header file .h, so this is in .cpp.
#include "ll/api/event/EventBus.h"
#include "ll/api/event/server/ServerStartedEvent.h"
#include "flat-gen-village/dimension/FlatVillageDimension.h"

static bool reg = [] {
    using namespace ll::event;
    // ll server start event
    EventBus::getInstance().emplaceListener<ServerStartedEvent>([](ServerStartedEvent&) {
        // more-dimensions API for registering the dimension
        ll::dimension::CustomDimensionManager::getInstance().addDimension<flat_village_dimension::FlatVillageDimension>(
            "flatVillageDimension"
        );
    });
    return true;
}();
Here's an explanation of the more-dimensions API for registering a dimension. The prototype of this addDimension function is actually as follows:
template <std::derived_from<Dimension> D, class... Args>
DimensionType addDimension(std::string const& dimName, Args&&... args);
You can see it is a template function. The function's parameters are the instantiation parameters of the custom dimension class, and this class must have Dimension as a parent class.
Our created FlatVillageDimension is indeed inherited from Dimension. Of course, if you want to modify the vanilla Nether, you can directly inherit NetherDimension and write a new class.
The return value of this function is a DimensionType. If the dimension is successfully created, it will return the ID of this dimension.
After writing the three sections above, the steps to create a new dimension are complete. Now we can put it into the BDS with levilamina for testing.
Execute the following command to build the plugin:
xmakeIf everything goes well, there will be a bin folder in the root directory of the plugin. Inside it, there will be a FlatGenVillage folder, which is the packaged plugin.
Simply copy the FlatGenVillage folder and place it into the BDS_directory/plugins folder. Also, remember to place the more-dimensions plugin into it as well.

This tutorial uses BDS version 1.20.61 as an example. Higher versions should work similarly.
Next, start the BDS. For information on installing levilamina, please refer to levilamina installation.
After starting BDS, if you have enabled debug-level logs, you will see similar information to the following:

This indicates that the dimension has been successfully registered.
Additionally, a JSON file recording the dimension information will be generated in the save directory:

Do not modify this file manually as it could lead to data loss in the save file.
After entering the game, you can directly use the tp command to teleport to the custom dimension. The command to teleport to the dimension written in this tutorial is as follows:
tp ~ -61 ~ flat_village_dimension
If everything goes well, you should be able to successfully teleport to the dimension mentioned above.
Previously, we successfully created a superflat dimension. Next, we will add the natural generation of villages to this dimension.
Open the file src/flat-gen-village/generator/FlatVillageGenerator.h and fill in the following content:
#pragma once

#include "mc/deps/core/data/DividedPos2d.h"
#include "mc/deps/core/utility/buffer_span.h"
#include "mc/util/Random.h"
#include "mc/world/level/block/BlockVolume.h"
#include "mc/world/level/levelgen/flat/FlatWorldGenerator.h"

#include <vector>

class ChunkViewSource;
class LevelChunk;
class ChunkPos;

// It is still recommended to add a namespace to avoid conflicts
namespace flat_village_generator {

// Inheriting from the original FlatWorldGenerator class will make it much more convenient
class FlatVillageGenerator : public FlatWorldGenerator {
public:
    Random random; // This class is related to BDS random number generation

    // Although we don't use generationOptionsJSON, it's needed for the instantiation of FlatWorldGenerator
    FlatVillageGenerator(Dimension& dimension, uint seed, Json::Value const& generationOptionsJSON);

    // This handles structure placement, including features, structures, and terrain
    bool postProcess(ChunkViewSource& neighborhood);

    // This handles initial block generation in new chunks, such as large quantities of blocks (stone, dirt)
    void loadChunk(LevelChunk& levelchunk, bool forceImmediateReplacementDataLoad);

    // Determine which structure feature type is at a given point
    StructureFeatureType findStructureFeatureTypeAt(BlockPos const&);

    // Determine if a given point is within a specific structure feature type
    bool isStructureFeatureTypeAt(BlockPos const&, ::StructureFeatureType) const;

    // Get the highest block at a given coordinate
    std::optional<short> getPreliminarySurfaceLevel(DividedPos2d<4> worldPos) const;

    // Optional, find a specific type of structure within a certain range from a given coordinate
    bool findNearestStructureFeature(::StructureFeatureType, BlockPos const&, BlockPos&, bool, std::optional<HashedString>);

    // No need to worry about this, just write it as is
    void garbageCollectBlueprints(buffer_span<ChunkPos>);

    // Handle terrain
    void prepareHeights(BlockVolume& box, ChunkPos const& chunkPos, bool factorInBeardsAndShavers);

    // Similar to prepareHeights, but also computes heights within a chunk
    void prepareAndComputeHeights(
        BlockVolume&        box,
        ChunkPos const&     chunkPos,
        std::vector<short>& ZXheights,
        bool                factorInBeardsAndShavers,
        int                 skipTopN
    );

    // Optional, can be omitted
    BlockPos findSpawnPosition() const { return {0, 16, 0}; };
};

} // namespace flat_village_generator
Next is the implementation. Open the file src/flat-gen-village/generator/FlatVillageGenerator.cpp and fill in the following content:
#include "FlatVillageGenerator.h"

#include "mc/deps/core/data/DividedPos2d.h"
#include "mc/world/level/BlockSource.h"
#include "mc/world/level/Level.h"
#include "mc/world/level/biome/VanillaBiomeNames.h"
#include "mc/world/level/biome/registry/BiomeRegistry.h"
#include "mc/world/level/chunk/ChunkViewSource.h"
#include "mc/world/level/chunk/LevelChunk.h"
#include "mc/world/level/chunk/PostprocessingManager.h"
#include "mc/world/level/levelgen/v1/ChunkLocalNoiseCache.h"

namespace flat_village_generator {

FlatVillageGenerator::FlatVillageGenerator(Dimension& dimension, uint seed, Json::Value const& generationOptionsJSON)
: FlatWorldGenerator(dimension, seed, generationOptionsJSON) {
    // Note that we are inheriting from FlatWorldGenerator, and will use its internal members, so we need to call its constructor
    random.mRandom.mObject._setSeed(seed);

    mBiome       = getLevel().getBiomeRegistry().lookupByHash(VanillaBiomeNames::Plains);
    mBiomeSource = std::make_unique<FixedBiomeSource>(*mBiome);
}

bool FlatVillageGenerator::postProcess(ChunkViewSource& neighborhood) {
    ChunkPos chunkPos;
    chunkPos.x      = neighborhood.getArea().mBounds.min.x;
    chunkPos.z      = neighborhood.getArea().mBounds.min.z;
    auto levelChunk = neighborhood.getExistingChunk(chunkPos);
    auto seed = getLevel().getSeed();

    // Necessary to lock the chunk
    auto lockChunk =
        levelChunk->getDimension().mPostProcessingManager->tryLock(levelChunk->getPosition(), neighborhood);

    if (!lockChunk) {
        return false;
    }
    BlockSource blockSource(getLevel(), neighborhood.getDimension(), neighborhood, false, true, true);
    auto        chunkPosL = levelChunk->getPosition();
    random.mRandom.mObject._setSeed(seed);
    auto one = 2 * (random.nextInt() / 2) + 1;
    auto two = 2 * (random.nextInt() / 2) + 1;
    random.mRandom.mObject._setSeed(seed ^ (chunkPosL.x * one + chunkPosL.z * two));

    // Place structures, if the chunk contains a structure, it will place the structures prepared in loadChunk
    WorldGenerator::postProcessStructureFeatures(blockSource, random, chunkPosL.x, chunkPosL.z);
    // Process other individual structures, such as shipwrecks, this is not mandatory
    WorldGenerator::postProcessStructures(blockSource, random, chunkPosL.x, chunkPosL.z);
    return true;
}

void FlatVillageGenerator::loadChunk(LevelChunk& levelchunk, bool forceImmediateReplacementDataLoad) {
    auto chunkPos = levelchunk.getPosition();

    auto            blockPos = BlockPos(chunkPos, 0);
    DividedPos2d<4> dividedPos2D;
    dividedPos2D.x = (blockPos.x >> 31) - ((blockPos.x >> 31) - blockPos.x) / 4;
    dividedPos2D.z = (blockPos.z >> 31) - ((blockPos.z >> 31) - blockPos.z) / 4;

    // Process other individual structures, such as shipwrecks, this is not mandatory
    WorldGenerator::preProcessStructures(getDimension(), chunkPos, getBiomeSource());
    // Prepare structures for placement, if the chunk contains a structure, it will prepare the structures
    WorldGenerator::prepareStructureFeatureBlueprints(getDimension(), chunkPos, getBiomeSource(), *this);

    // No structures are placed here, only basic terrain
    levelchunk.setBlockVolume(mPrototype, 0);

    levelchunk.recomputeHeightMap(0);
    ChunkLocalNoiseCache chunkLocalNoiseCache(dividedPos2D, 8);
    mBiomeSource->fillBiomes(levelchunk, chunkLocalNoiseCache);
    levelchunk.setSaved();
    levelchunk.changeState(ChunkState::Generating, ChunkState::Generated);
}

std::optional<short> FlatVillageGenerator::getPreliminarySurfaceLevel(DividedPos2d<4> worldPos) const {
    // The height of superflat is always the same, return a fixed value directly
    return -61;
}

void FlatVillageGenerator::prepareAndComputeHeights(
    BlockVolume&        box,
    ChunkPos const&     chunkPos,
    std::vector<short>& ZXheights,
    bool                factorInBeardsAndShavers,
    int                 skipTopN
) {
    auto heightMap = mPrototype.computeHeightMap();
    ZXheights.assign(heightMap->begin(), heightMap->end());
}

void FlatVillageGenerator::prepareHeights(BlockVolume& box, ChunkPos const& chunkPos, bool factorInBeardsAndShavers) {
    // In other world types, the box needs to be processed to generate terrain, but superflat does not need this, so just assign directly
    box = mPrototype;
};

StructureFeatureType FlatVillageGenerator::findStructureFeatureTypeAt(BlockPos const& blockPos) {
    return WorldGenerator::findStructureFeatureTypeAt(blockPos);
};

bool FlatVillageGenerator::isStructureFeatureTypeAt(const BlockPos& blockPos, ::StructureFeatureType type) const {
    return WorldGenerator::isStructureFeatureTypeAt(blockPos, type);
}

bool FlatVillageGenerator::findNearestStructureFeature(
    ::StructureFeatureType      type,
    BlockPos const&             blockPos,
    BlockPos&                   blockPos1,
    bool                        mustBeInNewChunks,
    std::optional<HashedString> hash
) {
    return WorldGenerator::findNearestStructureFeature(type, blockPos, blockPos1, mustBeInNewChunks, hash);
};

void FlatVillageGenerator::garbageCollectBlueprints(buffer_span<ChunkPos> activeChunks) {
    return WorldGenerator::garbageCollectBlueprints(activeChunks);
};

} // namespace flat_village_generatorTo use our generator, we need to modify the createGenerator implementation in our dimension class.
Open src/flat-gen-village/dimension/FlatVillageDimension.cpp
First, import the following header files:
#include "mc/world/level/levelgen/structure/StructureSetRegistry.h"
#include "mc/world/level/levelgen/structure/VillageFeature.h"
#include "mc/world/level/LevelSeed64.h"
Change
std::unique_ptr<World

Generator> FlatVillageDimension::createGenerator(br::worldgen::StructureSetRegistry const&) {
    // This tutorial only involves changes to the generator, so we won't go into detail about other parts
    // For now, handle it this way since we haven't written the generator yet, we'll use the original FlatWorldGenerator
    std::unique_ptr<WorldGenerator> worldGenerator;
    auto                            seed      = getLevel().getSeed();
    auto&                           levelData = getLevel().getLevelData();

    // Instantiate a FlatWorldGenerator class
    worldGenerator = std::make_unique<FlatWorldGenerator>(*this, seed, levelData.getFlatWorldGeneratorOptions());
    // This is necessary for some structure generation
    worldGenerator->getStructureFeatureRegistry().mChunkGeneratorStructureState =
        br::worldgen::ChunkGeneratorStructureState::createFlat(seed, worldGenerator->getBiomeSource(), {});

    // Must call to initialize the generator
    worldGenerator->init();
    return std::move(worldGenerator);
}
to
std::unique_ptr<WorldGenerator>
FlatVillageDimension::createGenerator(br::worldgen::StructureSetRegistry const& structureSetRegistry) {
    std::unique_ptr<WorldGenerator> worldGenerator;
    auto                            seed      = getLevel().getSeed();
    auto&                           levelData = getLevel().getLevelData();

    // Instantiate our written Generator class
    worldGenerator = std::make_unique<flat_village_generator::FlatVillageGenerator>(
        *this,
        seed,
        levelData.getFlatWorldGeneratorOptions()
    );
    // structureSetRegistry contains only the path structure village generation needs, so we'll get it
    std::vector<std::shared_ptr<const br::worldgen::StructureSet>> structureMap;
    for (auto iter = structureSetRegistry.begin(); iter != structureSetRegistry.end(); iter++) {
        structureMap.emplace_back(iter->second);
    }
    worldGenerator->getStructureFeatureRegistry().mChunkGeneratorStructureState.mSeed = seed;
    worldGenerator->getStructureFeatureRegistry().mChunkGeneratorStructureState.mSeed64 =
        LevelSeed64::fromUnsigned32(seed);

    // This is equivalent to registering structures in this generator
    // The second and third parameters of VillageFeature are the maximum and minimum distances between villages
    worldGenerator->getStructureFeatureRegistry().mStructureFeatures.emplace_back(
        std::make_unique<VillageFeature>(seed, 34, 8)
    );
    // This is necessary for some structure generation
    worldGenerator->getStructureFeatureRegistry().mChunkGeneratorStructureState =
        br::worldgen::ChunkGeneratorStructureState::createFlat(seed, worldGenerator->getBiomeSource(), structureMap);

    // Must call to initialize the generator
    worldGenerator->init();
    return std::move(worldGenerator);
}Now that everything is ready, execute xmake to build the plugin. Copy the packaged plugin from the bin/ directory to the plugins/ directory under the BDS root directory to experience it.
After entering the game, if you use the save file from the first time you entered the game, you will be in the registered custom dimension. You can use locate to find a village.
If not, first teleport to the custom dimension. The dimension parameter in the tp command will have dimension completion, then use the locate command:
locate structure village
You can see a chat prompt indicating that a village has been found. The location will vary depending on the seed.

Then teleport there, and you will see a naturally generated village.

In this tutorial, you can see that the seed used is the original one.
So some keen learners may ask: "Can I use a different seed?"
Answer: "Yes, you can, but it will have no effect."
No matter what seed you set in the example parameters, it will not affect the result, because the method of determining village chunks uses the original seed.
It is not recommended to download the example files without following the above tutorial. Go through the tutorial first and then download.