这是用Python+xcodebuild写的脚本打包工具,支持上传fir与蒲公英上传,打包完成后多邮件发送
- Xcode8.3+
- ruby 2.3.0(需要上传到fir-cli的ruby最低版本,如果不需要上传,使用默认的就好)
- rvm 1.29.1+
- 项目使用CocoaPods生成
-
如果Xcode版本是8.3~9.0之间,需要在终端看到下ruby的版本,命令为:
ruby -v,如果大于2.0.0,需要在终端中运行命令rvm use system(如果没有安装rvm点这里) -
如果要用到fir上传,要先安装fir-cli,并且使用fir login + token命令登录(具体用法可以在下载地址查看)
-
打开conf.ini,设置里面的证书名、描述文件、项目路径等。
-
打开终端,运行命令 python 路径+AutoBuild.py(如果下面的参数automatic为False则去Xcode里把打勾的automatically manage signing去掉,还有Signing里的证书与配置文件的设置都要去掉,比如:Code Signing identity与Provisioning Profile等等)
-
iPhone Developer: [email protected] (LJV3E98B44)就是了
-
还可以右键-->显示简介,常用名称就是了
-
描述文件

终端输入
security cms -D -i
从开发者中心下载的描述文件的绝对路径/Users/xxx/Documents/xxx.mobileprovision| grep -1 'UUID' | grep 'string'
如下图:

~/Library/MobileDevice/Provisioning Profiles 这是描述文件的路径
- 可以看到描述文件,如果你有多个项目建议你先copy一份放桌面,然后删除全部文件,在安装你从开发者中心下载的描述文件,这时,你在这个文件里就能看到描述文件名字了
# workspace的名字(这个是工作空间,使用CocoaPods生成的,一般是与工程名字一样,以xcworkspace为后缀名)
Workspace_Name = XL

# 配置环境,Release或者Debug,默认Release
Configuration = Release

# 是否需要发邮件,邮件配置在下面修改,False或者True,默认False
needSendMail = False

# 是否自动创建plist文件,False或者True,默认True,如果设置为False则使用参数PlistPath的配置文件
needCreatePlist = True

# 项目根目录(比如你的项目CocoaPods文件在/Users/AG/Documents/ios/XXXXXX/XL.xcworkspace)
project_path = /Users/AG/Documents/ios/XXXXXX

# 打包后ipa存储目录
targerIPA_path = /Users/AG/Documents/ipa

# 配置文件名(比如配置文件为:AdHoc.mobileprovision)
provisioningProfiles = AdHoc
添加下列参数:
[AppStore]
# 登录Application Loader的用户名
loaderUserNmae = [email protected]
# 登录Application Loader的App专用密码(App专用密码不是账号密码,登录https://appleid.apple.com/zh_CN 查看App专用密码)
loaderPassword = xxxx-xxxx-xxxx-xxxx
删除参数 isDev

参数Project_Name 修改为ProjectName 为每个Target名字

添加下列参数:

#是否需要自定义上传(修改CustomUpload.sh),False或者True,默认False
uploadCustom = False

[InfoPlist]
#是否为启用compileBitcode编译,False或者True,默认False
enableCompileBitcode = True
#是否为compileBitcode编译,False或者True,默认False
compileBitcode = False
特别说下 CustomUpload.sh 是自己实现的上传方式 里面的脚本是博主本地服务器的API 可以根据自己的需要修改
#是否打包测试环境,False或者True,默认False
isDev = False
#是否为Xcode自动管理证书,False或者True,默认False(如果要设置为True记得把Xcode里的automatically manage signing选项打勾)
automatic = False
#是否需要上传ipa到fir,False或者True,默认False
uploadFir = False
#是否需要上传ipa到PGYer,False或者True,默认False
uploadPGYer = False

# teamID
teamID = GSDFGDG
# info.plist文件的位置
plist_path = /Users/AG/Documents/ios/XXXXXX/SupportingFiles
# 蒲公英APIKey
APIKey = xxxxxxxxxxxxxxxxx
# FIRToken
FIRToken = xxxxxxxxxxxxxxxxx
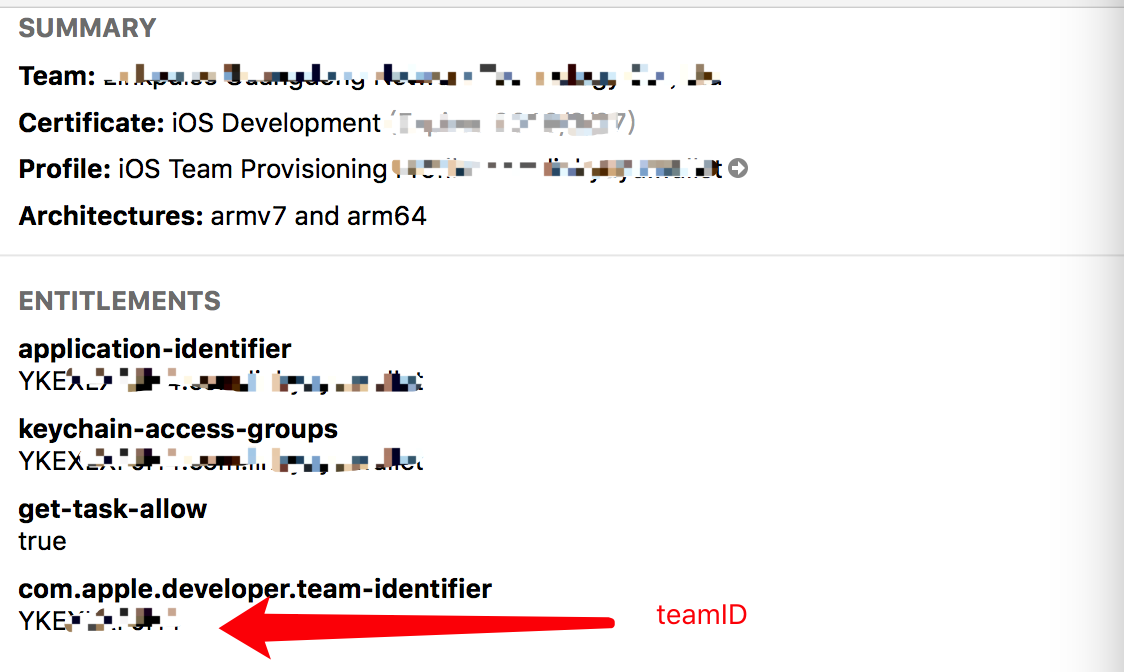
在用Xcode导出�包时�,可以找到teamID,注意是Xcode的automatically manage signing管理打出来的测试包,如下图:
- 特别说明下qq的授权码以及开启SMTP服务点这里
# 发送的邮箱账号
from_addr = [email protected]

# 发送的邮箱授权码或者密码(一些邮箱登录比如 QQ 邮箱需要 SSL 认证)
password = wsfqivulmhxjbgdc

# 是否需要 SSL 认证(QQ,163等邮箱需要 SSL 认证)
smtp_SSL = True

# SMTP 服务器地址
smtp_server = smtp.qq.com

# SMTP 服务器端口(如果smtp_SSL=True可不管,qq的是465或者587,之前为25)
smtp_port = 25

# 收件人地址,有多个要用逗号隔开
to_addrs = [email protected],[email protected]

# 发送内容(可不填)
text = 哈哈
-
error: exportArchive: No applicable devices found.如果报错提示是这个,要在终端输入 rvm use system
-
Provisioning profile "描述文件" doesn't include signing certificate "证书".Code signing is required for product type 'Application' in SDK 'iOS 10.3' 这个错误就是你的描述文件与证书不一致造成的,正确配置好就行了。
-
smtplib.SMTPAuthenticationError: (526, 'Authentication failure[0]')这个错误可能是密码、SMTP服务器地址、邮箱账号(有些邮箱是只写@前面的账号就行了,但大多数都要写全,比如:[email protected])填写错误引起的 -
Add a profile to the "provisioningProfiles" dictionary in your Export Options property list.这是没有找到配置文件问题,如果配置文件里的needCreatePlist设置为False,就把配置文件里的每个PlistPath路径设置正确。2.needCreatePlist设置为True。