Writing a PhD thesis is convenient in scrivener (not to mention fun), but it is hard to format it later. Latex is perfect to beautify the thesis, but hard to write a thesis in without getting caught up in formating. I came up with workflow while working on my thesis to get the best of both worlds. Enjoy!
- Install python 3 (figure out for your specific operating system).
- Install latex (texlive-latex-extra, texlive-extra-utils, texlive-science, and texlive-luatex).
- Ensure pdfcrop is installed for your specific operating system (generally automatically installed in ubuntu and MacOSx if the above latex packages are installed).
- Install pandoc (https://pandoc.org/installing.html; atleast 2.6).
- Download this repository (
git clone [email protected]:AbstractGeek/scrivener-latex.git). - Travel to this repository via commandline.
- Run
./scrivener_mmd_compile.py my-thesis.mmd - The pdf should be generated without any errors.
Here is how you set up scrivener when you begin you thesis (check the thesis-example.scriv for more details).
-
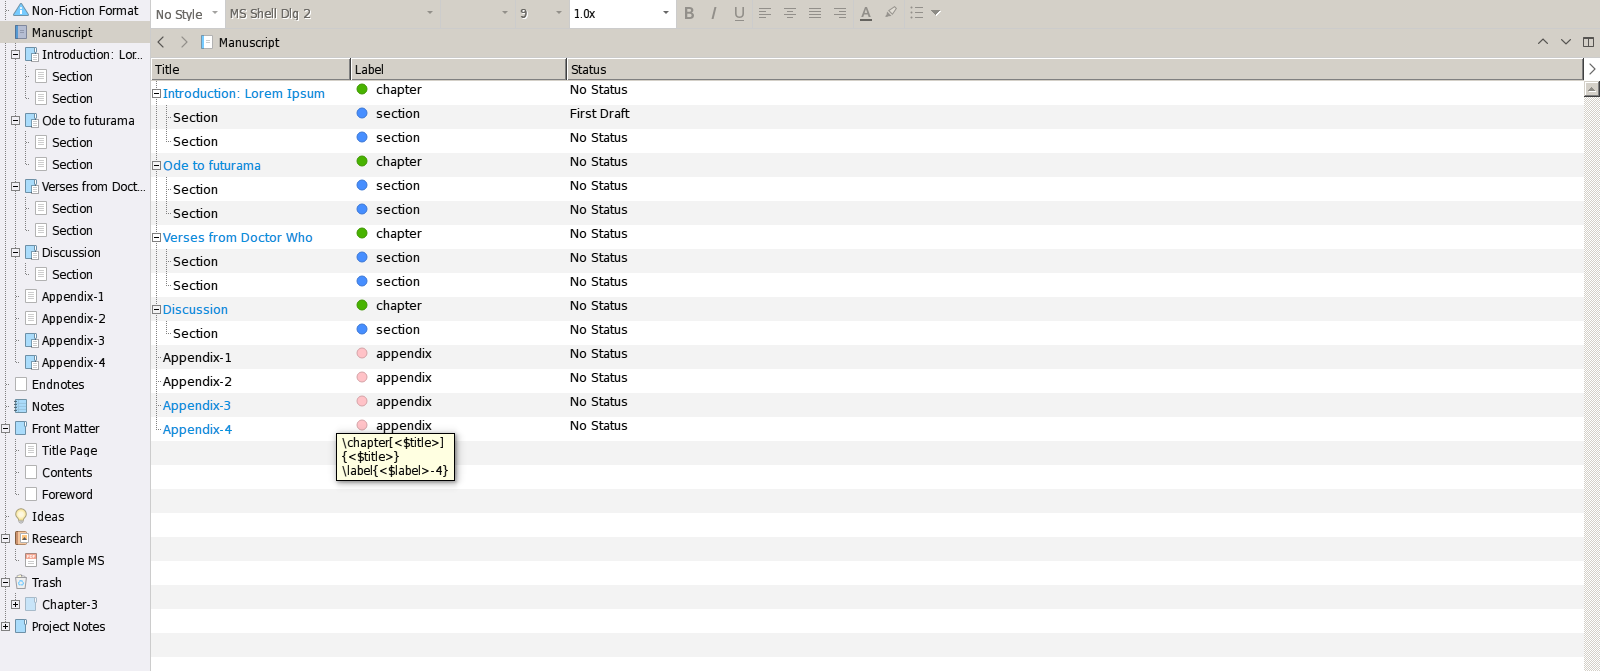
Create chapters as folders and the sections as text inside the folders. Note: names of the folders/text becomes the chapter/section title respectively (see below image).
-
Edit (and create) label names and assign to chapters, sections and appendices. Note: this is used to automatically assign chapter, section and appendix while generating latex code. The spellings should therefore match exactly (including lowercase; see below image).
- Add
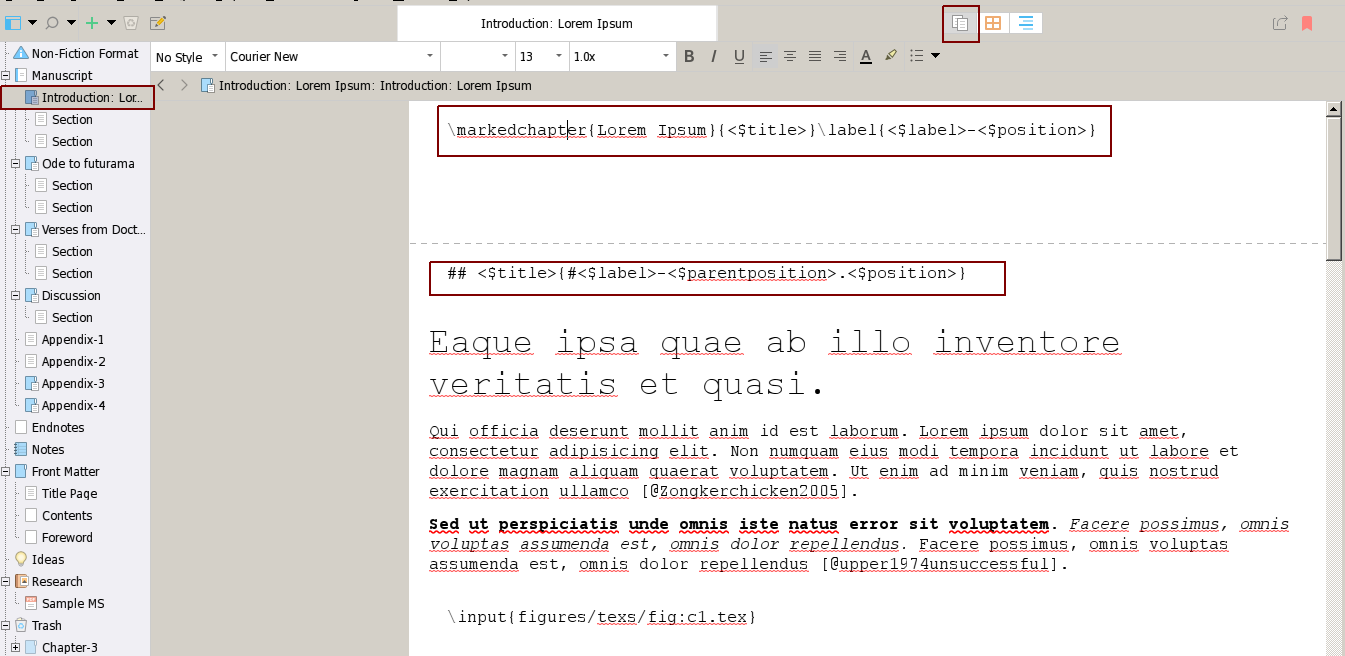
\markedchapter{short title}{<$title>}\label{<$label>-<$position>}to the start of the folder text (press the scrivenings view to add it to the folder). The first argument of the /markedchapter is a short title for the chapter that will be used for headers in the thesis. Similarly, add this## <$title>{#<$label>-<$parentposition>.<$position>}to the start of the text inside the folders (which becomes sections later; see image below). Both these additions is used the latex generation later, and creates easy labels for referencing chapters and sections inside text. For example chapter 1 can be referred by\ref{chapter-1}and section 1.1 can be referred by\ref{section-1.1}.
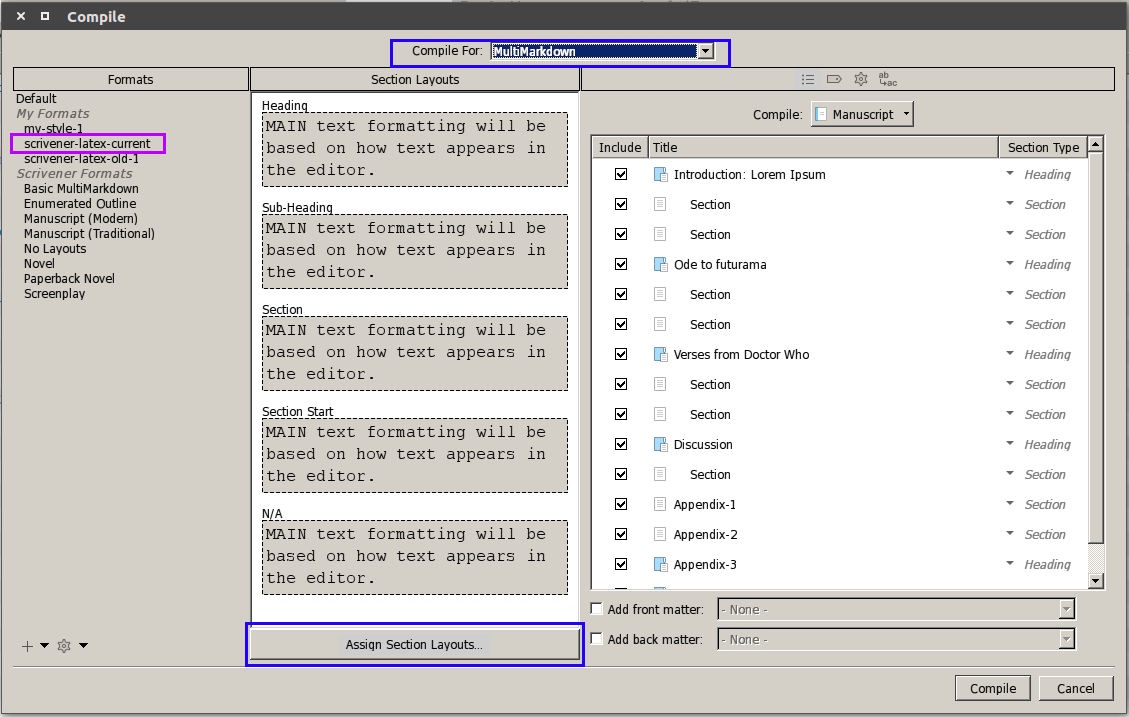
- Use the scrivener-latex.scrformat in scrivener-customization to compile. Import it, compile for mmd, and assign section headers as "MAIN text formatting ..." (see figure below). Compile to generate mmds that can be used convert to latex and pdf files.
- For chapter titles - name the folder (with the short title in the
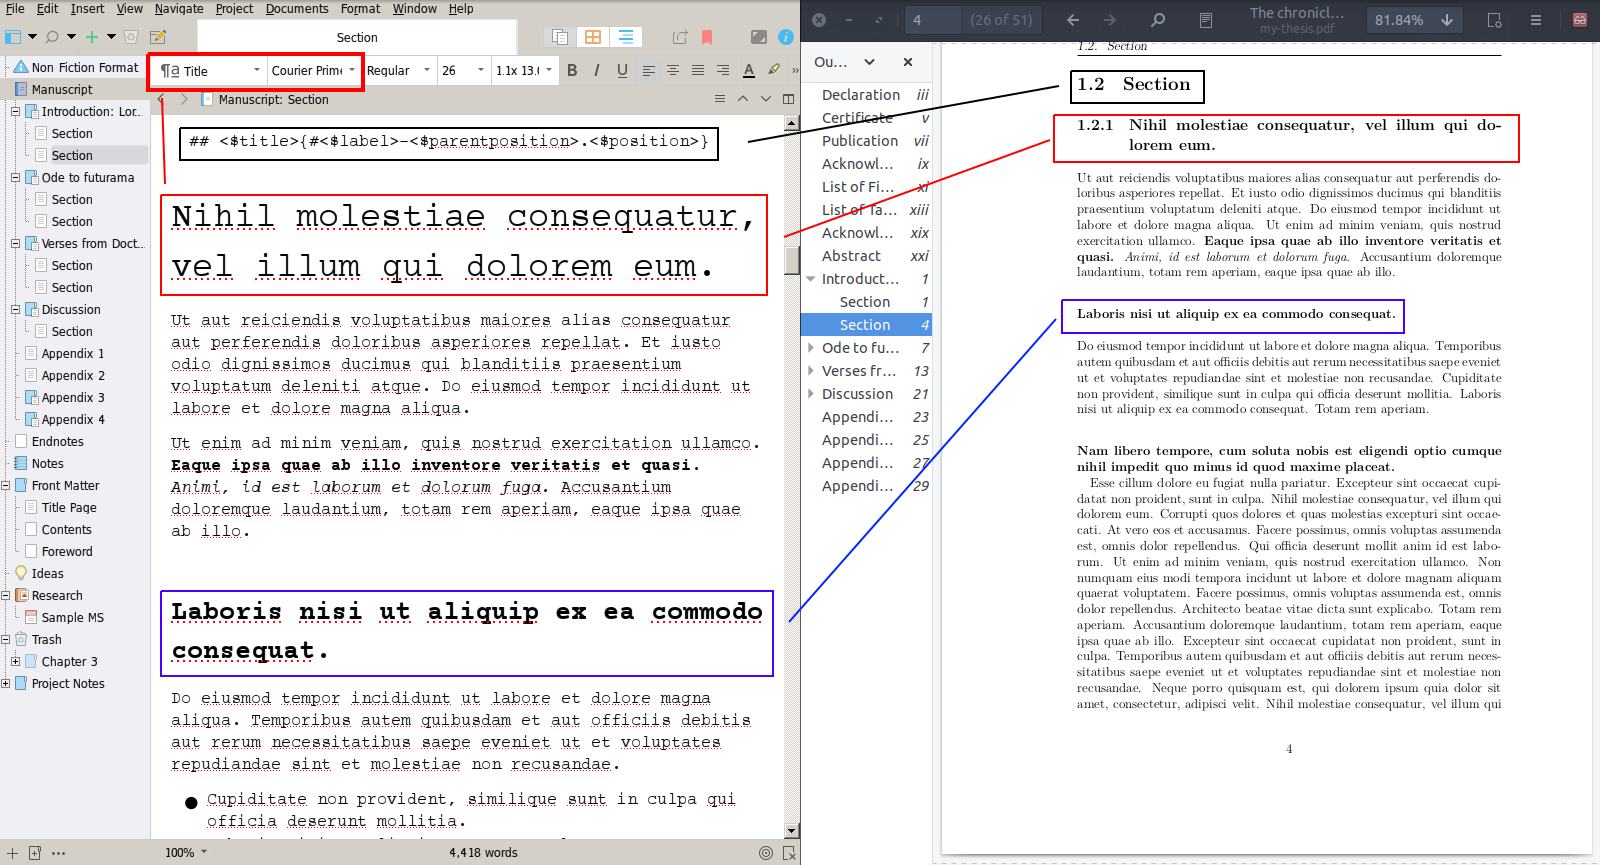
\markedchapter). Section titles are simply the title of the text file in the folder. To assign subsections and subheadings first change the font to Courier Prime. Subsections are Title inside the text. Subsubsections are heading 1, then heading 2. Use them wisely. Also note that for proper conversion into titles subtitles etc, the text should be spaced by spaces with the 'no style' style (annoying, i know). Easiest is to set everything to no style, type everything and made titles, headings etc in the end; that way all the enters and spaces are by default in 'no style'.
This is the slightly tricky part of the thesis. Adding figures and referring them follows three major steps:
-
Location of figures. All figures should be placed in the figures subfolder inside the main folder with the thesis (check the layout of the repository). I prefer making figure as a pdf with a A4 or A5 layout, with appropriate font size. I also prefer naming them with a chapter prefix and the count of the figure in the chapter (e.g. Figure-C1-10 for the 10th figure in the chapter).
-
Latex code for figure size and legends. The description of all the figures in the thesis is stored in
all_figures.tex. The description serves several purposes.
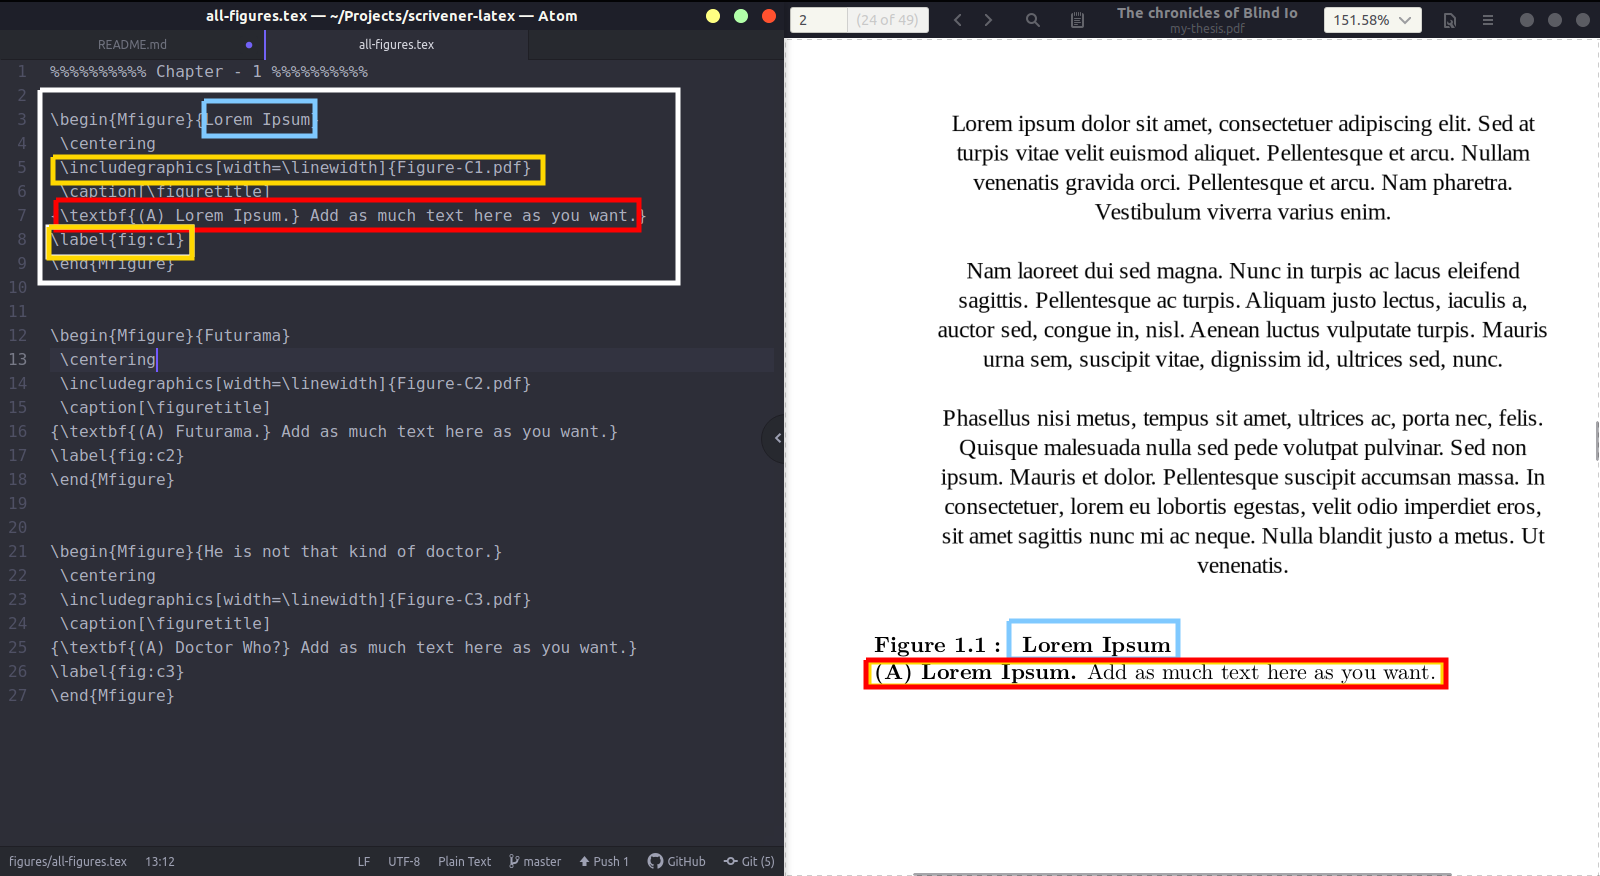
- [white box] A code snippet for description of figures. Copy paste the same one in the template, and modify it as indicated below.
- [blue box] Short title for the figure (also used for figure legends). Add a short title for the current figure here (notice the effect of the code on the pdf).
- [yellow box-long] Code describing the pdf to be displayed, along with its size.
width=\linewidthimplies latex will scale the width of the figure equal to the linewidth of the pdf. You can control the width of the figure as half of the linewidth by usingwidth=0.5\linewidth. One can thereby control the size of the figure by adding any decimal in front of the linewidth. The name of the figure is given in{Figure-C1.pdf}. Replace it with the name of the figure for the current short title and legend (the figure should be proper placed as described in point 1). - [red box] Figure legend (can be multiline, but has to be inside curly brackets). Additionally,
\textbf{A}allows to bold the text inside the curly brackets after textbf (similary textit makes the text inside italicized). Notice how the code in the template becomes the legend in the pdf. - [yellow box-short] Unique label identifier for every figure. Can be used to refer figures without confusing and also to create links to figures in an electronic pdf. I prefer it to follow similar nomenclature as the figure titles -
\label{fig:c1-03}for the 3rd figure in chapter 1 of the thesis. I prefer usingfig:in the front as it makes it a unique identifier for a figure.
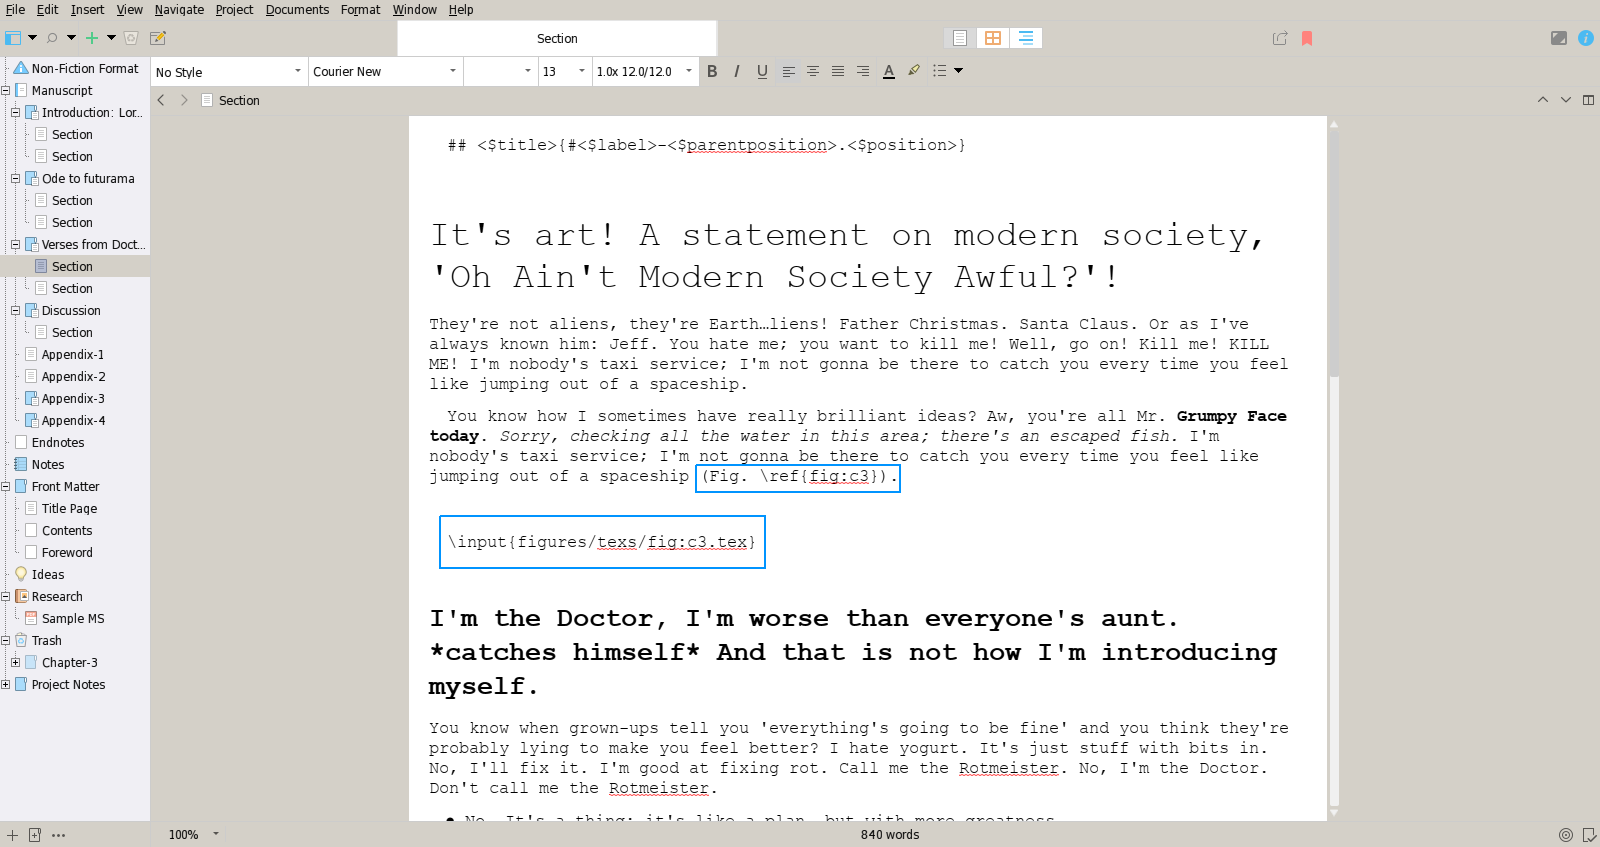
- Figure placement in the thesis. To place the figures in the thesis text simply add the line
\input{figures/texs/fig:c3.tex}between the text where you think it should roughly be placed. The filenamefig:c3.texshould be replaced by the label name + .tex for whichever figure file you want to display (why that particular folder structure will be described below). To cite the figure, use\ref{fig:c3}(or whatever the label name is for the figure). Note that latex will decide where to place the figure based on the where you place the this code line. It won't be exactly where the line is, but somewhere in the vicinity such that the flow of the text and the figure looks beautiful.
The above three steps sets up latex for placing the figures in the right positions, and generating figure legends, list of figures, etc. Here is what the code does: it goes through each of the figures, crops out the white spaces and saves it in \figures\cropped. These cropped figures are used in the thesis, so no need to worry about white spaces :-). Next, it goes through the all-figures.tex and creates individual figure files for every figure code chunk. This is saved in \figures\texs. So every figure gets its own tex file - fig:c2-01.tex for the 1st figure in chapter 2. This is what we call the the step 3, when we decide figure placement. Makes sense?
- Zotero (reference manager used for managing literature) - https://www.zotero.org/
- Better bibtex addon for Zotero - https://github.com/retorquere/zotero-better-bibtex
- xclip/pbcopy (used to copy the reference into keyboard) - install using the os specific package manager
- curl - install using the os specific package manager
- To cite articles run the zotpicknix-pd which is inside scrivener-customization folder (the file is modified from: https://emmareisz.github.io/zotpicknix/)
- Assign a shortcut that runs this file everytime it is pressed (ctrl+alt+z is mine for example).
- Everytime you add a citation, the reference is copied in the clipboard. To cite it in scriver, put it inside square brackets. It automatically separates them by semicolons if multiple references are cited. For example [@rosenbluethRoleModelsScience1945] is the citation of the Rosenblueth and Wiener paper.
- Have fun add citations to your thesis.
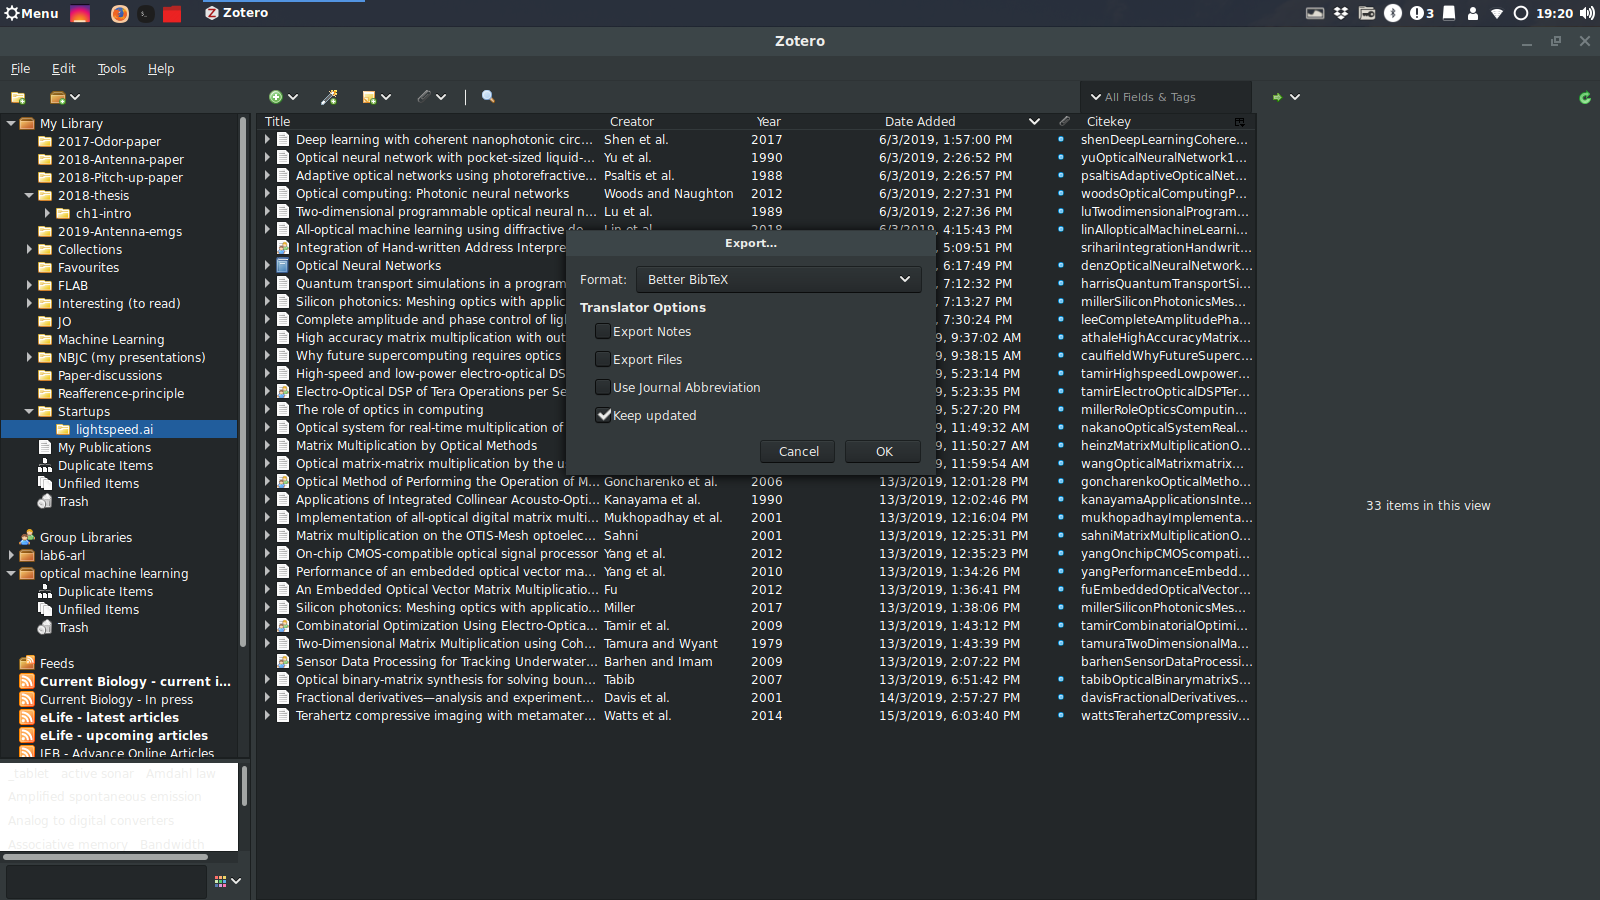
- Export you library as better-bibtex file that can be used to compile your thesis (File -> Export library -> Follow the settings in the image). Best name it literature.bib for easy compatibility with the code (if you use different names, change in the main latex file, described as below).
(to be added)
