-
Notifications
You must be signed in to change notification settings - Fork 0
usage
You can install webpack via npm:
npm install webpack -g
Note: We’re installing webpack globally for demonstration purposes. When you are building a real application, it’s more advisable to install webpack as a
devDependencyof your project.
We can define modules in JavaScript using the CommonJs syntax:
cats.js
var cats = ['dave', 'henry', 'martha'];
module.exports = cats;
app.js (Entry Point)
cats = require('./cats.js');
console.log(cats);
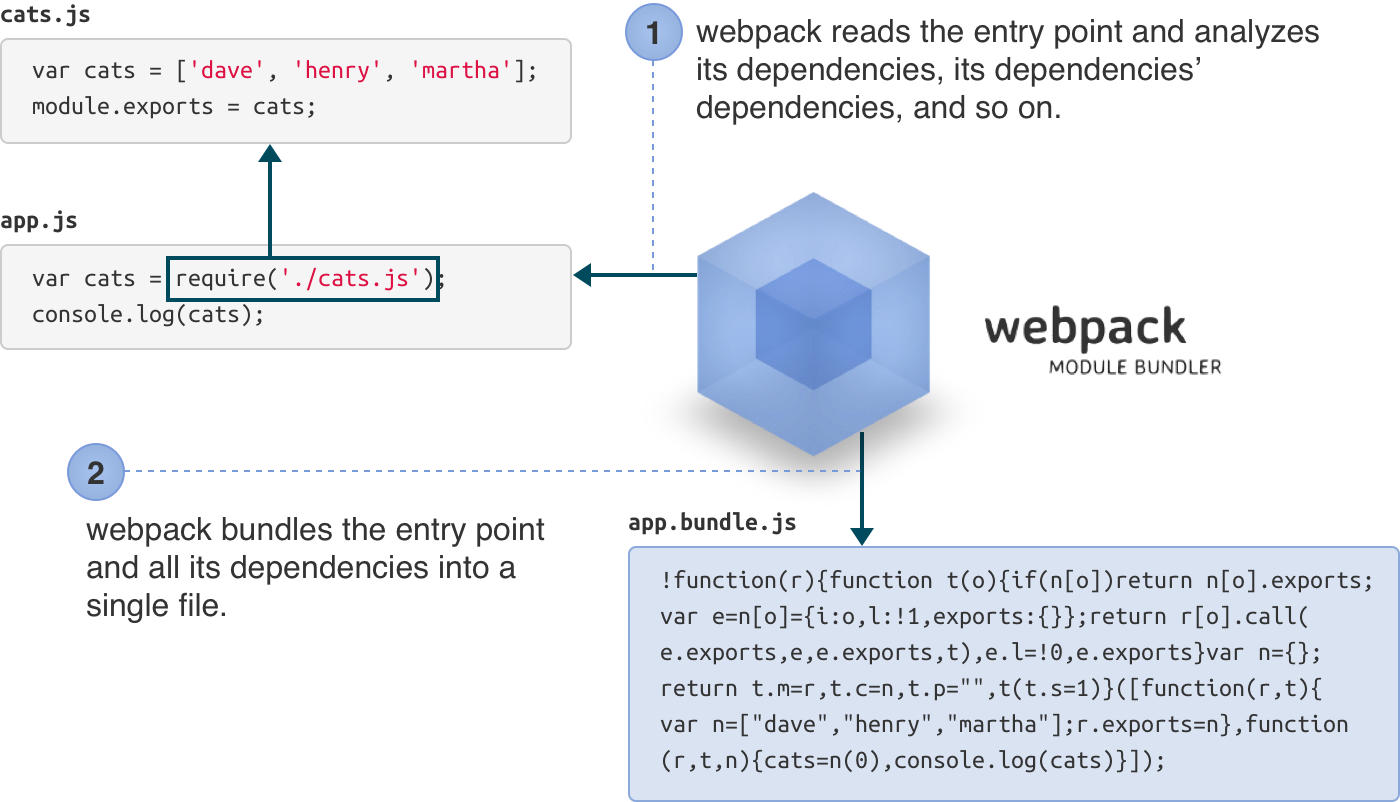
The entry point is where your application will start, and where webpack will start tracking dependencies between modules.
Give webpack the entry point (app.js) and specify an output file (app.bundle.js):
webpack ./app.js app.bundle.js
webpack will read and analyze the entry point and its dependencies (including transitive dependencies), and bundle them all into app.bundle.js.

Now your bundle is ready to be run. Run node app.bundle.js and marvel in your abundance of cats.
node app.bundle.js
["dave", "henry", "martha"]
You can also use the bundle in the browser.
Create an npm project structure. We'll use bin for this quickstart but it could be app, controllers, etc. Move app.js and cats.js to the src directory and intialize the npm project.
mkdir bin
mkdir src
mv *.js src
npm init (answer the questions)
npm i --save-dev webpack (you don't need webpack at runtime so it's a dev dependency)
Create a webpack.config.js file that includes the webpack module and specifies your entry point (now src/app.js):
const webpack = require('webpack');

module.exports = {
	entry: './src/app.js'
}
Note that you don't specify cats.js. Webpack will pick up the dependency for cats from require('cats') in app.js and include it in the bundle automatically. It will do the same for 'required' modules in node_modules as well.
Next, add the target bundle you want webpack to create to the webpack.config.js file:
const webpack = require('webpack');

module.exports = {
	entry: './src/app.js',
	output: {
		path: './bin',
		filename: 'app.bundle.js',
	}
}
Run 'webpack' from the command line (note you'll need the webpack module installed locally and globally). Webpack will build the bundle and save it as bin/app.bundle.js. If you examine webpack's output you'll see that it included ./src/app.js and ./src/cats.js. Run bin/app.bundle.js and you'll get your list of cats again.
webpack
node bin/app.bundle.js
["dave", "henry", "martha"]
Most people will be using a transpiler for ES6, CoffeScript, TypeScript, etc. We're going to tell webpack to run our source files through babel so we can use React and JSX. We'll do this by specifying a loader for JS(X) files. Webpack will use the loader to parse the files before including them in the bundle. To add babel as a loader, you add the the module/loader section to your webpack.config.js file:
const webpack = require('webpack');

module.exports = {
	entry: './src/app.js',
	output: {
		path: './bin',
		filename: 'app.bundle.js',
	},
	module: {
		loaders: [{
			test: /\.jsx?$/,
			exclude: /node_modules/,
			loader: 'babel',
        }]
	}
}
You'll need to include babel-core and babel-loader as dev dependencies (For an actual project you'll need to include the supporting babel plugins as well, like babel-preset-es2015):
npm i --save-dev babel-core babel-loader
There are a number of different loaders you can use to include files in your app bundle, including css and image loaders.
Usually you'll want to do some additional processing of the bundle in your workflow. An example would be minifying your file so that clients can load it faster. This can be done with plugins. We'll add the uglify plugin to our configuration:
const webpack = require('webpack');

module.exports = {
	entry: './src/app.js',
	output: {
		path: './bin',
		filename: 'app.bundle.js',
	},
	module: {
		loaders: [{
			test: /\.jsx?$/,
			exclude: /node_modules/,
			loader: 'babel',
		}]
	},
	plugins: [
		new webpack.optimize.UglifyJsPlugin({
			compress: {
				warnings: false,
			},
			output: {
				comments: false,
			},
		}),
	]
}
The Uglify plugin is included with webpack so you don't need to add additional modules, but this may not always be the case. You can write your own custom plugins. For this build, the uglify plugin cut the bundle size from 1618 bytes to 308 bytes.
Recommended reading: Webpack your bags by Maxime Fabre - a very good introduction on how to setup a real-world project using Webpack.
- see CLI for the command line interface.
- see node.js API for the node.js interface.
- see Configuration for the configuration options.