This guide contains all the steps to root your OnePlus 9RT and unlock it's potential!
We will have to unlock the bootloader of the phone, only then we can proceed to rooting it.
WARNNG: This will DELETE ALL THE DATA from your phone, so create a backup of anything important
-
Android Bootloader Interface from Windows Update -> Optional Updates -> Driver Updates Note: You will find this update when you're at the Fastboot Step - 2
- Enabling Developer Options:
- Go to Settings
- Go to About Phone
- Go to Version
- Tap on Build Number 8 times
- OEM Unlock and USB Debugging:
- Go to Additional Settings
- Go to Developer Option
- Find and enable USB Debugging
- Find and enable OEM Unlock
- Connect your phone to the computer
- Go to the SDK Platform Tools folder and in the address bar type "cmd"
- In the command prompmt type
adb devices - Open your phone and press allow on the USB Debugging prompt and it should look like this now
- To go into Fastboot mode type in the same cmd promt
adb reboot bootloader - You should see your phone go into a different menu
- Type
fastboot flashing unlock - If it says "Waiting for Devices" go to Requirements Step - 2
- On your phone a new screen will show up.
- Press Volume down to select the "UNLOCK THE BOOTLOADER" option
- Press the power button to select it
- You should get a message saying that the bootloader's unlocked. Wait for the device to boot.
Congragulations! You now have an unlocked bootloader!
Now we proceed to rooting the phone with Magisk
Since TYPO3 9.5.14+ implements SameSite cookie handling and restricts when browsers send cookies to your site. This is a problem when customers are redirected from external payment provider domain. Then, there's no session available on the confirmation page. To circumvent that problem, you need to set the configuration option cookieSameSite to none in your ./typo3conf/LocalConfiguration.php:
    'FE' => [
        'cookieSameSite' => 'none'
]TYPO3 10+ requires a site configuration which you have to add in "Site Management" > "Sites" available in the left navigation. When creating a root page (a page with a globe icon), a basic site configuration is automatically created (see below at Go to the Import View).
The page setup for an Aimeos web shop is easy, if you import the example page tree for TYPO3 10/11. You can download the version you need from here:
- 23.4+ page tree and later
- 22.10 page tree
- 21.10 page tree
Note: The Aimeos layout expects Bootstrap providing the grid layout!
In order to upload and install the file, follow the following steps:
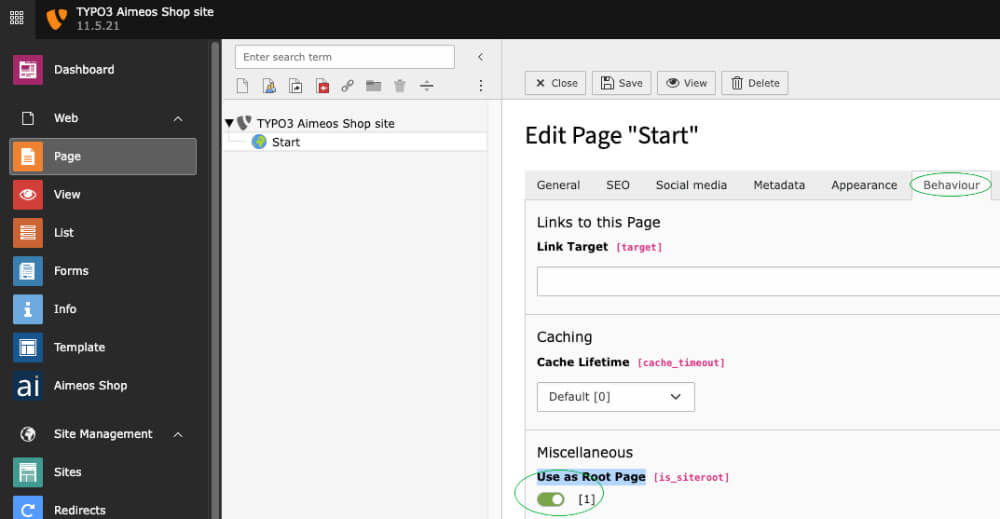
Note: It is recommended to import the Aimeos page tree to a page that is defined as "root page". To create a root page, simply create a new page and, in the "Edit page properties", activate the "Use as Root Page" option under "Behaviour". The icon of the root page will change to a globe. This will also create a basic site configuration. Don't forget to also create a typoscript root template and include the bootstrap templates with it!
- In "Web::Page", right-click on the root page (the one with the globe)
- Click on "More options..."
- Click on "Import"
- In the page import dialog
- Select the "Upload" tab (2nd one)
- Click on the "Select" dialog
- Choose the T3D file you've downloaded
- Press the "Upload files" button
- In Import / Export view
- Select the uploaded file from the drop-down menu
- Click on the "Preview" button
- The pages that will be imported are shown below
- Click on the "Import" button that has appeared
- Confirm to import the pages
Now you have a new page "Shop" in your page tree including all required sub-pages.
TYPO3 9.5 and later can create SEO friendly URLs if you add the rules to the site config: https://aimeos.org/docs/latest/typo3/setup/#seo-urls
The Aimeos TYPO3 extension is licensed under the terms of the GPL Open Source license and is available for free.


